
User`s guide

2-6 CB3000 Client Bridge User’s Guide
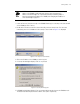
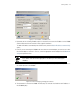
Figure 2.5 Login Dialog Box
6. Upon logging in, the CB3000 Information screen displays. See Viewing CB3000 Information on page 2-9
for more details.
7. Proceed to the following sections to configure the CB3000:
• Understanding and Configuring Ethernet Settings – This includes configuring identification settings
for the CB3000 within the network.
• Understanding and Configuring Wireless Settings – This includes configuring wireless network
settings, as well as security policies for data received and transmitted through the CB3000.
2.5.2 Changing the IP address for a new Client Bridge
The CB3000 is factory configured with DHCP enabled and ready to associate with a wireless network using
an ESSID of 101. When the device is booted up, it tries to associate to a network with ESSID 101 and obtain
its IP address from the DHCP server.
If the device is unable to obtain and IP address then the IP address has to be manually configured.
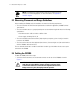
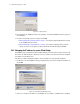
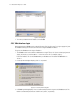
1. Double click on the new CB3000. A warning is displayed and you are asked to change the IP address for
the CB3000.
Figure 2.6 Subnet Mismatch Warning Screen
2. Select Yes to change the IP address for the CB3000. The Set IP address of Cb3000 screen is displayed.