
Install guide


2-10 CB3000 Client Bridge Quick Install Guide
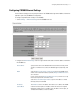
4. Select the Frequency Band (AP). By restricting the frequency band, you can reduce the time the
CB3000 takes to search for available APs.
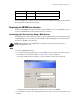
5. Click View to display the Available Networks screen.Use this screen to view a list of available ESSIDs
(networks) available to the CB3000 for connection. Select the checkbox to the left of the target ESSID
and click the Connect button to associate with that ESSID (Infrastructure mode) or networked peer
(Ad Hoc mode). Unlike the networks displayed within the drop-down menu, the networks within the
Available Networks screen can be updated by clicking the Refresh button. Refer to the Information
screen to verify the connection to the target ESSID.
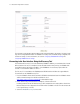
6. Select the Scan Mode the device uses to discover networks.
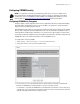
7. In the Country/Region drop-down list, select the appropriate operating region/country.
NOTE: Each country has its own regulatory restrictions concerning electromagnetic emissions and the
maximum RF signal strength that can be transmitted. Consequently, selecting a country different from the
country you are actually operating the CB3000 in results in the illegal operation of the CB3000.
8. Click Apply to implement the updated settings.
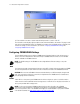
If the CB3000’s security settings match the security settings of the ESSID, device association takes place
without having to click Apply. However, if the CB3000’s security settings do not match the ESSID, the
Security Settings page displays and the device is required to be configured to match the security settings
of the target ESSID to ensure association compatibility.
9. Click Cancel to revert the WLAN Settings screen back to the last saved configuration.
The CB3000 is now ready to have its Ethernet settings configured.
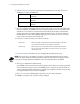
a/b/g Click this option to enable the CB3000 to work in the ‘a’ and the ‘b/
g’ frequencies.
a Click this option to enable the CB3000 to work only in the ‘a’
frequencies
b/g Click this option to enable the CB3000 to work only in the ‘b/g’
frequencies
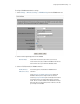
Active Scan When using Active Scan, the device transmits probe requests. It then waits
for response from APs and uses the responses to associate.
Passive Scan When using Passive Scan, the device waits for a beacon from any Access
Point. It then uses the beacon data to associate. A Passive scan is slower
than an Active Scan.