
User guide


Canopy System User Guide Rebranding Module Interface Screens
pmp-0229 (Mar 2013)
557
Rebranding Module Interface Screens
Distinctive fonts indicate
literal user input.
variable user input.
literal system responses.
variable system responses.
The interface screens on each module display the Canopy or Canopy Advantage logo. These logos
can be replaced with other logos using Procedure 39.
The logo is a hyperlink, and clicking on it takes the user to the Canopy web site. A different site
(perhaps the operator’s support site) can be made the destination using Procedure 40.
To return a module to regular logos and hyperlinks, use Procedure 41.
The logo at the top of each page is a key indicator to the user whether a module is Canopy or
Canopy Advantage. If you choose to replace the logos, use two noticeably different logos so that
users can continue to easily distinguish between a Canopy module and a Canopy Advantage
module.
To replace logos and hyperlinks efficiently throughout your network, read the following two
procedures, write a script, and execute your script through the Canopy Network Updater Tool
(CNUT).
9
To replace them individually, use one of the following two procedures.
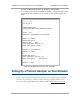
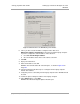
Procedure 39: Replacing the Canopy logo on the GUI with another logo
1. If the current logo is the Canopy logo, name your custom logo file on your
computer canopy.jpg and put it in your home directory.
If the current logo is the Canopy Advantage logo, name your custom logo file on your
computer advantaged.jpg and put it in your home directory.
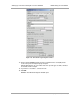
2. Use an FTP (File Transfer Protocol) session to transfer this file to the module, as
in the example session shown in Figure 191.
9
See Using the Canopy Network Updater Tool (CNUT) on Page 417.