
User guide


Canopy System User Guide Installing an SM
pmp-0229 (Mar 2013)
403
Procedure 23: Installing the OFDM SM
1. When gathering parts for the installation, select
◦ a 29.5-V DC power supply and 328 feet (100 meters) or less of cable for the power
supply.
◦ an SMMB-2A mounting bracket
◦ a 600SS surge suppressor
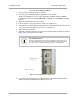
2. At the site, choose the best mounting location.
3. Mount the SMMB-2A bracket to thee structure.
4. Remove the base cover of the SM.
5. Terminate the UV outside grade Category 5 Ethernet cable with an RJ-45 connector, and
connect the cable to the SM.
6. Wrap a drip loop in the cable.
7. Use stainless steel hose clamps or equivalent fasteners to lock the SM into position.
8. Remove the cover of the 600SS Surge Suppressor.
9. Refer to Grounding SMs on Page 178.
10. With the cable openings facing downward, mount the 600SS to the outside of the
subscriber premises, as close as possible to the point where the Ethernet cable will
penetrate the residence or building.
11. Using diagonal cutters or long nose pliers, remove the knockouts that cover the cable
openings to the 600SS.
12. Pack both of the surge suppressor Ethernet jacks with dielectric grease.
13. Connect an Ethernet cable from the power adapter to either RJ-45 port of the 600SS.
14. Remove the bottom cover of the SM.
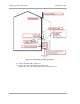
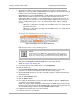
15. Secure a ground strap to the ground lug (circled in Figure 129 on Page 391) on the
bottom of the SM.
16. Secure the ground strap to the power service panel of the structure.
17. Weather-seal the connector on the coax cable (identified by arrow in Figure 129 on Page
391).
18. Wrap a splice loop in the loose end of the Ethernet cable from the SM.
19. Connect that cable to the other RJ-45 port of the 600SS.
20. Wrap an AWG 10 (or 6mm
2
) copper wire around the Ground post of the 600SS.
21. Tighten the Ground post locking nut in the 600SS onto the copper wire.
22. Securely connect the copper wire to the grounding system (Protective Earth) according to
applicable regulations.
23. Replace the cover of the 600SS surge suppressor.
24. Connect the power supply to a power source.
25. Connect the Ethernet output from the power supply to the Ethernet port of your laptop.
26. Climb your ladder to the SM.
27. Launch your web browser.
28. In the URL address bar, enter 169.254.1.1.
29. As described under Adding a User for Access to a Module on Page 430, log in as either
admin or root on the SM.