
User guide


Configuring a Point-to-Point Link for Test Testing the Components
220
pmp-0229 (Mar 2013)
• Synchronization
• LAN (Network) IP Address
In each page under Quick Start, you can
• specify the settings to satisfy the requirements of the network.
• review the configuration selected.
• save the configuration to non-volatile memory.
Proceed with the test setup as follows.
Procedure 13: Using Quick Start to configure the BHs for test
1. At the bottom of the Quick Start tab, click the Go To Next Page => button.
RESULT: The BHM responds by opening the Region Settings tab.
2. From the pull-down menu, select the region in which the BHM will operate.
3. Click the Go To Next Page => button.
RESULT: The BHM responds by opening the RF Carrier Frequency tab.
4. From the pull-down menu, select a frequency for the test.
5. Click the Go To Next Page => button.
RESULT: The BHM responds by opening the Synchronization tab.
6. At the bottom of this page, select Generate Sync Signal.
7. Click the Go To Next Page => button.
RESULT: The BHM responds by opening the LAN IP Address tab.
8. At the bottom of this tab, either
◦ specify an IP Address, Subnet Mask, and Gateway IP Address for
management of the BHM and leave the DHCP State set to Disabled.
◦ set the DHCP State to Enabled to have the IP address, subnet mask, and
gateway IP address automatically configured by a domain name server
(DNS).
9. Click the Go To Next Page => button.
RESULT: The BHM responds by opening the Review and Save Configuration
tab.
10. Ensure that the initial parameters for the BHM are set as you intended.
NOTE:
Cambium encourages you to experiment with the interface. Unless you save a
configuration and reboot the BHM after you save the configuration, none of the
changes are effected.
11. Click the Save Changes button.
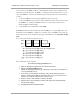
12. On the left side of the tab, click the Configuration button.
RESULT: The BH responds by opening the General tab of its Configuration page.
13. In the Timing Mode parameter, select Timing Master.