
User guide


Configuring a Point-to-Point Link for Test Testing the Components
218
pmp-0229 (Mar 2013)
Concluding the Test of Point-to-Multipoint Links
To conclude the test, perform the following steps.
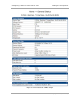
Procedure 11: Verifying and recording information from the AP
1. Confirm that the GPS Sync Pulse Status field indicates Generating Sync.
NOTE: This indication confirms that the AP is properly functional.
2. While your browser is directed to this General Status tab, note (or print) the
values of the following fields:
◦ Device type
◦ Software Version
◦ Board Type
◦ FPGA Version
3. Systematically ensure that you can retrieve this data when you prepare to deploy
the AP.
Configuring a Point-to-Point Link for Test
Perform the following steps to begin the test setup.
Procedure 12: Setting up the BH for Quick Start
1. In one hand, securely hold the top (larger shell) of the BH that you intend to
deploy as a timing master. With the other hand, depress the lever in the back of
the base cover (smaller shell). Remove the base cover.
2. Plug one end of a CAT 5 Ethernet cable into the timing master.
3. Plug the other end of the Ethernet cable into the jack in the pig tail that hangs
from the power supply.
4. Plug the other connector of the pig tail into the Ethernet jack of the computing
device.
WARNING!
From this point until you remove power from the BH, stay at least as far from the
BH as the minimum separation distance specified in
Table 43 on Page 174.
5. Plug the power supply into an electrical outlet.
6. Power up the computing device.
7. Start the browser in the computing device.