
User's Manual Part 2
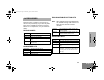
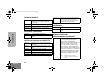
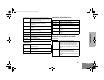
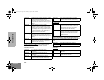

Table Of Contents
- Scan
- Talkback
- PassPort Primary Auto Group Scan (PassPort Trunked Operation Only)
- PassPort Group Scan (PassPort Trunked Operation Only)
- Auto Group Scan (LTR Trunked Operation Only)
- All Group Scan (LTR Trunked Operation Only)
- System Scan (LTR Trunked and Conventional Operation Only)
- Deleting a Nuisance Channel/ Talkgroup (PassPort Group Scan or System Scan Operation Only)
- Editing a Scan List (PassPort Group Scan or System Scan Operation Only)
- Adding or Deleting Talkgroups or Channels in a Scan List
- Prioritizing a Talkgroup or Channel in a Scan List (System Scan Operation Only)
- Phone
- Voice Storage
- Audio/Tone Settings
- Utilities
- Warranty
- Quick Reference Card

Selecting a Trunked Zone and Talkgroup
1. v or w to select desired trunked zone.
2. y or z until you see desired preprogrammed talkgroup on the display.
Sending a Trunked Call
1. Press PTT button. If trunked system access was successful — Red LED = steady;
if unsuccessful —LED = flashing; red-low pitched tone sounds.
2. Speak clearly into microphone. Release PTT button to listen.
Initial PassPort System Registration
Selecting a Conventional Zone and Channel
1. v or w to select desired conventional zone.
2. y or z until you see desired conventional channel on the display.
Sending a Conventional Call
• Press PTT button and speak clearly into microphone. LED = steady while call is being
sent. Release PTT button to listen.
Receiving a Trunked or Conventional Call
• v or w, then y or z to desired talkgroup or channel. Make sure PTT button
is released. When a call is received, the LED flashes.
Making a Selective Call (LTR Trunked and Conventional Operation only)
1. From Selective Call menu, select or enter desired radio ID number.
2. Press PTT button to send the call. The radio sounds a continuous tone.
3. Press PTT button and talk; release PTT button to listen.
Receiving a Selective Call (LTR Trunked and Conventional Operation only)
• When a Selective Call is received, the radio displays F symbol and name or ID of calling
radio; the yellow LED flashes. Press PTT button to answer.
Upon power up, PassPort alias appears on the LCD.
The selected talkgroup alias appears on the LCD.
May appear if a PassPort site cannot be quickly
located.
Appears indicating successful PassPort registration
(XXX = PassPort site on which you are registered).
Selected talkgroup alias appears and remains on the
display upon successful registration.
PASSPORT
TLKGRP ALIAS
SEARCHING
REG SITE XXX
TLKGRP ALIAS
CDM1550•LS
+
Quick Reference Card
Record the functions for your radio’s programmable buttons in the table provided below. For further
information, see pages 24 and 25 in this User Guide.
Button Feature Short Press Long Press Hold Down Page
Zone Selector/
Editing Buttons
Menu Enter/Select
Button
(Interchangeable)
Programmable
Button 2 (P2)
(Interchangeable)
Programmable
Button 4 (P4)
(Interchangeable)
Programmable
Button 3 (P3)
LCD Screen
Red/Yellow/Green
LED Indicators
Menu Exit/Escape
Button
(Interchangeable)
Programmable
Button 1 (P1)
(Left/Right)
Microphone
Jack
Control Knob
On/Off/Volume
Talkgroup/Channel Selector/
Menu Navigation Buttons
(Up/Down)