
Installation Manual

June, 2002 6880101W80-C 5
Installation Mobile 1/4-Wave Antennas
4. Remove the metal and filler from this
1-1/4-inch diameter hole.
5. Complete the installation per installation pro-
cedure given for vehicles with single wall con-
struction. A completed mount is illustrated in
Figure 9.
Vehicles Without Dome Lights
When the vehicle has no dome light, and it is not feasi-
ble to remove the headlining to get to the inside sur-
face, proceed as follows:
1. Locate the center of the roof and make sure
the area beneath this point is clear to allow
passage of a drill.
2. With a 3/4-inch diameter hole cutting saw
carefully cut a 3/4-inch hole from the top of
the roof through both thicknesses of metal.
Clean the metal in a neat circle around the
hole to assure a good contact between the roof
metal and the locking nut.
3. Remove any burrs and remove the filler sepa-
rating the roof thickness for a distance of
1/4-inch back from the hole.
4. Install the mount to the outside roof thickness
per installation procedure given for vehicles
with single
wall construction.
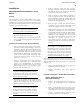
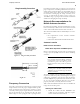
Mounting Hardware Installation – Trunk
Lip Mount
NOTE
Not recommended for transmitters with
power outputs of 7 W or greater.
1. Refer to Figure 11 for antenna location.
2. Using the Allen wrench supplied, turn the
two set screws counterclockwise until their
threads are not visible on the underside of the
clamp bracket.
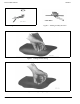
3. Raise the trunk lid to pass the coaxial cable
through; then tilt the mounting base slightly
to hook the clamp bracket on the trunk lip.
The coaxial cable, coming from under the
mounting base, may have to be bent down to
accomplish this step. When the base is in posi-
tion, the coaxial cable should not bind in any
way, or be pinched under a set screw.
4. Tighten the two set screws.
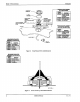
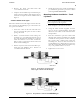
Figure 10. Roof Mount in Vehicle Without Dome Light
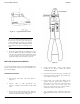
Figure 9. Roof Mount in Vehicle With
Dome Light or Removable Headlining