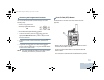
NAG-LACR.book Page 10 Thursday, April 12, 2012 5:58 PM Push-To-Talk (PTT) Button Accessing the Programmed Functions You can access various radio functions through one of the following ways: The PTT button on the side of the radio serves two basic purposes: • A short or long press of the relevant programmable buttons. OR < c • Use the Menu Navigation Buttons as follows: e > d 1 To access the menu, press the c button.
NAG-LACR.book Page 11 Thursday, April 12, 2012 5:58 PM • While a call is not in progress, the PTT button is used to make a new call (see Making a Radio Call on page 23). Switching Between Conventional Analog and Digital Mode If the Talk Permit Tone (see Turning the Talk Permit Tone On or Off on page 61) or the PTT Sidetone is enabled, wait until the short alert tone ends before talking.
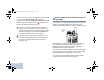
NAG-LACR.book Page 12 Thursday, April 12, 2012 5:58 PM IP Site Connect This feature allows your radio to extend conventional communication beyond the reach of a single site, by connecting to different available sites which are connected via an Internet Protocol (IP) network. When the radio moves out of range from one site and into the range of another, it connects to the new site's repeater to send or receive calls/data transmissions. Depending on your settings, this is done automatically or manually.
NAG-LACR.book Page 13 Thursday, April 12, 2012 5:58 PM Linked Capacity Plus Linked Capacity Plus is a multi-site multi-channel trunking configuration of the MOTOTRBO radio system, combining the best of both Capacity Plus and IP Site Connect configurations. Linked Capacity Plus allows your radio to extend trunking communication beyond the reach of a single site, by connecting to different available sites which are connected via an Internet Protocol (IP) network.
NAG-LACR.book Page 14 Thursday, April 12, 2012 5:58 PM Display Icons Scan Priority 2*‡ Radio detects activity on channel/group designated as Priority 2. The 132 x 36 pixels, monochrome display, liquid crystal display (LCD) of your radio shows radio status, text entries, and menu entries. Vote Scan Vote scan feature is enabled. The following are icons that appear on the status bar at the top of the radio’s display.
NAG-LACR.book Page 15 Thursday, April 12, 2012 5:58 PM Call Icons The following icons appear on the radio’s display during a call. These icons also appear in the Contacts list to indicate ID type. Private Call Indicates a Private Call in progress. In the Contacts list, it indicates a subscriber alias (name) or ID (number). Group Call/All Call Indicates a Group Call or All Call in progress.
NAG-LACR.book Page 16 Thursday, April 12, 2012 5:58 PM Mini Notice Icons The following icons appear momentarily on the radio’s display after an action to perform task is take. OR LED Indicator The LED indicator shows the operational status of your radio. Successful Transmission (Positive) Successful action taken. LED Indicator Failed Transmission (Negative) Failed action taken. Transmission in Progress (Transitional) Transmitting.
NAG-LACR.book Page 17 Thursday, April 12, 2012 5:58 PM Double blinking yellow – Radio is no longer connected to the repeater while in Capacity Plus or Linked Capacity Plus, all Capacity Plus channels or Linked Capacity Plus channels are currently busy.Auto roaming is enabled, radio is actively searching for a new site. Also indicates radio has yet to respond to a group call alert, or radio is locked. Solid green – Radio is powering up, or transmitting.
NAG-LACR.book Page 18 Thursday, April 12, 2012 5:58 PM Indicator Tones High pitched tone Selecting a Zone Low pitched tone Positive Indicator Tone Negative Indicator Tone A zone is a group of channels. Your radio supports up to 128 channels and 50 zones, with a maximum of 16 channels per zone. Use the following procedure to select a zone. Procedure: Press the programmed Zone button and proceed to Step 3. OR Follow the procedure below. 1 c to access the menu. 2 < or > to Zone and press e to select.
NAG-LACR.book Page 19 Thursday, April 12, 2012 5:58 PM Selecting a Channel Transmissions are sent and received on a channel. Depending on your radio’s configuration, each channel may have been programmed differently to support different groups of users or supplied with different features. After selecting the relevant Zone, select the relevant channel you require to transmit or receive on.
NAG-LACR.book Page 20 Thursday, April 12, 2012 5:58 PM Receiving and Responding to a Group Call 5 The LED lights up solid green. To receive a call from a group of users, your radio must be configured as part of that group. 6 Wait for the Talk Permit Tone to finish (if enabled) and Procedure: When you receive a Group Call (while on the Home screen): 1 The LED blinks green. 2 The Group Call icon appears in the top right corner. The first text line shows the caller alias.
NAG-LACR.book Page 21 Thursday, April 12, 2012 5:58 PM Receiving and Responding to a Private Call 6 Wait for the Talk Permit Tone to finish (if enabled) and A Private Call is a call from an individual radio to another individual radio. 7 Release the PTT button to listen. Procedure: When you receive a Private Call: 8 If there is no voice activity for a predetermined period of 1 Depending on how your radio is programmed: 9 You hear a short tone. The display shows Call Ended.
NAG-LACR.book Page 22 Thursday, April 12, 2012 5:58 PM Receiving an All Call An All Call is a call from an individual radio to every radio on the channel. It is used to make important announcements requiring the user’s full attention. Procedure: When you receive an All Call: 1 A tone sounds and the LED blinks green. 2 The Group Call icon appears in the top right corner. The first text line shows the caller alias. The second text line displays All Call.
NAG-LACR.book Page 23 Thursday, April 12, 2012 5:58 PM 6 Wait for the Talk Permit Tone to finish (if enabled) and speak clearly into the microphone. 7 Release the PTT button to listen. 8 If there is no voice activity for a predetermined period of time, the call ends. 9 You hear a short tone. The display shows Call Ended. NOTE: See Making a Selective Call on page 26 for details on making a Private Call.
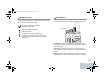
NAG-LACR.book Page 24 Thursday, April 12, 2012 5:58 PM Making a Call with the Channel Selector Knob Making a Group Call To make a call to a group of users, your radio must be configured as part of that group. Procedure: 1 Select the channel with the active subscriber alias or ID. See Selecting a Channel on page 19. OR Press the programmed One Touch Access button. 2 Hold the radio vertically 1 to 2 inches (2.5 to 5.0 cm) from your mouth. 3 Press the PTT button to make the call.
NAG-LACR.book Page 25 Thursday, April 12, 2012 5:58 PM Use the Call Alert features to contact an individual radio. See Call Alert Operation on page 41 for more information. You can also make a Private Call via Contacts (see Making a Private Call from Contacts on page 36). Procedure: Making an All Call 1 Select the channel with the active subscriber alias or ID. This feature allows you to transmit to all users on the channel. Your radio must be programmed to allow you to use this feature.
NAG-LACR.book Page 26 Thursday, April 12, 2012 5:58 PM Making a Selective Call Just like a Private Call, while you can receive and/or respond to a Selective Call initiated by an authorized individual radio, your radio must be programmed for you to initiate a Selective Call. OR If there is no voice activity for a predetermined period of time, the call ends. 6 You hear a short tone. The display shows Call Ended. Procedure: 1 Select the channel with the active subscriber alias or ID.
NAG-LACR.book Page 27 Thursday, April 12, 2012 5:58 PM Stopping a Radio Call This feature allows you to stop an ongoing Group or Private Call to free the channel for transmission. For example, when a radio experiences a “stuck microphone” condition where the PTT button is inadvertently pressed by the user. Your radio must be programmed to allow you to use this feature.
NAG-LACR.book Page 28 Thursday, April 12, 2012 5:58 PM The Talkaround setting is retained even after powering down Permanent Monitor NOTE: At Step 4, you can also use < or > to change the selected option. Use the Permanent Monitor feature to continuously monitor a selected channel for activity. Monitoring Features NOTE: This feature is not applicable in Capacity Plus and Linked Capacity Plus. Procedure: Monitoring a Channel 1 Press the programmed Permanent Monitor button.
NAG-LACR.book Page 29 Thursday, April 12, 2012 5:58 PM Radio Check If enabled, this feature allows you to determine if another radio is active in a system without disturbing the user of that radio. No audible or visual notification is shown on the target radio. 1 c to access the menu. This feature is only applicable for subscriber aliases or IDs. 3 < or > to the required subscriber alias or ID and Sending a Radio Check Procedure: Use the programmed Radio Check button.
NAG-LACR.book Page 30 Thursday, April 12, 2012 5:58 PM Scan Lists channel list. You cannot have multiple Priority 1 or Priority 2 channels in a scan list. Scan lists are created and assigned to individual channels/ groups. Your radio scans for voice activity by cycling through the channel/group sequence specified in the scan list for the current channel/group. There is no priority icon if priority is set to None. Your radio can support up to 250 scan lists, with a maximum of 16 members in a list.
NAG-LACR.book Page 31 Thursday, April 12, 2012 5:58 PM < or > to No and press e to select to save the current list. Setting and Editing Priority for an Entry in the Scan List Procedure: Deleting an Entry from the Scan List 1 c to access the menu. Procedure: 2 < or > to Scan and press e to select. 1 c to access the menu. 2 < or > to Scan and press e to select. 3 < or > to Scan List and press e to select. 4 < or > to the required alias or ID. 5 Press e to select.
NAG-LACR.book Page 32 Thursday, April 12, 2012 5:58 PM Scan Starting and Stopping Scan When you start a scan, your radio cycles through the programmed scan list for the current channel looking for voice activity. Procedure: Press the programmed Scan button to start or stop Scan. OR Follow the procedure below. The LED blinks yellow and the scan icon appears on the status bar.
NAG-LACR.book Page 33 Thursday, April 12, 2012 5:58 PM Responding to a Transmission During a Scan Deleting a Nuisance Channel During scanning, your radio stops on a channel/group where activity is detected. The radio stays on that channel for a programmed time period known as “hang time”. If a channel continually generates unwanted calls or noise (termed a “nuisance” channel), you can temporarily remove the unwanted channel from the scan list.
NAG-LACR.book Page 34 Thursday, April 12, 2012 5:58 PM Restoring a Nuisance Channel Procedure: To restore the deleted nuisance channel, do one of the following: • Turn the radio off and then power it on again, OR • Stop and restart a scan via the programmed Scan button or menu, OR • Change the channel via the Channel Selector Knob. Vote Scan Vote Scan provides you with wide area coverage in areas where there are multiple base stations transmitting identical information on different analog channels.
NAG-LACR.book Page 35 Thursday, April 12, 2012 5:58 PM Contacts Settings Contacts provides “address-book” capabilities on your radio. Each entry corresponds to an alias or ID that you use to initiate a call. Each entry, depending on context, associates with one of five types of calls: Group Call, Private Call, All Call, PC Call or Dispatch Call. PC Call and Dispatch Call are data-related. They are only available with the applications. Refer to the data applications documentation for more information.
NAG-LACR.book Page 36 Thursday, April 12, 2012 5:58 PM 7 Release the PTT button to listen. When any user in the group responds, the LED blinks green. You see the Group Call icon, the group ID, and that user’s ID on your display. 8 If the Channel Free Indication feature is enabled, you will hear a short alert tone the moment the target radio releases the PTT button, indicating the channel is free for you to respond. Press the PTT button to respond.
NAG-LACR.book Page 37 Thursday, April 12, 2012 5:58 PM Setting Default Contact Call Indicator Settings Procedure: Follow the procedure below. 1 c to access the menu. Activating and Deactivating Call Ringers for Call Alert 2 < or > to Contacts and press e to select. You can select, or turn on or off ringing tones for a received Call Alert. 3 < or > to the required alias or ID and press e to Procedure: select. 1 c to access the menu. 4 < or > to Set as Default and press e to select.
NAG-LACR.book Page 38 Thursday, April 12, 2012 5:58 PM Activating and Deactivating Call Ringers for Private Calls Activating and Deactivating Call Ringers for Selective Call You can turn on or off the ringing tones for a received Private Call. You can select, or turn on or off ringing tones for a received Selective Call. Procedure: Procedure: 1 c to access the menu. 1 c to access the menu. 2 < or > to Utilities and press e to select. 2 < or > to Utilities and press e to select.
NAG-LACR.book Page 39 Thursday, April 12, 2012 5:58 PM Assigning Ring Styles Escalating Alarm Tone Volume You can program your radio to sound one of ten predefined ringing tones when receiving a Call Alert from a particular contact. You can program your radio to continually alert you when a radio call remains unanswered. This is done by automatically increasing the alarm tone volume over time. This feature is known as Escalert. Procedure: 1 c to access the menu.
NAG-LACR.book Page 40 Thursday, April 12, 2012 5:58 PM Call Log Features Your radio keeps track of all recent outgoing, answered, and missed Private Calls. Use the call log feature to view and manage recent calls. You can perform the following tasks in each of your call lists: • Delete Deleting a Call from a Call List Procedure: 1 c to access the menu. 2 < or > to Call Log and press e to select. 3 < or > to the required list and press e to select.
NAG-LACR.book Page 41 Thursday, April 12, 2012 5:58 PM Viewing Details from a Call List Procedure: 1 c to access the menu. 2 < or > to Call Log and press e to select. 3 < or > to the required list and press e to select. 4 < or > to the required alias or ID and press e to select. 5 < or > to View Details and press e to select. Display shows details. Call Alert Operation Call Alert paging enables you to alert a specific radio user to call you back when they are able to do so.
NAG-LACR.book Page 42 Thursday, April 12, 2012 5:58 PM Making a Call Alert from the Contacts List Procedure: 1 c to access the menu. 2 < or > to Contacts and press e to select. 3 < or > to the required subscriber alias or ID and press e to select. 4 < or > to Call Alert and press e to select. 5 The display shows Call Alert and the subscriber alias or ID, indicating that the Call Alert has been sent. 6 The LED lights up solid green when your radio is sending the Call Alert.
NAG-LACR.book Page 43 Thursday, April 12, 2012 5:58 PM Making a Call Alert with the One Touch Access Emergency Operation Button Procedure: 1 Press the programmed One Touch Access button to make a Call Alert to the predefined alias or ID. 2 The display shows Call Alert and the subscriber alias or ID, indicating that the Call Alert has been sent. 3 The LED lights up solid green when your radio is sending the Call Alert.
NAG-LACR.book Page 44 Thursday, April 12, 2012 5:58 PM • Emergency Alarm with Voice to Follow Sending an Emergency Alarm In addition, each alarm has the following types: This feature allows you to send an Emergency Alarm, a non-voice signal, which triggers an alert indication on a group of radios. • Regular – Radio transmits an alarm signal and shows audio and/or visual indicators. • Silent – Radio transmits an alarm signal without any audio or visual indicators.
NAG-LACR.book Page 45 Thursday, April 12, 2012 5:58 PM Sending an Emergency Alarm with Call This feature allows you to send an Emergency Alarm to a group of radios. Upon acknowledgement by a radio within the group, the group of radios can communicate over a programmed Emergency channel. Procedure: 1 Press the programmed Emergency On button. 2 The display shows Tx Alarm and the destination alias. The LED lights up solid green and the Emergency icon appears.
NAG-LACR.book Page 46 Thursday, April 12, 2012 5:58 PM Sending an Emergency Alarm with Voice to Follow This feature allows you to send an Emergency Alarm to a group of radios. Your radio’s microphone is automatically activated, allowing you to communicate with the group of radios without pressing the PTT button. This activated microphone state is also known as “hot mic”. If your radio has Emergency Cycle Mode enabled, repetitions of hot mic and receiving period are made for a programmed duration.
NAG-LACR.book Page 47 Thursday, April 12, 2012 5:58 PM If your radio is set to Silent, it will not display any audio or visual indicators during Emergency mode, or allow any received calls to sound through the radio’s speaker, until the programmed hot mic transmission period is over, and you press the PTT button.
NAG-LACR.book Page 48 Thursday, April 12, 2012 5:58 PM Exiting Emergency Mode NOTE: This feature is only applicable to the radio sending the Emergency Alarm. Your radio exits Emergency mode when one of the following occurs: • Emergency Alarm acknowledgement is received (for Emergency Alarm only), OR • An Emergency Exit Telegram is received, OR • All retries to send the alarm have been exhausted, OR • The Emergency Off button is pressed. NOTE: If your radio is powered off, it exits the Emergency mode.
NAG-LACR.book Page 49 Thursday, April 12, 2012 5:58 PM Analog Message Encode Your radio is able to send preprogrammed messages from the Message list to a radio alias or to the dispatcher. Sending MDC Message Encode to Dispatcher Procedure: Sending 5-Tone Message Encode to Contact Procedure: 1 < or > to Message and press e to select. 2 < or > to Quick Text and press e to select. 3 < or > to the required message. Press e to select. 1 < or > to Message and press e to select.
NAG-LACR.book Page 50 Thursday, April 12, 2012 5:58 PM Analog Status Update For 5-Tone systems, see Setting Default Contact on page 37 for details on setting the default contact. Your radio is able to send preprogrammed messages from the Status List indicating your current activity to a radio contact (for 5-Tone systems) or to the dispatcher (for MDC systems).
NAG-LACR.book Page 51 Thursday, April 12, 2012 5:58 PM Privacy If enabled, this feature helps to prevent eavesdropping by unauthorized users on a channel by the use of a softwarebased scrambling solution. The signaling and user identification portions of a transmission are not scrambled. Your radio must have privacy enabled on the channel to send a privacy-enabled transmission, although this is not a necessary requirement for receiving a transmission.
NAG-LACR.book Page 52 Thursday, April 12, 2012 5:58 PM NOTE: At Step 4, you can also use < or > to change the selected option. Dual Tone Multi Frequency (DTMF) The Dual Tone Multi Frequency (DTMF) feature allows the radio to operate in a radio system with an interface to telephone systems. Procedure: To initiate a DTMF call. 1 Press and hold the PTT button. 2 Enter the desired number, * or #.
NAG-LACR.book Page 53 Thursday, April 12, 2012 5:58 PM Procedure: Use the menu. 1 c to access the menu. Stopping an Automatic Site Search When the radio is actively searching for a new site: 2 < or > to Utilities and press c to select. Procedure: Press the programmed Site Lock On/Off button. 3 < or > to Radio Settings and press c to select. 1 A tone sounds and the display shows Site Locked. 4 < or > to Site Roaming and press c to select.
NAG-LACR.book Page 54 Thursday, April 12, 2012 5:58 PM NOTE: At Step 5, you can also use < or > to change the selected option. Starting a Manual Site Search connect to it, a tone sounds and the LED turns off. The display shows Channel Busy. 8 The radio returns to the Home screen. Procedure: Press the programmed Manual Site Roam button and proceed to Step 6. OR Follow the procedure below. 1 c to access the menu. 2 < or > to Utilities and press c to select.
NAG-LACR.book Page 55 Thursday, April 12, 2012 5:58 PM Security You can enable or disable any radio in the system. For example, you might want to disable a stolen radio, to prevent the thief from using it, and enable that radio, when it is recovered. NOTE: Performing Radio Disable and Enable is limited to radios with these functions enabled. Check with your dealer or system administrator for more information. Radio Disable Procedure: Use the programmed Radio Disable button.
NAG-LACR.book Page 56 Thursday, April 12, 2012 5:58 PM Radio Enable Procedure: Use the programmed Radio Enable button. 1 Press the programmed Radio Enable button. 2 < or > to the required alias or ID and press e to select. 3 The display shows Radio Enable and the subscriber alias or ID. The LED lights up solid green. 4 Wait for acknowledgment. 5 If successful, the radio sounds a positive indicator tone and the display shows positive mini notice.
NAG-LACR.book Page 57 Thursday, April 12, 2012 5:58 PM Lone Worker This feature prompts an emergency to be raised if there is no user activity, such as any radio button press or activation of the channel selector, for a predefined time. Following no user activity for a programmed duration, the radio pre-warns the user via an audio indicator once the inactivity timer expires. If there is still no acknowledgment by the user before the predefined reminder timer expires, the radio initiates an Emergency Alarm.
NAG-LACR.book Page 58 Thursday, April 12, 2012 5:58 PM Password and then, shows Radio Locked. A tone sounds and the LED double blinks yellow. Turning the Password Lock On or Off Procedure: Your radio enters into locked state for 15 minutes, and responds to inputs from On/Off/Volume Control Knob and programmed Backlight Auto button only. 1 c to access the menu. NOTE: The radio is unable to receive any call, including emergency calls, in locked state. 3 < or > to Radio Settings and press e to select.
NAG-LACR.book Page 59 Thursday, April 12, 2012 5:58 PM Changing the Password Procedure: 1 c to access the menu. 2 < or > to Utilities and press e to select. 3 < or > to Radio Settings and press e to select. 4 < or > to Passwd Lock and press e to select. 5 Enter your current four-digit password. See Step 2 in Accessing the Radio from Password on page 57. 6 If the password is correct: < or > to Change Pwd and press e to select.
NAG-LACR.book Page 60 Thursday, April 12, 2012 5:58 PM Utilities Turning the Radio Tones/Alerts On or Off You can enable and disable all radio tones and alerts (except for the incoming Emergency alert tone) if needed. Procedure: Press the programmed All Tones/Alerts button to toggle all tones on or off. OR Follow the procedure below. 1 c to access the menu. 2 < or > to Utilities and press e to select. 3 < or > to Radio Settings and press e to select. 4 < or > to Tones/Alerts and press e to select.
NAG-LACR.book Page 61 Thursday, April 12, 2012 5:58 PM Turning the Talk Permit Tone On or Off Setting the Power Level You can enable and disable the Talk Permit Tone if needed. You can customize your radio’s power setting to high or low for each channel. Procedure: 1 c to access the menu. 2 < or > to Utilities and press e to select. 3 < or > to Radio Settings and press e to select. Settings: High enables communication with radios located at a considerable distance from you.
NAG-LACR.book Page 62 Thursday, April 12, 2012 5:58 PM NOTE: At Step 4, you can also use < or > to change the selected option. Adjusting the Display Brightness You can adjust radio’s display brightness as needed. Procedure: Press the programmed Brightness button and proceed to Step 5. OR Follow the procedure below. 1 c to access the menu. 2 < or > to Utilities and press e to select. 3 < or > to Radio Settings and press e to select. 4 < or > to Brightness and press e to select.
NAG-LACR.book Page 63 Thursday, April 12, 2012 5:58 PM Setting the Squelch Level You can adjust your radio's squelch level to filter out unwanted calls with low signal strength or channels that have a higher than normal background noise. Settings: Normal is the default. Tight filters out (unwanted) calls and/or background noise. However, calls from remote locations may also be filtered out. Procedure: Press the programmed Squelch button to toggle squelch level between normal and tight.
NAG-LACR.book Page 64 Thursday, April 12, 2012 5:58 PM Language Turning the LED Indicator On or Off You can set your radio display to be in your required language. You can enable and disable the LED Indicator if needed. Procedure: Procedure: 1 c to access the menu. 1 c to access the menu. 2 < or > to Utilities and press e to select. 2 < or > to Utilities and press e to select. 3 < or > to Radio Settings and press e to select. 3 < or > to Radio Settings and press e to select.
NAG-LACR.book Page 65 Thursday, April 12, 2012 5:58 PM transmits, for a programmed period, whenever the microphone on the VOX-capable accessory detects voice. Pressing the PTT button during radio operation will disable VOX. To re-enable VOX, do one of the following: • Turn the radio off and power it on again, OR • Change the channel via the Channel Selector Knob, OR • Follow the procedure below. NOTE: Turning this feature on or off is limited to radios with this function enabled.
NAG-LACR.book Page 66 Thursday, April 12, 2012 5:58 PM 3 < or > to Radio Settings and press e to select. Call Forwarding 4 < or > to Voice Announcement. You can enable your radio to automatically forward voice calls to another radio. 5 Press e to enable Voice Announcement. The display shows 9 beside Enabled. OR Press e to disable Voice Announcement. The 9 disappears from beside Enabled. NOTE: At Step 3, you can also use < or > to change the selected option. Procedure: 1 c to access the menu.
NAG-LACR.book Page 67 Thursday, April 12, 2012 5:58 PM Menu Timer Analog Mic Automatic Gain Control (AGC) Set the period of time your radio stays in the menu before it automatically switches to the Home screen. This feature controls the your radio's microphone gain automatically while transmitting on an analog system. It suppresses loud audio or boosts soft audio to a preset value in order to provide a consistent level of audio. Procedure: 1 c to access the menu.
NAG-LACR.book Page 68 Thursday, April 12, 2012 5:58 PM Digital Mic AGC Intelligent Audio This feature controls the your radio's microphone gain automatically while transmitting on an digital system. It suppresses loud audio or boosts soft audio to a preset value in order to provide a consistent level of audio. Your radio automatically adjusts its audio volume to overcome current background noise in the environment. Procedure: 1 c to access the menu. 2 < or > to Utilities and press e to select.
NAG-LACR.book Page 69 Thursday, April 12, 2012 5:58 PM Accessing General Radio Information Your radio contains information on the following: • Battery • Radio Alias and ID • Firmware and Codeplug Versions NOTE: Press d at any time to return to the previous screen or long press d to return to the Home screen. The radio exits the current screen once the inactivity timer expires. Accessing the Battery Information Displays information on your radio battery.
NAG-LACR.book Page 70 Thursday, April 12, 2012 5:58 PM Checking the Firmware Version and Codeplug Front Panel Configuration (FPC) Version Displays the firmware and codeplug versions on your radio. Procedure: 1 c to access the menu. 2 < or > to Utilities and press e to select. 3 < or > to Radio Info and press e to select. 4 < or > to Versions and press e to select. 5 The display shows the current firmware and codeplug versions.
NAG-LACR.book Page 71 Thursday, April 12, 2012 5:58 PM Accessories Your radio is compatible with the accessories listed in this chapter. Contact your dealer for details.
NAG-LACR.book Page 72 Thursday, April 12, 2012 5:58 PM Chargers • IMPRES Single-Unit Charger, Base Only (WPLN4243_) • IMPRES Single-Unit Charger with Switch Mode Power Supply (WPLN4232_) • IMPRES Multi-Unit Charger, Base Only (WPLN4211_) • IMPRES Multi-Unit Charger, US/NA Plug (WPLN4212_) • IIMPRES Multi-Unit Charger with Display Base Only (WPLN4218_) • IMPRES Multi-Unit Charger with Display, US/NA Plug (WPLN4219_) • U.S.
NAG-LACR.
NAG-LACR.book Page 74 Thursday, April 12, 2012 5:58 PM Batteries and Chargers Warranty The Capacity Warranty The capacity warranty guarantees 80% of the rated capacity for the The workmanship warranty guarantees against defects in workmanship under normal use and service.
NAG-LACR.book Page 75 Thursday, April 12, 2012 5:58 PM obligations or liability for additions or modifications to this warranty unless made in writing and signed by an officer of MOTOROLA. Limited Warranty MOTOROLA COMMUNICATION PRODUCTS I. WHAT THIS WARRANTY COVERS AND FOR HOW LONG: Limited Warranty MOTOROLA SOLUTIONS, INC.
NAG-LACR.book Page 76 Thursday, April 12, 2012 5:58 PM INABILITY TO USE SUCH PRODUCT, TO THE FULL EXTENT SUCH MAY BE DISCLAIMED BY LAW. SOME STATES DO NOT ALLOW THE EXCLUSION OR LIMITATION OF INCIDENTAL OR CONSEQUENTIAL DAMAGES OR LIMITATION ON HOW LONG AN IMPLIED WARRANTY LASTS, SO THE ABOVE LIMITATION OR EXCLUSIONS MAY NOT APPLY. This warranty gives specific legal rights, and there may be other rights which may vary from state to state. IV.
NAG-LACR.book Page 77 Thursday, April 12, 2012 5:58 PM Limited Warranty VI.
Motorola Solutions, Inc. 1303 East Algonquin Road Schaumburg, Illinois 60196 U.S.A. MOTOROLA, MOTO, MOTOROLA SOLUTIONS and the Stylized M logo are trademarks or registered trademarks of Motorola Trademark Holdings, LLC and are used under license. All other trademarks are the property of their respective owners. © 2012 Motorola Solutions, Inc. All rights reserved. March 2012. www.motorolasolutions.