
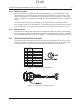
Wiring Diagram


MN003109A01_aa
4-10 Options and Accessories Installation Accessory Connector Assembly Details (P2)
4.4 Accessory Connector Assembly Details (P2)
The APX mobile accessory connector assembly is mounted on the right rear of the radio, opposite
the antenna and adjacent to the power connector. It is fastened to the radio using the jackscrews and
held together by the two cover screws. It is a multi-functional connector that allows for many different
types of adaptations. All approved accessory wires are securely strain-relieved through the exiting
slots at the back of the accessory connector assembly. The terminations that are supplied with all
accessories are designed to be fully engaged and locked into the plug connector (6680163F01).
They can also be detached for service with the assistance of a terminal removal tool. The accessory
connector assembly can be serviced multiple times for future installation upgrades.
For mid power, the accessory connector assembly, supplied with every APX mobile dash-mounted
radio, is equipped with a 26-pin plug assembly, two covers, two jackscrews, two cover screws, one
emergency jumper, one ignition sense cable assembly, and one speaker pigtail. The jumper is
provided to complete the circuit for emergency mode. If this circuit becomes open, the radio is set to
emergency mode.
39800834F05 is the crimping pin part number for use with any wires used inside the accessory cable
connector.
4.4.1 Disassembly and Assembly
4.4.1.1 Disassembly
1. Disconnect the negative terminal from the vehicle battery. Make sure that the battery cable is
secured and do not power the vehicle electrical system.
2. Unscrew both jackscrews completely.
3. Pull the accessory connector assembly out from the radio.
4. Loosen both cover screws, but do not remove them completely.
5. Pull the jackscrews away from the plug and hold them back.
6. Pry apart the accessory connector assembly covers.
7. Attach any new wire to its proper location by pushing in the male terminal. When you hear a
pop, the wire is engaged. To verify that the wire is engaged, tug gently on the wire and be
sure it does not come out. Do not overload the wire to avoid severe damage to the plug.
Draft