
Installation Manual
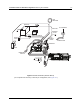
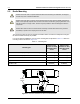
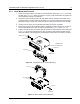
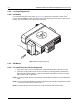
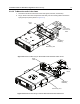
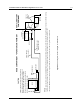
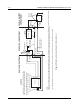
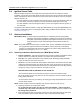
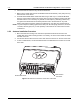
Table Of Contents
- Chapter 1 Introduction
- 1.1 Mobile Radio Description
- 1.2 Standard Configurations
- 1.3 Base/Control Stations
- Chapter 2 Installation Details for Standard Configurations
- 2.1 Planning the Installation
- 2.2 Radio Mounting
- 2.3 Power Cable
- 2.4 Ignition Sense Cable
- 2.5 Antenna Installation
- 2.6 Microphone Hang-Up Clip
- 2.7 Completing the Installation
- Chapter 3 Options and Accessories Installation
- 3.1 Accessory Installation
- Chapter 4 Best Practices: Installation & Troubleshooting
- 4.1 Check Wiring of Ignition and Radio Ignition Sensing
- 4.2 Check Physical Installation of Radio Ground and Radio Accessory Wiring
- 4.3 Improve the Electrical Quality of the Power and Ignition Lines
- 4.4 Jump-Start the Vehicle
- 4.5 Eliminate Noise/Howling from PA Speaker
- A.1 Basic Ordering Information
- A.2 Motorola Online
- A.3 Mail Orders
- A.5 Fax Orders
- A.6 Parts Identification
- A.7 Product Customer Service
- B.1 Servicing Information
- B.2 Motorola Service Center
- B.3 Motorola Federal Technical Center
- B.4 Motorola Canadian Technical Logistics Center

Installation Details for Standard Configurations Radio Mounting 2-7
2.2.3.2 To Mount the radio in the frame
1. Provide the electrical connections for the radio (power, antenna, accessories).
2. Plug in all the connectors and push the radio firmly into the mounting frame until the two
springs snap into place (shown in Figure 2-9).
Figure 2-9 Dashboard Mounting for MOTOTRBO XPR 4000/XPR 4000e Series
Figure 2-10 Dashboard Mounting for MOTOTRBO XPR 5000/XPR 5000eSeries
Demounting Tool
Fix screws
here to secure
frame
Fixing
Tabs
DIN Mount
RLN5933_
DIN Mount
RLN6465_
Demounting Tool
Fix screws
here to secure
frame
Fixing
Tabs