
User's Manual
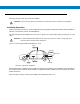
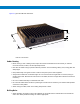
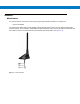

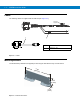
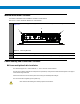
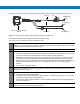

Table Of Contents
- Patents
- Warranty
- Legal Notice
- Revision History
- Introduction
- Configurations
- Chapter Descriptions
- Notational Conventions
- Related Documents
- Service Information
- Safety
- FCC Interference
- VML700 Description
- Installation
- Configuring and Monitoring the VML700
- Troubleshooting
- Using the VML700
- Specifications
- Reference

2 - 9
Process 2-1 describes the steps for the modem installation.
Process 2-2 gives general instructions for mounting the antennas.
Special Antennas Installation Considerations
General Antenna Installation Safety Considerations
Main Antenna
The main antenna must be installed on the vehicle’s roof, preferably in the center of it. For best performance, a minimum
distance of 36” (91.44cm) must be kept between this antenna and any other antenna.
Diversity Antenna
It is recommended that the Diversity Antenna will be installed on the vehicle’s trunk hood. For best performance, a
minimum distance of 36” (91.44cm) must be kept between this antenna and any PSNB antenna.
Process 2-1
Modem Installation Process
1
Ensure adequate space for the installation. (See Planning the Installation on page 2-3)
2
Install the antennas. (See Antennas Mounting on page 2-9).
3
Route the cables. (See Planning the Installation on page 2-3 and Cables Routing and Connection Procedure
on page 2-10).
4
Install the brackets and the unit. (See Modem Installation Procedure on page 2-10.).
5
Connect the DC Power and Ignition cable. (See DC Power and Ignition Cable Installation on page 2-10).
6
Connect the main antenna cables. (See Main Antenna Cables Installation on page 2-12).
7
Connect the Diversity/WiFi antenna cable. (See Diversity Antenna Cable Installation on page 2-12).
8
Connect the LAN/Ethernet cable. (See LAN/Ethernet Cable Installation on page 2-12).
9
Place caps on unused connector(s). (See Cap Installation on page 2-12).
Process 2-2
How to Mount the Antennas
1
Mount the antennas in accordance with the instructions provided with each antenna kit and with the
Product Safety and RF Energy Exposure Booklet for Mobile Two-Way Radios Installed in Vehicles or as
Fixed Site Control Stations (6881095C99) enclosed with the product.
The main and diversity antennas must be installed in a location that will ensure a distance of
at least 8” (20cm) between them and any bystander.