
User's Guide


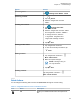
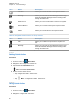


Table Of Contents
- Contents
- Legal and Support
- Read Me First
- Radio Care
- Radio Overview
- System Overview
- Seamless Voice
- Getting Started
- 6.1 Inserting or Removing MicroSD Card
- 6.2 Inserting or Removing SIM Card
- 6.3 Attaching or Detaching the Battery
- 6.4 Attaching or Detaching the Accessory Connector Cover
- 6.5 Attaching or Detaching the Antenna
- 6.6 Charging the Battery
- 6.7 Turning the Radio On or Off
- 6.8 Holding Your Radio While Transmitting Audio
- 6.9 Adjusting the Volume
- 6.10 Activating eSIM
- 6.11 Removing Camera Lens Protective Cover
- 6.12 Using the Carry Holster
- 6.13 On-Screen Keyboard Overview
- 6.14 Touchscreen Navigation
- Home Screen Overview
- General Radio Settings
- 8.1 Accessing Radio Settings
- 8.2 Creating Radio Settings as Shortcut in Home Screen
- 8.3 Adjusting Display Brightness
- 8.4 Turning On or Off Dark Theme
- 8.5 Setting the Clock
- 8.6 Setting the Front Display Timer
- 8.7 Screen Lock
- 8.8 Setting Languages
- 8.9 Audio Settings
- 8.10 Airplane Mode
- 8.11 USB Desense
- 8.12 Battery
- About Device
- Connectivity
- 10.1 LTE
- 10.2 Wi-Fi Operation
- 10.3 Bluetooth®
- Basic Radio Operation
- Types of Radio Calls
- Emergency Operation
- Man Down (Fall Alert)
- Lone Worker
- Privacy
- Contacts Settings
- Seamless Over-The-Air-Programming
- Voice Operating Transmission
- Text Messaging
- Security
- Call Indicator Settings
- Recent Calls
- Call Queue
- Priority Call
- Scan
- Location
- Conventional Squelch Operation
- Using the PL Defeat Feature
- Monitor Feature
- Trunking System Control
- Dynamic Group Number Assignment
- Auto Roaming
- Radio Check
- Transmit Interrupt (Supervisory Override)
- Auto-Range Transponder System
- Applications
- Broadband PTT Application
- Authorized Accessories List
- Déclaration de conformité du fournisseur
- Déclaration relative au WLAN (Industrie Canada)
- Consignes de sécurité importantes
- Avis aux utilisateurs (FCC)
- Avis aux utilisateurs (Industrie Canada)
- Renseignements sur la conformité réglementaire

Option Actions
Accessing dialer
Tap Floating Action Button→Dialer
Searching contacts
a Tap Search.
b Enter the <required contact
name>.
Creating new contacts
a Tap
Floating Action But-
ton→New Contact.
b Enter the <required contact name>
and <required contact number>.
c To change the tones, select the
< required ringtone> and
<required message alert>.
d Tap
Save.
Viewing contact details
a Tap <required contact>.
b To view the secondary information, tap
down.
Editing contacts
a Tap <required contact>→
More→Edit Contact.
b Make the required changes.
NOTE: In analog mode, you
can only edit tones.
c Tap
Save.
Deleting contacts
Tap <required contact>→
More→Delete Contact.
17.2.1
Quick Actions
You can assign the following radio functions as Quick Action
through the contact setting.
Table 19: Assignable Radio Functions for Individual Contacts
Icon Name Description
Call Allows you to initiate Private Call to the required con-
tact.
MN006217A01-AF
Chapter
17 : Contacts Settings
85