APX™ P25 Mobile Two-Way Radio ™ APX NEXT APX NEXT™XE User Guide OCTOBER 2020 © 2020 Motorola Solutions, Inc.
MN005642A01-AG Chapter 1: Read Me First Chapter 1 Read Me First This User Guide covers the basic operation of the radio. However, your dealer or system administrator may have customized your radio for your specific needs. Check with your dealer or system administrator for more information. If you attempt to use features which are mutually exclusive, one or more of the following occurs: • The feature control or icon is grayed out. • A negative tone sounds. • The radio displays Feature not allowed. 1.
MN005642A01-AG Chapter 1: Read Me First NOTICE: To ensure radio longevity, front display, LTE, Wi-Fi, Bluetooth, and GPS are not available when radio internal temperature is below -20 ºC. The top display indicates Cold Temp Mode in this temperature. On the other hand, LMR radio communication is not available when the temperature reaches -30 ºC.
MN005642A01-AG Chapter 2: Radio Care Chapter 2 Radio Care Proper radio usage and care ensure efficient operation and long life of the product. CAUTION: Use the radio according to the following recommendations and warnings. 4 • Your radio casing has a vent port for pressure equalization in the radio. Never poke this vent with objects such as needles, tweezers, or screwdrivers. Poking the vent could create leak paths into the radio and the radio submergibility will be lost.
MN005642A01-AG Chapter 2: Radio Care 2.1 Cleaning Your Radio CAUTION: Do not use solvents or disinfectants to clean your radio as these chemicals may permanently damage the radio housing, seals, and adhesives. To clean the external surfaces of your radio, follow the procedure described next. Procedure: 1 Combine one teaspoon of mild dishwashing detergent to one gallon of water (0.5% solution).
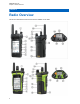
MN005642A01-AG Chapter 3: Radio Overview Chapter 3 Radio Overview This section describes the buttons and functions available on the radio.
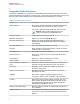
MN005642A01-AG Chapter 3: Radio Overview Table 1: Front View Description No. Description 1 High Dynamic Range (HDR) Mic 1 2 Purple (Side Top) Programmable Button 3 Push-to-Talk (PTT) Button 4 Touch Screen 5 Middle Side (1-Dot) Programmable Feature Button 6 Lower Side (2-Dot) Programmable Feature Button 7 Display Sleep/Wake (Short Press) Home Button (Long Press) 8 Battery Latch Table 2: Rear View Description No.
MN005642A01-AG Chapter 3: Radio Overview 3.1 Assignable Radio Functions Your system administrator can program the programmable buttons or switches as shortcuts to radio functions depending on the duration of a button press. Contact your system administrator to learn more about the radio functions assigned to the programmable buttons and switches of your radio.
MN005642A01-AG Chapter 3: Radio Overview Function Description Private Call (Trunking Only) Allows a call from one individual radio to another. Priority Dispatch Allows you to call the dispatcher on a different talkgroup. Rekey Request Notifies the dispatcher that a new encryption key is needed. Repeater Access Button (RAB) (Conventional Only) Allows you to manually send a repeater access codeword.
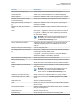
MN005642A01-AG Chapter 3: Radio Overview Function Description Zone Bank Down Scrolls through the zone banks in descending order. Zone Select Allows you to select a zone from the switch. 3.2 ViQi ViQi is a virtual assistant that helps you manage your radio and perform information lookups using voice commands. This feature is purpose-built for public safety and is active when you press the assigned ViQi button on the radio or an associated Remote Speaker Microphone (RSM).
MN005642A01-AG Chapter 3: Radio Overview Feature Examples • "What is my channel" • "Current channel" • "Channel" To change to a new channel, say: Home Channel Volume • "Channel " • "Change channel to " • "Switch channel to " To change to your home channel, say: • "Home channel" • "Change to home channel" • "Switch to home channel" To identify the volume level of your radio, say: • "What is my volume" • "Current volume" • "Volume" To chan
MN005642A01-AG Chapter 3: Radio Overview Feature Time Initiate ViQi Virtual Partner Examples • "Battery level" • "Battery" To identify current time, say: • "What is the time" • "What time is it" • "Current time" • "Time check" • "Time" "Hey ViQi" "Look up information" NOTICE: These commands are used to initiate Virtual Partner when both Voice Control and Virtual Partner are programmed on the same ViQi button.
MN005642A01-AG Chapter 3: Radio Overview You are also able to receive and listen to LMR and Virtual Partner over broadband audio simultaneously. These audio mixing is configurable and must be preprogrammed by a qualified radio technician. Check with your dealer or system administrator for more information. 3.2.1 Using ViQi Perform the following procedure to activate ViQi for the Voice Control or Virtual Partner features. Prerequisites: See ViQi on page 10 for the queries supported by this feature.
MN005642A01-AG Chapter 4: Getting Started Chapter 4 Getting Started This section provides instructions to prepare your radio for use. 4.1 Attaching and Removing the Battery The radio notifies you if it detects a non-Motorola Solutions battery when it is powering up, charging, or removed from the charger. Attaching the Battery Procedure: • To attach the battery, align the battery with the bottom rails on the back of the radio.
MN005642A01-AG Chapter 4: Getting Started 4.2 Attaching and Removing the Antenna Attaching the Antenna Prerequisites: When attaching the antenna, ensure that the radio is turned off. Procedure: To attach the antenna, perform the following actions: a Set the antenna in the receptacle. b Turn the antenna clockwise and tighten the antenna securely to the radio.
MN005642A01-AG Chapter 4: Getting Started Removing the Antenna Prerequisites: When removing the antenna, ensure that the radio is turned off. Procedure: To remove the antenna, turn the antenna counterclockwise, then remove it from the receptacle. 4.3 Attaching and Removing the Accessory Connector Cover To prevent damage to the accessory connector, shield it with the connector cover when not in use.
MN005642A01-AG Chapter 4: Getting Started Removing the Accessory Connector Cover Procedure: To remove the Accessory Connector Cover, perform the following actions: a Rotate the thumbscrew counterclockwise until it disengages from the radio. b Rotate outwards and lift the connector cover to disengage it from the radio.
MN005642A01-AG Chapter 4: Getting Started 4.4 Using the Carry Holder Procedure: 1 To insert the radio into the carry holder, perform the following actions: a Position the radio within the carry holder with the main speaker facing outward. b Slide the radio down into the carry holder until it clicks in place. 2 To remove the radio from the carry holder, perform the following actions: a Place the tip of your fingers on the ledge of the carry holder.
MN005642A01-AG Chapter 4: Getting Started Turning Off the Radio Procedure: • To turn off the radio, rotate the On/Off/Volume Control Knob counterclockwise until you hear a click.
MN005642A01-AG Chapter 4: Getting Started 4.7 Adjusting the Volume of the Radio Procedure: Perform one of the following actions: • To increase the volume, rotate the On/Off/Volume Control Knob clockwise. • To decrease the volume, rotate the On/Off/Volume Control Knob counterclockwise. 4.8 Adjusting Display Brightness Procedure: 1 From the Home screen, tap Brightness. 2 Perform one of the following actions: • Drag the Brightness Slider to set a custom brightness level.
MN005642A01-AG Chapter 4: Getting Started 4.11 Setting the Front Display Timer This setting determines the period before the front display dims and turns off due to inactivity. Procedure: 1 From the Home screen, tap System Settings. 2 Tap Display → Front Display Timer. 3 Select the required period. 4.12 Keyboard Overview Use the keyboard in portrait or landscape orientation to enter alphanumeric text on your radio. The keyboard supports auto-capitalization and word suggestions in the Messaging feature.
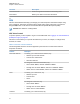
MN005642A01-AG Chapter 5: Home Screen Chapter 5 Home Screen No. Name Description 1 Status Bar Status icons appear in the status bar to provide device status and feature notifications. 2 Identity and Status Widget Displays the identity of the radio with either the Radio Alias, Soft ID, or User Login. Allows you to send the operational status from the Home screen. 3 Channel Status Icons Provides information or status specific to the selected channel.
MN005642A01-AG Chapter 5: Home Screen No. Name Description 8 Menu Feature Launcher Widget Displays the top two priority features provisioned in the CPS. The items. More option contains all other programmed menu 9 Home Channel Revert Allows you to revert to the Home Channel or Talkgroup. 10 Radio Quick Settings Allows you to quickly toggle the radio communication settings. The settings are channel specific.
MN005642A01-AG Chapter 5: Home Screen 3 Enter the authorized PIN, then tap Done. If a PIN is not assigned to the ID, skip this step. The display shows the Progress screen. If the channel does not support Automatic Registration Service login, the display shows the status as Offline. 4 While sign in is in progress, tap Hide. After the login is completed, the Identity and Status Widget shows the login ID. 5.1.2.
MN005642A01-AG Chapter 5: Home Screen 2 Tap CommandCentral Login, then enter your username or email address followed by your password. 3 Tap Sign On. 4 Scroll down and tap the Received passcodes via email button. 5 Enter the passcode and tap Verify to complete the log in. 5.1.4.2 Logging In to CommandCentral (Subsequent Login) Procedure: 1 From the Home screen, tap Shift Manager Launcher. 2 Tap CommandCentral Login, then enter your username or email address followed by your password.
MN005642A01-AG Chapter 5: Home Screen Icon Name Description GPS GPS is enabled and its signal is available. No SIM SIM card is not inserted or detected. LTE Network Strength The radio is connected to an LTE network. The number of bars represents the signal strength of the LTE network. LTE No Service The radio is not connected to an LTE network. Data Disabled The radio is connected to an LTE network but the data is disabled. Downloading Data Indicates the updates are downloading.
MN005642A01-AG Chapter 5: Home Screen Icon Name Description Steady – The radio is operating in a secure channel. AES Secure Operation Blinking – The radio is receiving an AES-encrypted voice call. Steady – The radio is operating in an AES-secure channel. Scan The radio is scanning a scan list. Priority Channel Scan Blinking – The radio detects activity on the designated Priority-One channel. Steady – The radio detects activity on the designated Priority-Two channel.
MN005642A01-AG Chapter 5: Home Screen 5.2.3 LED Indications The Status LED shows the operational status of your radio. A qualified technician can permanently disable the LED indication by preprogramming it. Table 7: LED Indications Indication Status Solid red Radio is transmitting. Double blinking red Radio is transmitting an emergency alarm or call. Rapid blinking red Radio has failed the self-test upon powering up or encountered a fatal error. Solid yellow Channel is busy in conventional mode.
MN005642A01-AG Chapter 5: Home Screen Color Call State Gray Unprogrammed 29
MN005642A01-AG Chapter 6: Responding to Notifications Chapter 6 Responding to Notifications The Notification Center provides concise information about an activity or event. Procedure: 1 Drag down the Status Bar to open the Notification Center. 2 Perform one of the following actions: • To respond to a notification, tap the assigned action message. • To clear all notifications, tap Clear All. 3 Swipe up from the bottom of the screen to close the Notification Center.
MN005642A01-AG General Radio Operation Chapter 7 General Radio Operation This chapter explains the general operations of your radio. 7.1 Scan Lists Scan lists are created and assigned to individual channels/groups. Your radio scans for voice activity by cycling through the channel/group sequence specified in the scan list for the current channel/group.
MN005642A01-AG Chapter 7: General Radio Operation If… Then… To turn on Scan, turn the preprogrammed 2–Position Concentric switch to the scan position. a From the Home screen, tap Radio Quick Settings. b To toggle the scan feature on and off, tap Scan. 7.2.
MN005642A01-AG Chapter 7: General Radio Operation If… Then… Slide the ABC Programmable Switch to the required position. a From the Home screen, tap the Radio Control Widget. b Perform one of the following actions: a Select Current Zone , then select the required zone followed by the required channel. NOTICE: If the default or last known channel is configured on the radio, it automatically highlights that channel for easier selection.
MN005642A01-AG Chapter 7: General Radio Operation If… Then… a From the Home screen, tap the Radio Control Widget. b Perform one of the following actions: a On the Channel tab, select the required channel. b On the Recents tab, select the recently used zone and channel. c To search for the required channel, tap Search. 7.5.1 Channel Error Messages If there is a channel error, your radio displays error messages on the Radio Control Widget.
MN005642A01-AG General Radio Information Chapter 8 General Radio Information Use this menu item to view the general information of your radio. The available information are: • Radio Information • IP Display • SIM Status • Control Assignments 8.1 Accessing the Radio Information Procedure: 1 From the Home screen, tap 2 Tap More. Info → Radio Information.
MN005642A01-AG Chapter 8: General Radio Information See Programmable Features for more information on the various programmable features of your radio. Procedure: 1 From the Home screen, tap 2 Tap More. Info → Control Map. 8.3 Checking Device Status Procedure: 1 From the Home screen, tap 2 Tap My Device. 36 System Settings.
MN005642A01-AG Selecting a Radio Profile Chapter 9 Selecting a Radio Profile This feature allows you to manually switch the visual and audio settings of the radio. The display, backlight, alert tones, and audio settings are defined according to the preprogrammed radio settings of each radio profile. Procedure: 1 From the Home screen, tap 2 Tap More. Profiles, then select the required profile.
MN005642A01-AG Chapter 10: Toggling the Transmit Power Level between High and Low Chapter 10 Toggling the Transmit Power Level between High and Low This feature allows you to reduce the transmit power level for a specific case that requires a lower power level. The reduced transmit power level does not affect the receiving performance of your radio nor diminish the data functionality of the radio. Low power level enables a shorter transmitting distance and helps conserve power.
MN005642A01-AG Types of Radio Calls Chapter 11 Types of Radio Calls Your radio can make talkgroup, private, and enhanced private calls in conventional and/or trunking mode. Call Type Conventional Mode Trunking Mode SmartConnect Talkgroup Call A Talkgroup Call is a point-to-multipoint call operation. Your radio must be configured as a member of the talkgroup for you to communicate within the talkgroup. Private Call A Private Call is a call from one individual radio to another.
MN005642A01-AG Chapter 11: Types of Radio Calls If… Then… c Perform one of the following actions: • Trunking – Wait for the Talk Permit tone, then speak into the microphone. • Conventional – Speak into the microphone. d To listen, release the PTT button to. NOTICE: You cannot transmit longer than the preset Time-Out Timer setting. If you attempt to do so, the radio automatically stops your transmission, and you hear a negative tone. Call Alert Page a From the Home screen, tap tacts.
MN005642A01-AG Chapter 11: Types of Radio Calls If… Then… b Press the PTT button while entering the DTMF number. If DTMF Mic enabled: a From the Menu Feature Launcher, tap Dialer → More → DTMF. b Enter the DTMF number. 11.2 Receiving Calls on the Radio Procedure: Perform one of the following actions based on the type of radio calls: If… Then… Talkgroup Call No action is required. Your radio automatically plays the transmission from the talkgroup call.
MN005642A01-AG Chapter 12: Emergency Operation Chapter 12 Emergency Operation The Emergency feature is used to indicate a critical situation. An emergency signal overrides any other communication over the selected channel. Your radio supports the following Emergency modes: • Emergency Alarm • Emergency Call • Emergency Alarm with Emergency Call One channel supports only one Emergency mode. The radio responds differently when pressing the preprogrammed Emergency button in each channel.
MN005642A01-AG Chapter 12: Emergency Operation 12.2 Emergency Keep-Alive This feature prevents the radio from being turned off when it is in Emergency mode. If this feature is enabled, you are required to exit Emergency mode before turning off your radio. 12.3 Sending Emergency Alarms This feature allows you to send a data transmission, which identifies the radio sending the emergency, to the dispatcher. Procedure: Press the preprogrammed Emergency button.
MN005642A01-AG Chapter 12: Emergency Operation If… Then… NOTICE: The Hot Mic applies to the first voice transmission from your radio during the Emergency call. For subsequent transmissions in the same Emergency call, you must press the PTT button. 3 To exit Emergency Call, see Exiting Emergency Operation on page 44. 12.5 Sending Emergency Alarms with Emergency Calls Procedure: 1 Press the preprogrammed Emergency button.
MN005642A01-AG Chapter 12: Emergency Operation If… Then… Press and hold the preprogrammed Emergency button until you hear the emergency exit tone. a From the Home screen, swipe down the Status Bar. b Tap Cancel and confirm the action by tapping Yes. 12.7 Exiting Emergency as Supervisor (Trunking Only) Radios configured as Supervisor are able to cancel emergency mode of other radios. The dispatch console must be preprogrammed to use this feature.
MN005642A01-AG Chapter 13: Man Down Chapter 13 Man Down Man Down is a supporting feature of the Emergency operation. The Emergency feature must be programmed for Man Down to operate. Your radio activates the Man Down feature when it achieves or exceeds a tilt angle threshold or a combination of the angle threshold and radio motion below the motion sensitivity level. The radio must stay in this condition for a programmed period before the Emergency Alarm or Call is activated.
MN005642A01-AG Chapter 13: Man Down 2 Lay the radio down in a horizontal position. The radio plays an alert tone and the display shows Man Down Detected. Postrequisites: If Man Down is configured but the condition does not trigger the activation of the feature, send the radio to a qualified technician. 13.3 Exiting Man Down Procedure: To exit Man Down mode, press Cancel. 13.
MN005642A01-AG Chapter 14: Secure Operations Chapter 14 Secure Operations Secure radio operation provides the highest commercially available level of voice security on both trunked and conventional channels. By default, the radio automatically enters the encrypted environment without having to manually select or clear the secure transmission. 14.1 Toggling between Secure and Clear Transmission Procedure: Turn the Secure/Clear switch to the required position.
MN005642A01-AG Chapter 14: Secure Operations 14.5 Requesting Rekey Over-the-Air Rekey (OTAR), allows the system administrator to remotely reprogram encryption keys in the radio. The Rekey Request feature allows you to request for the reprogramming of the encryption keys. Prerequisites: Ensure that at least one initial secret Unique Key Encryption Key (UKEK) has been provisioned. This secret UKEK must be established before a Rekey Request delivers the updated keys.
MN005642A01-AG Chapter 15: SmartProgramming Chapter 15 SmartProgramming The SmartProgramming service enables radio programming and updates over LTE broadband connection while the radios are in use. Seamless updates of firmware (full and differential), radio configuration and security updates are scheduled by the radio system administrator and the radio user is given a choice to install immediately or delay for later.
MN005642A01-AG Connectivity Chapter 16 Connectivity This section explains the management of connections between your radio and a variety of networks and other devices. 16.1 LTE Your radio is set up with Long Term Evolution (LTE) broadband connection to enable Smart Programming out-of-the box, and also the SmartConnect and SmartLocate features. The LTE SIM is installed into the radio at the Motorola Solutions factory and locked to the specific radio, so it cannot operate in any other radio or device.
MN005642A01-AG Chapter 16: Connectivity By default, Bluetooth is activated on your radio. Your radio supports the following Bluetooth devices or profiles: • Headset (HSP) • Serial Port (SPP) 16.4.1 Toggling Bluetooth On and Off Procedure: 1 From the Home screen, tap 2 Tap More. Bluetooth. 3 To toggle Bluetooth on and off, tap Bluetooth. 16.4.2 Searching and Pairing the Bluetooth Device Procedure: 1 From the Home screen, tap 2 Tap 3 Tap More. Bluetooth. .
MN005642A01-AG Chapter 16: Connectivity 16.4.4 Viewing and Clearing the Bluetooth Device Information Procedure: 1 From the Home screen, tap 2 Tap More. Bluetooth. 3 To view the device information, tap next to the name of the device. 4 Tap Forget twice, to confirm the request. 16.
MN005642A01-AG Chapter 17: Location Chapter 17 Location The Global Navigation Satellite System (GNSS) integrates information from the Global Positioning System (GPS) and the Global Navigation Satellite System (GLONASS) to determine the approximate geographical location of your radio. The radio also supports the following features: Indoor Positioning This feature allows your radio location to be tracked through Wi-Fi or cellular modem when satellite signal is unavailable.
MN005642A01-AG Chapter 17: Location If… Then… If SmartMapping is enabled Perform one of the following actions: If SmartMapping is disabled • In Map view, tap My Location and tap the address. • In List view, tap the address in My Location. Tap the address in My Location. 17.3 Waypoints This feature shows the location coordinates and the saved waypoints on your radio. Waypoints are saved manually or automatically whenever an Emergency operation is triggered from your radio.
MN005642A01-AG Chapter 17: Location 17.3.3 Managing Waypoints Procedure: More → 1 From the Home screen, tap Waypoints. 2 Select Waypoint from the list. 3 Tap More to perform one of the following actions: If… Then… To search waypoints a Tap Search waypoints, then enter the name of the waypoint. b To view the waypoint details, tap the required waypoint. To delete waypoints a Tap Delete waypoints. b Select the waypoints that you want to delete, then tap To change location settings Delete.
MN005642A01-AG Chapter 17: Location Icon Name Description Zoom In/Zoom Out Enlarges or reduces the view of the map. Center Location Brings My Location to the center of the map. Appears when My Location is not at the map center. Waypoint Indicates the waypoints saved in your radio. Police unit Indicates other talkgroup units that are logged in to CommandCentral. Police unit in Emergency Indicates that the unit is in Emergency mode.
MN005642A01-AG Chapter 17: Location 3 Tap Add Waypoint. 4 Enter a name for the waypoint, then tap Done. 17.4.3 Editing Waypoints in Map View Procedure: 1 From the Home screen, tap the Location Widget. 2 From the Map view, tap a waypoint then tap More. 3 Perform one of the following actions: If… Then… To edit waypoint name a Tap Edit Name. b Enter a waypoint name, then tap Done. To set a waypoint to current location location Tap Set to current loc. → Update. To delete waypoint Tap Delete. 17.
MN005642A01-AG Chapter 17: Location If… Then… To view map details Tap About map. 17.4.5 Managing Options in List View Procedure: 1 From the Home screen, tap the Location Widget. 2 Tap List → More and perform one of the following actions: If… Then… To search for other devices/units a Tap Search, then enter the Unit/Device name. b To view the location details, tap the desired device/unit. To filter and display group and Waypoints options a Tap Filter.
MN005642A01-AG Chapter 18: Contacts Chapter 18 Contacts This feature provides “address-book” capabilities on your radio. Each entry corresponds to an alias (name) and ID (number) that you use to initiate a call. Contact entries are alphabetically sorted according to the entry alias.
MN005642A01-AG Chapter 18: Contacts 18.3 Dialer This feature allows you to dial a number to make calls. The recent calls on your radio with local date and time timestamp. Dialer can be accessed either from the Recents screen shows the 50 most FAB or the Menu Feature Launcher screen. Icon Description Missed Call Emergency Call Private Call Page Dual Tone Multi-Frequency (DTMF) No icon Dispatch Call 18.4 Searching Contacts Procedure: 1 From the Home screen, tap 2 Tap Contacts.
MN005642A01-AG Chapter 18: Contacts • To exit contact creation, tap Done. 18.6 Viewing Contact Details Procedure: 1 From the Home screen, tap Contacts. 2 Tap the required contact, then tap Down to view the secondary information of the contact. 18.7 Managing Contacts Procedure: 1 From the Home screen, tap Contacts. 2 Tap the required contact, then tap If… More to perform one of the following actions: Then… Edit Contact a Tap Edit Contact → Edit. b Make the required changes, then tap Done.
MN005642A01-AG Chapter 18: Contacts 18.8 Making Calls from the Contacts Screen Procedure: 1 From the Home screen, tap Contacts. 2 Select the required contact. 3 To initiate the call, press the PTT button. 4 To end the call, tap End. 18.9 Changing Call Types in Contacts Procedure: 1 From the Home screen, tap Contacts. 2 Scroll the contact list to the contact that you want to modify. 3 Tap and hold the call icon. 4 From the drop down list, select the new call type.
MN005642A01-AG Chapter 19: Instant Recall Chapter 19 Instant Recall This feature allows you to playback the recent received calls and save them in your radio. Check with your system administrator for the duration of the recorded calls that your radio supports. All saved calls are removed upon radio power cycle. 19.1 Playing Received Calls Procedure: 1 From the Home screen, tap 2 Tap More. Recents and perform one of the following actions: • To play a recent call audio, tap All conv.
MN005642A01-AG Messages Chapter 20 Messages This feature allows you to quickly send and receive messages directly from your radios. The maximum length of a text message is 200 characters. Local date and time is timestamped on the messages. NOTICE: This feature must be preprogrammed by a qualified radio technician. Check with your dealer or system administrator for more information. 20.1 Composing and Sending Text Messages Procedure: 1 From the Home screen, tap New Message.
MN005642A01-AG Chapter 20: Messages 20.3 Deleting Selected Messages Procedure: 1 From the Home screen, tap All Messages. 2 Perform one of the following actions: If… Then… To delete a single message, Tap and hold the message that you want to delete. To delete more than one message, a Tap More → Select to Delete. b Select the messages that you want to delete. 3 Tap Delete. 20.4 Deleting All Messages Procedure: 1 From the Home screen, tap 2 Tap All Messages. More → Delete All.
MN005642A01-AG SmartMessaging Chapter 21 SmartMessaging SmartMessaging allows you to send or receive messages over a broadband connection. This feature also includes advanced messaging capabilities such as multimedia attachments. You are required to log in to CommandCentral to use this feature. See Logging In to CommandCentral (Subsequent Login) on page 25. NOTICE: This feature is a selling feature. 21.1 Composing and Sending a New Text Message Procedure: 1 From the Home screen, tap New Message.
MN005642A01-AG Chapter 21: SmartMessaging If… Then… b Enter the user name or ID. c Tap the target user. 3 Tap Double Down Arrows in the text entry box. 4 Tap one of the canned messages. 5 To send the message, tap . 21.3 Adding a New Quick Text Message Procedure: 1 From the text input screen, tap Double Down Arrows → Add Quick Text. 2 Use the keyboard to enter your message. 3 Tap Check to save your message. 21.
MN005642A01-AG Chapter 21: SmartMessaging 21.6 Viewing Multimedia Attachment NOTICE: This feature is applicable for SmartMessaging only. Procedure: 1 From the Home screen, tap All Messages. 2 Select the desired conversation and perform one of the following actions: • If you want to view an image attachment, tap the image. • If you want to view a video attachment, tap the video and tap • If you want to listen to a audio attachment, tap Play. Play. 21.
MN005642A01-AG Chapter 21: SmartMessaging 21.9 Viewing Message History Procedure: 1 From the Home screen, tap All Messages. 2 Tap the selected conversation. 3 View message history in the conversation view. 21.10 Searching Message History Procedure: 1 From the Home screen, tap All Messages. 2 Type either contact name or keyword at appear.
MN005642A01-AG Voice Announcement Chapter 22 Voice Announcement This feature enables the radio to audibly indicate the current feature mode, zone, or channel assigned to the user. The available voice announcement priority options are: High Voice announcement is enabled even when the radio is receiving calls. Low Voice announcement is disabled when the radio is receiving calls.
MN005642A01-AG Chapter 23: Radio Inhibit Chapter 23 Radio Inhibit This feature allows the system administrator to put a radio into a non-functional state when the radio is missing or in an unknown hand. The radio stays in this state regardless of its power changes. NOTICE: If the radio has Inter-system roaming capability, the system administrator is able to put the radio into a non-functional state when the missing radio roams to another system.
MN005642A01-AG Conventional Squelch Operation Chapter 24 Conventional Squelch Operation This feature filters out unwanted calls with low signal strength or channels that have a higher than normal background noise. Analog Options Tone Private Line, Digital Private-Line, and carrier squelch is available (preprogrammed) per channel. Option Result Carrier squelch You hear all traffic on a channel. Tone Private Line or Digital Private-Line The radio responds only to your messages.
MN005642A01-AG Chapter 25: Using the PL Defeat Feature Chapter 25 Using the PL Defeat Feature This feature allows you to override any coded squelch that preprogrammed to a channel. The radio also unmutes to any digital activity on a digital channel. When this feature is active, the Carrier Squelch status indicator is displayed. Procedure: Place the preprogrammed PL Defeat switch in the PL Defeat position. One of the following occurs: 74 • The radio plays the active transmission on the channel.
MN005642A01-AG Digital PTT ID Support Chapter 26 Digital PTT ID Support This feature allows you to see the radio ID (number) of the radio from whom you are currently receiving a transmission. The receiving radio and the dispatcher can view the ID, which consists of up to a maximum of eight characters. The ID number of your radio is also automatically sent every time you press the PTT button. This feature is preprogrammed per channel.
MN005642A01-AG Chapter 27: Smart PTT (Conventional Only) Chapter 27 Smart PTT (Conventional Only) Smart PTT is a per-personality, programmable feature used to keep radio users from talking over other radio conversations. When Smart PTT is enabled in your radio, you cannot transmit on an active channel. The following table shows the variations of Smart PTT. Mode Description Transmit Inhibit on Busy Channel with Carrier You cannot transmit if traffic is detected on the channel.
MN005642A01-AG Toggling between Repeater and Direct Operation Chapter 28 Toggling between Repeater and Direct Operation Repeater operation increases radio coverage area by connecting with other radios through a repeater. Direct or "talkaround" operation bypasses the repeater and connects directly to another radio. You can select either one of these operations on your radio. Procedure: 1 From the Home screen, tap Radio Quick Settings. 2 To toggle between repeater and direct operation, tap Direct.
MN005642A01-AG Chapter 29: Trunking System Controls Chapter 29 Trunking System Controls This chapters explain the trunking system control features in your radio. 29.1 Operating in Failsoft System The failsoft system ensures continuous radio communication during a trunked system failure. When the radio goes into failsoft operation, it automatically switches to a failsoft channel which allows your radio to transmit and receive in conventional operation on a predetermined frequency.
MN005642A01-AG Dynamic Regrouping (Trunking Only) Chapter 30 Dynamic Regrouping (Trunking Only) This feature allows the dispatcher to temporarily reassign selected radios to a particular channel to communicate with each other. When your radio is dynamically regrouped, it receives a dynamic regrouping command and automatically switches to the dynamically regrouped channel. You hear a tone and the display shows the name of the dynamically regrouped channel.
MN005642A01-AG Chapter 31: Accessories Chapter 31 Accessories Not all accessories are FCC certified to operate with all radio models and/or bandsplits. Refer to the radio price pages for a list of FCC certified accessories or contact your sales representative for accessory compatibility. Visit http://www.motorolasolutions.com to know more about the accessories supported by this radio.
MN005642A01-AG Legal and Compliance Statements Legal and Compliance Statements Disclaimer The information in this document is carefully examined, and is believed to be entirely reliable. However, no responsibility is assumed for inaccuracies. Furthermore, Motorola Solutions reserves the right to change any products to improve readability, function, or design.
MN005642A01-AG Legal and Compliance Statements As defined by the WEEE directive, this cross-out trash bin label means that customers and end-users in EU countries should not dispose of electronic and electrical equipment or accessories in household waste. Customers or end-users in EU countries should contact their local equipment supplier representative or service centre for information about the waste collection system in their country.
MN005642A01-AG Legal and Compliance Statements Important Safety Information RF Energy Exposure and Product Safety Guide for Portable Two-Way Radios CAUTION: This radio is restricted to Occupational use only. Before using the radio, read the RF Energy Exposure and Product Safety Guide for Portable Two-Way Radios which contains important operating instructions for safe usage and RF energy awareness and control for Compliance with applicable standards and Regulations.
MN005642A01-AG Legal and Compliance Statements transmitter adjustments should be made only by or under the supervision of a person certified as technically qualified to perform transmitter maintenance and repairs in the private land mobile and fixed services as certified by an organization representative of the user of those services. Replacement of any transmitter component such as crystal, semiconductor, and others not authorized by the FCC equipment authorization for this radio could violate FCC rules.
MN005642A01-AG Maritime Radio Use in the VHF Frequency Range Maritime Radio Use in the VHF Frequency Range Special Channel Assignments Emergency Channel If you are in imminent and grave danger at sea and require emergency assistance, use VHF Channel 16 to send a distress call to nearby vessels and the United States Coast Guard. Transmit the following information, in this order: 1 “MAYDAY, MAYDAY, MAYDAY.” 2 “THIS IS _____________________, CALL SIGN __________.
MN005642A01-AG Maritime Radio Use in the VHF Frequency Range - in the semiduplex mode on the two frequency channels specified in the table below. NOTICE: Simplex channels 3, 21, 23, 61, 64, 81, 82, and 83 cannot be lawfully used by the general public in US waters. Additional information about operating requirements in the Maritime Services can be obtained from the full text of FCC Rule Part 80 and from the US Coast Guard.
MN005642A01-AG Maritime Radio Use in the VHF Frequency Range * 156.075 160.675 62 156.125 160.725 63 156.175 160.775 * 156.225 160.825 65 156.275 160.875 66 156.325 160.925 67** 156.375 156.375 68 156.425 156.425 69 156.475 156.475 71 156.575 156.575 72 156.625 – 73 156.675 156.675 74 156.725 156.725 75 *** *** 76 *** *** 77** 156.875 – 78 156.925 161.525 79 156.975 161.575 80 157.025 161.625 * 157.075 161.675 * 157.125 161.725 * 157.175 161.
MN005642A01-AG Maritime Radio Use in the VHF Frequency Range Declaration of Compliance for the Use of Distress and Safety Frequencies The radio equipment does not employ a modulation other than the internationally adopted modulation for maritime use when it operates on the distress and safety frequencies specified in RSS-182 Section 7.3. Technical Parameters for Interfacing External Data Sources RS232 USB SB9600 Input Voltage (Volts Peak-to-peak) 18 V 3.6 V 5V Max Data Rate 115 Kbps 12 Mbps 9.
MN005642A01-AG Limited Warranty Limited Warranty MOTOROLA SOLUTIONS COMMUNICATION PRODUCTS I. WHAT THIS WARRANTY COVERS AND FOR HOW LONG: MOTOROLA SOLUTIONS, INC.
MN005642A01-AG Limited Warranty delivery service. MOTOROLA SOLUTIONS will pay for outbound shipping via MOTOROLA SOLUTIONS'S normal shipping methods. DEVICE MANAGED SERVICES (DMS) STANDARD HARDWARE Provides extended hardware normal wear and tear repair coverage beginning AFTER MOTOROLA SOLUTIONS’S standard Commercial Warranty period expires. Service performed under this plan consists of repair of the covered equipment as set forth in the terms and conditions.
MN005642A01-AG Limited Warranty which adversely affect performance of the Product or interfere with MOTOROLA SOLUTIONS's normal warranty inspection and testing of the Product to verify any warranty claim. 6 Product which has had the serial number removed or made illegible. 7 Rechargeable batteries if: • any of the seals on the battery enclosure of cells are broken or show evidence of tampering.
MN005642A01-AG Limited Warranty VII. GOVERNING LAW: This Warranty is governed by the laws of the State of Illinois, U.S.A. VIII. For Australia Only This warranty is given by Motorola Solutions Australia Pty Limited (ABN 16 004 742 312) of Tally Ho Business Park, 10 Wesley Court. Burwood East, Victoria. Our goods come with guarantees that cannot be excluded under the Australia Consumer Law.