
User's Guide

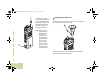

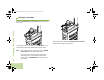
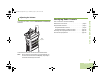
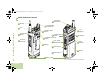
Table Of Contents
- Declaration of Conformity
- Important Safety Information
- Software Version
- Computer Software Copyrights
- Documentation Copyrights
- Disclaimer
- Getting Started
- Preparing Your Radio for Use
- Identifying Radio Controls
- Identifying Status Indicators
- General Radio Operation
- Advanced Features
- Advanced Call Features
- Scan Lists
- Scan
- Call Alert Paging
- Emergency Operation
- Secure Operations
- Trunking System Controls
- Utilities
- Using the Flip Display
- Selecting a Zone Bank
- Selecting the Power Level
- Controlling the Display Backlight
- Turning Voice Mute On or Off
- Using the Time-Out Timer
- Using the Conventional Squelch Operation Features
- Using the PL Defeat Feature
- Using the Digital PTT ID Feature
- Using the Smart PTT Feature (Conventional Only)
- Voice Announcement
- Helpful Tips
- Accessories
- Appendix: Maritime Radio Use in the VHF Frequency Range
- Glossary
- Commercial Warranty

Preparing Your Radio for Use
English
3
Charging the Battery
The Motorola-approved battery shipped with your radio is
uncharged. Prior to using a new battery, charge it for a minimum
of 16 hours to ensure optimum capacity and performance.
For a list of Motorola-authorized batteries available for use
with your radio, see Accessories on page 48.
Note: When charging a battery attached to a radio, turn the
radio off to ensure a full charge.
Battery Charger
To charge the battery, place the battery, with or without the
radio, in a Motorola-approved charger. The charger’s LED
indicates the charging progress; see your charger’s user guide.
For a list of chargers, see Accessories on page 48.
Attaching the Battery
With the radio turned off, slide the battery into the radio’s frame
until side latches click into place.
To avoid a possible explosion:
• DO NOT replace the battery in any area
labeled “hazardous atmosphere”.
• DO NOT discard batteries in a fire.
!
WARNING
!
6875952M01-D_TopD.book Page 3 Wednesday, May 12, 2010 11:35 AM