
Instruction Manual


14
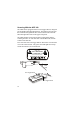
Cradle Installation
The Cradle can be installed by using the four threaded holes on its
back side (See figure in page 14). Use the holes to attach the Cradle
to any surface, such as: vehicle dashboard, office wall or table.
Planning is the key to fast, easy HDT 600 Cradle installation.
Before a hole is drilled or a wire is run, inspect the vehicle and
determine how and where you intend to mount the Cradle and
accessories. Plan wire and cable runs to provide maximum protec-
tion from pinching, crushing, and overheating.
The installation planning should only be undertaken by persons
who are competent and able to ensure that the complete installation
fulfills its regulatory requirements, such as EMC (ElectroMagnetic
Compatibility).
Please note that it is the responsibility of the installing party to
ensure that the inclusion of mount accessories and connections to
the battery system is according to local standards and is not in vio-
lation of applicable safety specifications.
When routing the power cable to the Cradle, it is important to use
as much cable as needed and cut off the remainder. Using the exact
cable length ensures proper power supply to the Cradle. Make sure
that the power cable has a 3 Amps fuse (See “HDT 600 Cradle
Connections” on page 5).
The power cable must originate after the vehicle current protection
system. In order to prevent continuous consumption from the vehi-
cle's battery, route the power cable after the ignition switch. Note
that the input voltage to the Cradle may range from 10.6 to 32 VDC
(Max peak current: 2 Amps). The Cradle output voltage is 12 VDC
(Max continuous current: 1 Amp at -30 to +50°C, 0.5 Amp at 50 to
60°C).
Classification level 5 for power supplies having output circuit that
meet the requirements for SELV circuit.