
Instruction Manual


Delivery Link
108 Copyright 1999 United Parcel Service of America,
Inc.
All Rights Reserved
7. Verify that the UPS Delivery Link computer program is on the Main Menu and the
computer monitor displays: “DIAD Communications: Enabled.”
8. Place the DIAD Optical Interface (DOI) in the correct position on the DIAD. Be sure to
align the optical interface on the DIAD with the DOI. The DOI has to be a clip style DOI
with DIAD III. Verify that the monitor displays: “Establishing connection with DIAD.
Please continue with DIAD entry...”
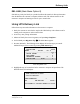
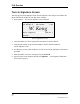
9. Press Enter è. The following screen displays.
Del Link Check Off List
1. DIAD connected to DOI?
2. Correct Address?
<LINE TECHNOLOGY >
<121 Establishing Link w/DOI BLVD >
Press ENTER to continue ESCAPE to
cancel
Del Link Check Off List With Establishing Link Pop-Up
10. The DIAD beeps and returns to the DIAD Main Menu when it is finished transferring
information to the computer.
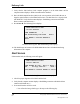
Alert Screen
If data transfer fails, the following screen will appear:
Del Link Check Off List
1. DIAD connected to DOI?
2. Correct Address?
<LINE TECHNOL No Link - Retry or Bring >
<121 3rd Copy Tomorrow BLVD >
Press ENTER to continue ESCAPE to cancel
Del Link Check Off List with No Link Pop-Up
1. Check for proper alignment of the DIAD and the DOI.
2. Verify that the computer monitor displays: “Establishing connection with DIAD. Please
continue with DIAD entry...”
3. If successful transfer cannot be made:
• You will need to bring a third copy to the stop on the following day.