Applicant: Motorola, Inc. FCC ID: AZ489FT7002 Exhibit VIII. User Information and Manual: 1.) User Card - 2 pages User Safety Training and Safety Information Operational Instructions and Training Guidelines 2.
963C77ODRAFT2.fm Page 1 Thursday, February 28, 2002 5:16 PM DIADIII Terminal with GPRS Radio-Modem OPERATIONAL INSTRUCTIONS AND TRAINING GUIDELINES Body-worn operation • User Safety, Training, and General Information READ THIS IMPORTANT INFORMATION ON SAFE AND EFFICIENT OPERATION BEFORE USING YOUR MOTOROLA HANDHELD PORTABLE TERMINAL Always place the terminal in a Motorola approved clip, holder, holster, case, or body harness for this product.
2963C77ODRAFT2.fm Page 2 Thursday, February 28, 2002 5:16 PM handheld wireless terminal and a pacemaker. These recommendations are consistent with those of the U.S. Food and Drug Administration. Persons with pacemakers should: • ALWAYS keep the terminal more than 6 inches (15 centimeters) from their pacemaker when the terminal is turned ON. • not carry the terminal in the breast pocket. • use the ear opposite the pacemaker to minimize the potential for interference.
DIAD III Reference Guide This guide is current through DIAD 21.32 Copyright 1999 United Parcel Service of America, Inc. All rights reserved.
Table of Contents Introduction ....................................................................................................................... 4 How to Use the Reference Guide .................................................................................. 4 About DIAD III .............................................................................................................. 4 Features ..........................................................................................................
Table of Contents Late Air Reasons Screen Definitions................................................................................................................ 46 Edit Late Air Reason Screen .............................................................................................................................. 46 Other Delivery Options.................................................................................................... 47 Pre-Recording.............................................
Table of Contents DIAD Alerts ..................................................................................................................... 89 ETA Alert ..................................................................................................................... 89 Commit Time Alert....................................................................................................... 89 Missed Commit Alert ......................................................................................
DIAD Keys and Functions INTRODUCTION How to Use the Reference Guide This reference guide is designed to assist you in using the DIAD. It is broken into several sections, reflecting the DIAD menus. In general, the sections are arranged according to the order of events followed by a typical driver on a typical day. The events you will encounter earlier and most frequently are covered first. The Table of Contents shows you where particular sections begin, and graphics indicate quick reference pages.
DIAD Keys and Functions Features • The DIAD case has a contoured, hourglass shape. The carrying handle retracts when not in use. • The DIAD III is equipped with more data memory and a faster digital processor than previous models. • A small built in flashlight is provided for viewing package labels or other objects in low light conditions. The keypad glows in the dark for easy viewing in low light conditions. • Pressing any key activates the DIAD.
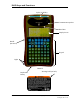
DIAD Keys and Functions Stylus (In Holder) Communication speaker Hand Rest Display Screen Handle (Recessed) Keypad Lights DIAD III Replaceable Battery 6 Warning Label (on back) © Copyright 1999 United Parcel Service of America, Inc. All Rights Reserved.
DIAD Keys and Functions Safety Information SAFETY INFORMATION WARNING Potentially Explosive Atmospheres Most battery-powered equipment, including DIAD III, should not be used in areas where potentially explosive atmosphere is present. If the DIAD III battery is removed in a potentially explosive atmosphere, a spark from the battery contacts could cause an explosion of fire. To avoid such an occurrence, record packages and obtain signatures at the package car.
DIAD Keys and Functions Cycle Space/Backspace Shifts function of space key between space and backspace. Inserts space character when keying in data. Shifts control of light key between backlight and DIAD flashlight. Backspaces over previous character when cycle key is pressed before space key. Big Arrow Up Shifts selection of soft key functions between bottom two lines on display screens.
DIAD Keys And Functions Lights Pressed to turn backlight on and off. Also controls small flashlight at top underside of DIAD. To control flashlight press and release cycle key before pressing backlight key. Signature Displays DIAD signature screen. Pressed while in signature screen, it displays signature clarification screen. Stop Complete Signals DIAD that all information on the current stop has been entered and DIAD should prepare to receive data for next stop.
DIAD Keys And Functions 10 © Copyright 1999 United Parcel Service of America, Inc. All Rights Reserved.
DIAD Keys And Functions Use of Function Keys The DIAD selects most functions and data processing operations through the use of five general selection keys (called Soft Keys because of they are used in conjunction with DIAD software). The following paragraphs describe the use of Soft Keys in DIAD operation, define the functions controlled by Soft Keys (as listed on the two bottom function lines), and provide examples of Soft Key operation as an aid in understanding their use.
DIAD Keys And Functions Daily Totals Unit Totals for Add Tot this Stop ARS XXX XXX || Special A XXXX Special 1 XXX XXX || Special B XXXX Special 2 XXX XXX || || || || Edit Street # Street Name Type Dir Suf 121 SIR WILLIAM BLVD City PostCode Unit ASEANA 27369 1001 Consignee Room Flr LINE TECHNOLOGY 502 5 Note:1 CDS N Completed Stop = 0 Prerec Stop = 0 SplCnts IntlChk PreComm / Edit Dup PreRec Ovrride Function Lines Cycle Key Used to highlight upper and lower function lines DIAD III Soft Key Function Se
A.M. Routine QUICK REFERENCE – A.M. ROUTINE A.M. Routine 1. After obtaining your DIAD from the base station, review the Verify Driver Information screen. Make sure all information is correct. Edit as necessary. Name: ID#: Code: OJS: Ctr: Route: Verify Driver Information ------ ------ ----------KONG, WAI 000000001 SUP GROUP: 1 06 Sched Start: 8:30 Driv/Help (D/H): D 9999 Time: 08:15 A01 Date: 05/03/99 Battery:E||||||||||F |||||||||| Radio Verify Driver Information Screen 2.
A.M. Routine 11. Place DIAD in DVA while vehicle is in motion. 14 © Copyright 1999 United Parcel Service of America, Inc. All Rights Reserved.
A.M. Routine Verify Driver Information Screen The Verify Driver Information screen is used to verify information downloaded to the DIAD, such as pay code and scheduled start time. Verify or make any changes needed.
A.M. Routine 16 © Copyright 1999 United Parcel Service of America, Inc. All Rights Reserved.
Menu Overview MENU OVERVIEW DIAD III is menu driven, making it fast and easy to operate. This means you will choose an option from a menu in order to reach another screen. Now we will explore the DIAD menus in greater detail, beginning with the Main Menu. Main Menu The Main Menu has nine selections, which are discussed in the following paragraphs. We will start with Option 5, “Statistics”. DIAD Main Menu V21.
Statistics Menu Statistics Menu (Main Menu Option 5) The Statistics Card Menu also has nine numbered selections. “StpDIAD” and “Verify” functions can also be selected by Soft Keys. Various options that can be selected in the Statistics Card Menu are shown below, and are discussed in the following pages.
Statistics Menu Inside Building (Statistics Card Option 2) This screen contains fields for entry of specific activities performed while inside the center. Inside Building Data Entry Procedure From the Statistics Card Menu, press 2. Inside Building screen is displayed with cursor in first empty field.
Statistics Menu Other Work (Statistics Card Option 3) This screen is used to record other tasks performed during a workday. Other Work [ 9:00] Center Grp Description 8491 4 Train New Start 8:30 : : Finish 9:00 : : Other Work Screen Other Work Screen Definitions • Center – Enter the center’s SLIC where the work is performed. • Grp – Enter the number of the supervisory group where the work was performed.
Statistics Menu Other Work Screen Selections If required description does not appear on Other Work Codes screen, press Big Arrow Down. Other Work Codes screen 2 is displayed.
Statistics Menu Recap (Statistics Card Option 4) This screen shows work performed by the Delivery or Pickup Loop Detail unit. This is a display-only screen. Paper Packages DEL A TOT TOT DR PU PU PL LS UNIT PKGS STP STP STP PKGS LT TR ---- - ---- --- --- --- ---- -- ---1001 90 10 3 11 14 0 0 P1004 30 50 20 10 100 0 0* * Spec A= 1 Spec B= 1 Special Counts Recap Screen Recap Screen Field Definitions • Del Unit - Delivery or pickup unit. • A - Area type. • Tot Pkgs - Total number of packages per unit.
Statistics Menu Review C.O.D. Data (Statistics Card Option 5) This screen allows you to view C.O.D. information by stop and by package. This is a displayonly screen. Shipper 333333 333333 666666 ASD OP 222222 ASD S ASD U Col Amt 12.00 6.00 9.00 3.00 150.00 15.00 11.00 Check Amt 12.00 6.00 9.00 3.00 150.00 15.00 11.00 Stop D4 ODS D ODS P P3 P8 P4 Review C.O.D. Screen Review C.O.D. Screen Field Definitions • Shipper—Shipper number. • ASD S—Collection amount for an ASD at a scheduled pickup.
Statistics Menu Road Call (Statistics Card Option 6) This screen is used to record road call information. Road Call Menu [17:30] Start : Finish : Memo Number Mechanic's Init Bkdwn Code (Ctr/Road) R Road Center Road Call Menu Note: Highlight cursor moves only to fields that can logically be entered. The “Finish” field, for example, cannot be entered until a time has been entered in the “Start” field. Key in the appropriate data, or select soft key under “Road” or “Center” to select the Breakdown Code.
Statistics Menu Summary (Statistics Card Option 7) The Statistics Summary screen is a display only screen, which shows information on the shipments delivered and picked up during the course of the day. Press Big Arrow Down to access two additional summary screens, which contain information on special counts and service class totals.
Statistics Menu Special Counts Summary Screen Special ARS = 3 Spc1= 21 Spc2= 0 Spkr= 0 RA = 0 OCAStps= Counts | Pickup Counts σ PAS | Stps= 1| Pkgs= 80| Pgs = 2| OMsg= 2|COP= 5 |Tracked Pickup Scan 5 |Scan= 35 Keyd= 2 τ Special Counts Summary Screen Special Counts Summary Screen Definitions • ARS—Number of Authorized Return Service packages picked up. • Spc1—Number of CDS packages and additional information. • Spc2—Number of phone calls to CSC to report tracking information.
Statistics Menu Service Class Totals This screen displays bar code totals scanned during pickup and delivery by service class. EAM 1DA 1DS 2DA Service Class Totals Del Pup|| Del 3 1||3DS 2 3 4||Stand 0 20 15||Economy 0 0 0||Inter'l 5 σ Pup 6 0 2 6 Service Class Totals Screen Turn-In (Statistics Card Option 8) The Turn-In Summary screen and the Turn-In Signature screen allow you to: • Turn in C.O.D. and C.O.P. collections. • Scan your daily turn-in envelopes.
Statistics Menu Vehicles (Statistics Card Option 9) The Vehicles screen is used to record daily information for up to three vehicles. Vehicle 1 Car # 221234 Start 1243 Finish 0 Tot 0 Pump1 0 Fuel1 0 Oil 0 Pump2 0 Fuel2 0 τ ----Trailer #--------Couple---Uncouple-1 1 0 2 0 0 3 0 0 Ovrride Vehicles Screen Vehicles Screen Definitions • Vehicle—Displays the number of the vehicle driven. • Car #—Displays the UPS car number. You can enter this manually, or let the DIAD retrieve it automatically from the DVA.
Statistics Menu Press Big Arrow Up other vehicles. or Big Arrow Down to display additional Vehicles screens or First trip must be completed with entry of start and finish mileage before starting a second trip. A prompt is displayed requesting load quality information at the finish of each trip.
Delivery QUICK REFERENCE – TYPICAL DELIVERY STOP Delivery (Main Menu Option 4) 1. From the Main Menu, press 4 (“Delivery”). Delivery Address screen is displayed. Street # Street Name Type Dir Suf 121 SIR WILLIAM BLVD City PostCode Unit ASEANA 27369 1001 Consignee Room Flr LINE TECHNOLOGY 502 5 Note:1 CDS N Completed Stop = 0 Prerec Stop = 0 SplCnts IntlChk PreComm / Edit Dup PreRec Ovrride Delivery Address Screen 2. Key in correct data in “Street #” field.
Delivery Non-Bar Coded Packages • On Non-Bar Coded Packages, key enter six-digit alphanumeric shipper number in “Ship #” field and cursor will automatically move to “ ID#” field. 8. Key enter ID number into “ID#” field. After three numbers are keyed, cursor moves to “Remark” field. 9. For additional packages, press Enter è or Little Arrow Up ⇑ then scan or key enter any additional packages. Getting the Signature Note: Whenever possible, obtain the signature before entering package detail. 10.
Delivery Delivery Address Screen Street # Street Name Type Dir Suf 121 SIR WILLIAM BLVD City PostCode Unit ASEANA 27369 1001 Consignee Room Flr LINE TECHNOLOGY 502 5 Note:1 CDS N Completed Stop = 0 Prerec Stop = 0 SplCnts IntlChk PreComm / Edit Dup PreRec Ovrride Delivery Address Screen Delivery Address Screen Definitions and Operations • Street # Note: When the “Street #” data includes a fraction (e.g. 123 ½ Wing Hong St), type the whole numbers followed by the Space key and the “1” key.
Delivery Override Feature If the desired address is not contained in your Loop Detail, you can manually key enter information by overriding the address guidance function. 1. From the “Street Name” field, key enter the entire street name. 2. Observe that highlight is on lower function selection line. If not, press Cycle key highlight lower line. to 3. Press Soft key ¤ directly beneath “Ovrride” to accept data and move cursor to “Typ” field. • Type - Type of street (Ave., Blvd., etc.).
Delivery Delivery Package Screen The Delivery Package screen is where you enter all delivery information about each package. Street # Street Name Type Dir Suf 121 SIR WILLIAM BLVD ---------------------------------------4 Col Amt Ship # ID# Remark 1 #994934 W 2 #517821 E 3 #123456 E Edit COD Dup NonDel Ship#6 +Paper PkgInfo PreRec Deliver Delivery Package Screen Note: The top two lines of the Delivery Package screen display the address information for the stop.
Delivery ASD Delivery Additional information is required when you deliver a package that has an ASD, or Air Shipping Document, attached. Proceed as follows: 1. From the Delivery Package screen, scan the ASD bar code and the ASD screen will display. Air Shipping Document ASD Trk # BIN Shipper # Pkg Weight -> N2151613179 -> -> -> (or N=None L=Ltr) Msg-> Dup Ship#<6 ASD Screen 2. If the BIN is present, key enter it. Otherwise, press Enter è to go to the “Shipper #” field.
Delivery Scanning Bar Coded Packages 1. From the Delivery Package screen, scan. The Warning Laser screen will appear. Note: Be sure that the laser beam is pointing away from your eyes before scanning. **************************** * * * WARNING LASER ACTIVE * **************************** Warning Laser Screen 2. Hold the DIAD about 12 inches above the bar code at a 45° angle. The laser beam projects downward and forward at a slight angle, so you will be able to see the beam. 3.
Delivery 6. Try once more to scan the bar code. If the second attempt fails, key enter the numbers exactly as they appear below the bar code, but do not enter any spaces. Press Enter è. Delivery Package screen is displayed. Street # Street Name Type Dir Suf 121 SIR WILLIAM BLVD ---------------------------------------1 Col Amt Ship # ID# Remark 1 #123456 E Edit COD Dup NonDel Ship#<6 +Paper PkgInfo PreRec Deliver Delivery Package Screen 7. Key enter additional delivery package detail.
Delivery Signature Screen This is where you obtain the customer’s signature on the DIAD. 1. Press Signature − to display signature screen, and press Enter è to verify number of packages and stops. 2. Present the DIAD with the top of the unit toward the customer. It does not need to be reversed. Signature screen image will be reversed so that it appears correctly for the customer. Note: Customer must sign directly on display within the boxed area. Signature appears directly beneath tip of stylus. 3.
Delivery Signed Service Notice Use this procedure whenever you deliver a package by accepting a signed Service Notice. 1. Press Soft key ¤ directly beneath “SDN”. 2. Delivery Package Screen is displayed with “Clarify Signature” field. Street # Street Name Type Dir Suf 121 SIR WILLIAM BLVD ---------------------------------------1 Col Amt Ship # ID# Remark 1 #123456 E Clarify Signature / Delivery Package Screen Showing Enter Location Field 3.
Delivery Collection Entry Ship#/ID: 123456 E Col Barcode Type Amount ---------------------------------------COD 10.00 FC Check Collection Due Entry Screen 2. Key enter the C.O.D. amount. 3. When you accept a check for the C.O.D., press Soft key ¤ beneath “Check” on screen. The C.O.D. Calculation screen will display. Cash (Stop): 130.00 Ship # Cash due Col Amt 123456 10.00 455655 25.00 30.00 15.00 666666 50.00 Edit Multchk NonDel Chk Amt 0.00 0.00 0.00 0.00 0.00 Check C.O.D. Calculation Screen 4.
Delivery 5. If the check amount does not equal the total amount due, key enter the amount of the check. Press Enter è the “Cash Due” field will show the balance due. You may change the status of a C.O.D. to show it was not collected by pressing Soft key ¤ beneath “NonDel” while in the C.O.D. Calculation screen or the Delivery Package screen. If a C.O.D. is marked as a Non-Delivery, the C.O.D. is no longer displayed on this screen. All C.O.D.
Delivery Non-Delivery The Non-Delivery Menu is used to select a reason for a package that could not be delivered or picked up. When you press Non-Delivery, the DIAD will prompt you for the necessary information. Non Delivery Menu 1 Other 2 REFused 4 Not In 5 No Money 3 CLOsed 6 Not Ready Non-Delivery Menu 1. Select a reason from the Non-Delivery Menu or press 1 (“Other”) to display the Other NonDelivery Reasons screen.
Delivery Non-Delivery Menu Definitions • 1 (“Other”)—Select this option if the reason for Non-Delivery does not appear. • 2 (“REFused”)—The DIAD will display a list of reasons for refusal. Select the appropriate reason and the DIAD will prompt you for the return address. • 3 (“CLOsed”)—Indicates a business that is closed during normal delivery hours. The DIAD will prompt for attempt number 1, 2, or 3 (or H = Holiday).
Delivery Package Info The Package Info Sort Key is used to capture additional package information. When you select the package type, the DIAD will prompt you for the necessary information. Package Type Menu 1 2 Return 4 AOD 5 Call SplCnts IntlChk 3 6 MX|FC|DF PreComm Package Type Menu Package Type Menu Definitions • 2 (“Return”)—A package that is being returned to the original shipper. Enter the name of the original receiver.
Delivery Late Air Reasons The DIAD requires you to select a late air reason after a stop complete when one of the following types of packages is delivered past its commit time: • Early A.M. • Next Day Air. • Next Day Air Saver (Commercial stop only). • 2nd Day Air A.M. (Commercial stop only). • Time-Sensitive International. If you scan a Worldwide waybill bar code, you will be prompted to select the service class that has been designated on the waybill.
Delivery Late Air Reasons Screen Definitions • A (“Customer Opens After Commit Time/Consignee Requested Late Delivery”)—Choose this reason when the firm’s posted hours show that the business is closed until after the commit time or when the consignee requested a delivery time later than the commit time. • B (“Severe Weather Delay On Area”)—Choose this reason to indicate an on-area delay caused by environmental circumstances beyond your control (such as earthquake, flood, etc.).
Other Delivery Options OTHER DELIVERY OPTIONS Pre-Recording To Pre-Record a Stop 1. From Delivery Address screen, key enter the street number and street name. 2. Highlight last line and press Soft key ¤ beneath “PreRec” to automatically pre-record the stop. Highlight last line and press the soft key beneath PreRec SplCnts IntlChk PreComm Edit Dup / PreRec Ovrride Delivery Address Screen Note: A stop can also be pre-recorded after the package detail has been added.
Other Delivery Options Stop the DIAD Alert Screen You cannot stop the DIAD until all pre-recorded pickup or delivery stops are given a stop completed status. If any pre-recorded scheduled pickup stops are not complete at the end of the day, the Pre-Record Pickups Exist screen will display to alert you. Complete or Void Prerecorded Stops Press Any Key to Continue Pre-Recorded Pickups Exist Screen Press Big Arrow Up 48 and enter stop disposition. Copyright 1999 United Parcel Service of America, Inc.
Other Delivery Options Multiple Stops Left At One Location Follow these steps if you attempt to deliver multiple stops and leave them at one address. Each recorded address is counted as a stop. 1. Highlight bottom line and press Soft key ¤ beneath “PreRec” to access pre-record stop list. 121 LINE TECHNOLOGY SIR WILLIAM BLVD ASEANA Rm 502 Flr 5 --------------------------------# Pkg-LA SIR WILLIAM BLVD 2 TAMAN WARNA RISE 1 Dup/Com Dup/Res LA/Com LA/Res Pre-Record List 2.
Other Delivery Options 50 Copyright 1999 United Parcel Service of America, Inc.
Other Delivery Options 4. After tagging the necessary stops, press Signature −. 5. Verify the number of stops and packages and press Enter è. 6. Have the receiver sign the DIAD using the stylus. Press Signature − again. 7. Clarify the receiver’s last name in the “Clarification” field. Press Enter è. 8. Press Stop Complete 4 . The Delivery Location/Receiver screen will appear.
Other Delivery Options Multiple Stops Left At Central Receiving Location/Mail Room Follow these steps to deliver multiple delivery addresses to one central receiving location or mailroom. This type of delivery counts as one stop. 1. From the “Street #” field on the Delivery Address screen, press Soft key ¤ beneath “PreRec” to access pre-record stop list.
Other Delivery Options 8. Press Stop Complete 4 . The Delivery Location/Receiver screen will appear. © Copyright 1999 United Parcel Service of America, Inc. All Rights Reserved.
Other Delivery Options Delivery Location/Receiver 1 2 3 Residence Dock 4 5 6 Front Desk Reception Mail Room 7 8 9 Office Receiver Guard 0-OTHER Delivery Location/Receiver Screen 9. Indicate where you left the packages. 10. Key enter the left-at address for the packages. Left – At Address Screen Left – At Location: / Left – At Address Screen 54 Copyright 1999 United Parcel Service of America, Inc.
Other Delivery Options Editing a Completed Stop and Tracking Information Completed Stop 1. From “Street #” field on Delivery Address screen, highlight last line and press Soft key ¤ beneath “Edit” to access the stop. Big Arrow Down displays Delivery Package screen.
Other Delivery Options Voiding a Delivery Package or Stop To Void a Package 1. In the Delivery Package screen, move cursor to the shipper number and press Void . 2. Press Soft key ¤ beneath “Yes” to answer the question: “Void This Package (Y/N)?” 3. If stop is active, package data disappears. If stop is complete, package is marked as void. To Void a Delivery Stop 1. Void all packages first on the Delivery Package screen. 2. Press Big Arrow Up 3.
Other Delivery Options Paper Delivery Record Screen © Copyright 1999 United Parcel Service of America, Inc. All Rights Reserved.
Other Delivery Options Paper Delivery Record Screen Definitions: • Gross Pkgs This Stop—Includes all packages delivered to this stop whether recorded on DIAD, PPRS (pre-recorded), or Delivery Information Record. • Total Pkgs Handwritten by Driver—Number of packages handwritten by driver either on the Delivery Information Record or on customer copy. 2. Enter gross packages for this stop. 3. Enter total packages recorded on paper. 4. Press Big Arrow Up to return to the Delivery Package screen. 5.
Other Delivery Options 1. Scan or key enter the shipper number. • Key enter the alternate control number or press Enter è if there is not one. 2. If Delivery Confirmation label has “Y” in the “Signature Required” field, you must obtain signature. 3. Complete required information and press Big Arrow Up screen. to return to Delivery Package 4. Record your next package or complete stop.
Other Delivery Options Special Counts Screen The Special Counts screen allows you to keep track of specific events. 1. From most Delivery, Pickup, or Statistics Card screens, or at the Package Type Screen, press Soft key ¤ beneath “Splcnts”. Package Type Menu 1 2 Return 4 AOD 5 Call SplCnts IntlChk 3 6 MX|FC|DF PreComm Package Type Menu 2. The Special Counts screen will display.
Other Delivery Options Preload Communications You can key enter information about: • The car load condition. • Misloaded packages. This information is printed out each morning on the Preload Communications Report and given to the preloader. Accessing the Preload Communication Misload Screen If you access Preload Communications after you have key entered the delivery address, the DIAD will attach misload information to the specific address.
Other Delivery Options 7. If you are not going to deliver the misloaded package, follow the steps to record a missed package. • Select “Non-Del” and then press 1 (“Other”). • Press Big Arrow Down and press “D” (“Missed”). 8. Record your next package or complete the stop. Selecting the Preload Communications Load Screen Use the Preload Communications Load screen for information on the package car load in general. 1.
Other Delivery Options Load Quality Prompt If you key enter an ending mileage without entering the load quality rating for the current vehicle, a Load Quality prompt will display.
Other Delivery Options pkg shipment WAYBILL AUDIT (All Shipments): ο Shipper number/account number ο Name of sender & phone number ο Shipper name & address (including postal code) ο Receiver contact person/phone number ο Receiver name & address (including International Shipment Checklist (First Continuation Screen) postal code) ο One Payment of Charges selected ο One Service Level selected for all Packages within the shipment ο No.
Pickups QUICK REFERENCE - PICKUPS Typical Scheduled Pickup Stop (Non-Letter Center) Scheduled pickups have been downloaded to the DIAD and must be picked up daily. 1. Press 1 (“Scheduled”) from the Main Menu. DIAD Main Menu V21.32_D3 1 Scheduled 4 Delivery 7 Print SplCnts 2 Unscheduled 5 Statistics 8 DelLink IntlChk [12:14] 3 OneTime 6 Comm 9 ODS PreComm Main Menu 2. The Scheduled Pickup Account List will appear. This list shows each of your regular pickup accounts in pickup order.
Pickups LEUNG ENTERPRISES DOCK 17:00 Scheduled Ship#:123456 Unit:1001 LBX (Y/N): N ---------------------------------------Totl:0 Tot: 0.00 Loos:0 Ck: 0.00 Pall:0 SplCnts IntlChk NoLBXBC COP NonPU PreRec Check Scheduled Pickup Package Screen 4. Press Stop Complete 4. You will return to Account List. Highlight next pickup account using Little Arrow Up ⇑ and Little Arrow Down ⇓, or press Escape to return to Main Menu.
Pickups Overview There are several types of pickups you can complete with the DIAD. The first three appear on the Main Menu. • Scheduled Pickup—A pickup that has been downloaded to the DIAD and is completed daily. • Unscheduled Pickup—A pickup that is not requested on a daily basis. For example, when you assist other service providers by completing pickups for them. • One-Time Pickup—A customer-requested pickup for a predetermined number of packages.
Pickups 2. From Scheduled Letter Box Pickup Package screen, scan the Letter Center bar code. Six-digit shipper number will fill “LBX Id” field. 10:50 Scheduled LBX Id: 000 541 Unit:1001 LBX (Y/N):Y ---------------------------------------Totl:0 SplCnts IntlChk NoLBxBc COD NonPU PreRec Check Scheduled Letter Box Pickup Package Screen Note: If you are unable to scan or key enter the Letter Center bar code, press Soft key ¤ beneath “NoLBxBc” to exit the “LBX Id” field. 3.
Pickups Tracking # Cr 2 N1421618234 N 1 N3214687425 N Cash 0.00 0.00 COP Check 15.50 20.00 Check Tracking Number Screen 7. Press Big Arrow Up . 8. Record additional pickup package information and the total number of packages picked up. The ASD revenue fields display ASD totals. These fields only display if cash or checks are associated with the scanned ASD.
Pickups Alert Screens You will see this screen if you press Stop Complete 4 and one or both of the conditions shown on the screen exists.
Pickups Unscheduled Pickups (Main Menu Option 2) Non-Letter Center 1. Press 2 (“Unscheduled”) from the Main Menu. 2. If there are ASDs at the pickup point, verify the ASD to ensure that it is complete. Fill in the missing information. Make sure that billing information and weight are complete. 3. Key enter address information and press Big Arrow Down . 4. Key enter the customer’s shipper number. 5. Remove the green UPS copy and return it to your center. 6.
Pickups 8. Press Big Arrow Up . Record additional pickup package information and the total number of packages picked up. ASD revenue fields display any cash or checks that were entered as a method of payment on the previous Tracking Number screen. These fields only display if cash or checks are associated with the scanned ASD. ASD fields include: “Totl” (total cash and checks) and “Chk.
Pickups One-Time Pickup (Main Menu Option 3) To record one-time pickup stops: 1. Press 3 (“OneTime”) from the Main Menu. 2. Key enter the address. Press Big Arrow Down . 3. Key enter the last three digits of the One-Time ID (the last three digits of the customer’s telephone number). 4. Record the pickup information. COOMBS RESTAURANT One Time Ship#:123456 Unit:1001 ID: ---------------------------------------Totl:0 Tot: 0.00 Loos:0 Ck: 0.00 Pall:0 SplCnts IntlChk COP NonPU Ship#<6 Check Pickup Screen 5.
Pickups Pickup Summary Bar Codes With the automation of UPS shipping systems, many of our customers generate a Pickup Summary Bar Code Report when they close out their shipping activity at the end of the day. The Pickup Summary Bar Code (PSB) is a 23-character code generated by any customer using an automated shipping system, such as TeleShip, OnLine Office, or OnLine Professional. Pickup Summary Bar Code Report 74 Copyright 1999 United Parcel Service of America, Inc.
Pickups Completing the Pickup If customers generate Pickup Summary Bar Code Reports at their locations, follow these steps during your normal pickup routine: 1. Verify the total number of packages picked up against information on the Pickup Summary Bar Code Report. 2. From the Scheduled Non-Letter Box Pickup Summary screen, scan or key enter the pickup summary bar code. LEUNG ENTERPRISES DOCK 17:30 Scheduled Ship#:123456 Unit:1001 ---------------------------------------Totl:0 Tot: 0.00 Loos:0 Ck: 0.
Pickups 6. Key enter the total number of packages picked up in the DIAD. 7. Sign the Pickup Summary Bar Code Report, recording the pickup time and the number of packages picked up. The report stays with the shipper. 8. If high-value packages are in the pickup, the automated shipping system will generate a High Value Report. The system can produce two separate reports for total value over $1,000 and $5,000. Sign the High Value Report and return it to the center.
On Demand Events ON DEMAND EVENTS (MAIN MENU OPTION 9) System Overview: How it Works DIAD III, which is equipped with a data radio, can send messages to a center and/or dispatch site, and receive messages from either site. The service provider can receive messages such as requests for a pickup, a delivery, or an assist. These are called On Demand events. You can receive or initiate these types of On Demand events: Pickup: • • OCA—A pickup with the service type of On Call Air (OCA).
On Demand Events On Demand Alert Screen Definitions • Alert—Status of the alert. Ø New—First time message has been dispatched. Ø Modify—Contains updated information about an existing event, such as an address or commit time change. Check the screen for new or changed information. Appears only if the event has not been stop completed. Ø Cancel—Cancels a previously dispatched event and removes it from the list (only if the stop has not been stop completed).
On Demand Events 2. Select a listed option or press 2 for (“Out of area”). Enter Details (Optional): To: Out of area Escape - Clear Enter - Send Override Response Key Entry Screen for Pre-Defined Response 3. To send the completed message, press Enter è. Then press Soft key ¤ to select “Yes” to respond to the question, “OK to Send Y/N?” Enter Details (Optional): To: Out of area OK to Send Y/N? Yes No Override Response Key Entry Screen With OK Message Editing On Demand Events 1.
On Demand Events On Demand Event: Pickup 1. Press 9 (“ODS”) on the Main Menu. DIAD Main Menu V21.32_D3 1 Scheduled 4 Delivery 7 Print 2 Unscheduled 5 Statistics 8 DelLink [12:14] 3 OneTime 6 Comm 9 ODS SplCnts IntlChk PreComm Main Menu 2. Press 1 (“Pickup”) from the On Demand Services Menu. On Demand Services Menu 1 Pickup 4 Delivery 2 Assist 3 5 6 On Demand Services Menu 3. The On Demand Pickup List will appear.
On Demand Events On Demand Event Pickup Detail Commit: 17:45 Ready: 17:00 ETA: Event #:0000AB1234 Close: Phone #:4100-4567 Type: Pkgs: 3 Wgt: Contact:BILL MUNSON 17:30 18:00 OCA 75 O/W SplCnts IntlChk PreComm PreRec ODS Pickup Detail Screen 5. Verify or key enter information in the On Demand Event Pickup Detail screen. Notes: • Once the On Demand event is pre-recorded, the ETA can’t be modified until you receive a new ETA alert. • If you have the event number, enter it.
On Demand Events ODS Pickup Package Level Detail Screen 82 Copyright 1999 United Parcel Service of America, Inc.
On Demand Events Note: This screen appears only if the dispatch site transmits package detail information for five or fewer packages. 9. Verify customer-provided package detail information. 10. To complete the On Demand Event, press Big Arrow Up Summary screen. Then press Stop Complete 4. to return to the Pickup ODS Pickup Status Menu 1. If you were unable to complete the pickup for any of the reasons listed, use Soft key ¤ to select “NonPU” from summary screen. 2. ODS Pickup Status Menu is displayed.
On Demand Events Note: When adding an event, the Delivery Address screen will appear prior to the ODS Pickup Detail screen. 84 Copyright 1999 United Parcel Service of America, Inc.
On Demand Events GUAT KENG INC 18:00 PAT REDDAN ASEANA press PRERECORD to add Delivery ----ETA103 N ZAMA SEN 14:00 *250 OAK JUNCTION 15:00 790 CHEMPAKA RING RD 15:30 AddStop ODS Delivery List 3. The DIAD displays the ODS Delivery Address screen. Verify and correct necessary address information.
On Demand Events Street # Street Name Type Dir Suf 103 ZAMA SEN N ---------------------------------------Col Amt Ship # ID# Remark Edit COD Dup NonDel Ship#<6 +Paper PkgInfo PreRec Deliver ODS Delivery Package Screen 7. Scan or key enter package detail. ODS Delivery Status Menu If you are unable to complete the delivery, follow the current procedures for accessing NonDelivery reasons by selecting “NonDel” from package screen. 86 Copyright 1999 United Parcel Service of America, Inc.
On Demand Events On Demand Event: Assist 1. Select 2 (“Assist”) from On Demand Services Menu. On Demand Services Menu 1 Pickup 4 Delivery 2 Assist 3 5 6 On Demand Services Menu 2. The ODS Assist List will appear. Select an event from the On Demand Event List and service it, or add an event by using Soft key ¤ to select “AddStop”. 3. Verify or key enter information in the ODS Assist Address screen.
On Demand Events ODS Assist Status Menu If you are unable to complete an assist you previously accepted, use Soft key ¤ to select “NonDel” in ODS Assist Detail Screen. ODS Assist Status Menu will be displayed. On Demand Assist Status Menu 1 Missed 4 Not In 7 AlreadySvc 2 Cancelled 5 8 3 CLO Early 6 Not Ready 9 ODS Assist Status Menu 88 Copyright 1999 United Parcel Service of America, Inc.
DIAD Alerts DIAD ALERTS Alerts can: • Notify you of upcoming ETA and commit times. • Ask you for information about a missed commitment time. • Review work that needs to be completed. • Alert you to On Demand System (ODS) communication conditions. ETA Alert The ETA Alert Screen reminds you that an Estimated Time of Arrival (ETA) is approaching. The alert is defaulted to 20 minutes prior to the ETA.
DIAD Alerts Missed Commit Alert The Missed Commit Alert screen requires you to establish a new ETA and requests information about the missed commit time. Missed Commit Alert Delivery - Gen MO DAVIS INVESTMENTS 1123 PACIFIC ASEANA AV Commit: 14:00 Ready: 13:30 Close: 18:00 Enter ETA: Pkgs: 1 Time: 14:00 PreRec Ovrride Missed Commit Alert Screen 1. Enter new ETA and Select Missed Commit Reason screen appears.
DIAD Alerts Exceeded Maximum Retries Alert When the DIAD has exceeded the maximum number of retries while attempting to transmit data through the DVA back to the dispatch site or center, the Exceeded Maximum Retries Alert screen will appear. See next page. ODS Transmission Alert COMMUNICATION FAILURE Follow Center Instructions Press BIG UP to Return PreRec Exceeded Maximum Retries Alert ScreenPhone ODS © Copyright 1999 United Parcel Service of America, Inc. All Rights Reserved.
Phone ODS PHONE ODS (Communications Menu Option 6) The Exceeded Maximum Retries Alert screen tells you that you need to use the telephone to verbally communicate your messages. 1. To perform this function, return to the Main Menu. DIAD Main Menu V21.32_D3 1 Scheduled 4 Delivery 7 Print [12:14] 2 Unscheduled 5 Statistics 8 DelLink 3 OneTime 6 Comm 9 ODS SplCnts IntlChk PreComm Main Menu 2. Select 6 (“Comm”). The Communications Menu will display.
Phone ODS 3. From the Communications Menu, select 6 (“Phone ODS”). The Phone ODS Instructions screen will display. Phone ODS - Instructions 1) Dial 9999-9999 2) The next screen displays a list of On Demand Messages that need to be Communicated to the On Demand System. 3) Press Stop Complete on each message when finished communicating. Press Big Down to continue.... Phone ODS Instructions Screen 4. Dial the dispatch number listed, and prepare to talk through your pending messages. 5.
Phone ODS ODS Alerts On Demand Events Not Complete Alert The following screen warns you that you still need to complete pre-recorded On Demand events before stopping the DIAD.
Phone ODS 1. Press Big Arrow Up screen. to return to the ODS Messages Waiting for Communication ODS Messages Waiting for Communication -Event #-----Message Info--Time---Dest-*0000GH1328 Delivery ETA 12:30 0000DE1620 Pickup Comp 10:50 0000GB1525 Assist Comp 10:00 Text DISP Resp Req ODS Messages Waiting for Communication Screen 2. Verbally communicate all the pending messages before stopping the DIAD. © Copyright 1999 United Parcel Service of America, Inc. All Rights Reserved.
Radio Status Indicator TEXT MESSAGES (Communications Menu Option 3) Text Messages Overview The DIAD is capable of sending and receiving text messages. These messages can alert you to traffic problems, Next Day Air arrivals, meet points, etc. You can receive two types of messages: • Response Required. • Text. To send and receive this essential information, you need to establish contact between the DIAD and the ODS system. This link or log-in automatically occurs.
DIAD Alerts Response Required Messages Messages that require a response to the center will appear on the Response Required Alert screen. Response Required Alert HAS THE ACCIDENT CLEARED ON PHUA CHU KANG LANE BGDN to continue or PRERECORD to defer PreRec Response Required Alert Screen 1. To respond to this message, press Big Arrow Down screen will appear. .
Radio Status Indicator Service Provider Created Text Messages To create and send a text message: 1. Go to the Main Menu. Press 6 (“Comm”). The Communications Menu will display. Communications Menu 1 Phone 2 4 5 3 Send Txt Msg 6 Phone ODS Rad On Rad Off Communications Menu 2. Press 3 (“Send Txt Msg”). Note: Text messages cannot be sent by phone (Speaker-Comm). 3. The Select Message Destination screen will display. Decide where your message will go.
DIAD Alerts 5. Add additional text if necessary on the Override Response Key Entry screen. Enter Details (Optional): To:Dispatch Site Finished Work Escape - Clear Enter - Send / Override Response Key Entry Screen for Pre-Defined Response 6.
Radio Status Indicator DIAD Alerts Transmission of delivery tracking information and exception data is crucial in keeping our commitment to our customers. The DIAD will prompt you with alert screens in the following situations: • when data needs to be sent • if there is a problem transmitting the information If the DIAD radio does not transmit the data, make a Speaker-Comm call. A successful Speaker-Comm call sends all DIAD package tracking information and exception package detail.
Speaker- Comm Calls SPEAKER-COMM CALLS (Communications Menu Option 1) A Speaker-Comm call is one where you use the DIAD’s built-in speaker to transmit package tracking data and exceptions over a telephone. 1. From the Communications Menu, press 1 (“Phone”). The Speaker Instructions screen will display. . . . . . . .
Radio Transmitter Disable Function 4. When the transmission is complete, the DIAD will show the following screen, asking you to confirm that the transmission was completed successfully: Was the Transmission Complete? 1 - Retry Transmission or 2 - Quit Transmission (Try Later) 3 - Transmission OK Transmission Complete Screen 5. Press 1 (“Retry Transmission”) to retry it now, or press 2 (“Quit Transmission”) to save the information for a later call. 6.
Speaker- Comm Calls RADIO TRANSMITTER DISABLE FUNCTION To disable the radio transmitter in areas with notices to turn off electronic devices: 1. From the Main Menu, press 6 (Comm). 2. From the Communications Menu, press the soft key beneath “Rad Off”. The radio transmitter is then disabled.
Print PRINT (Main Menu Option 7) This option is used for uploading delivery stop information so it can be printed at the customer’s location using either: • Print Buffer (replaces the PAS)—A small print buffer box uploads delivery data from the DIAD using a DOI, and prints directly on the customer’s printer, or • Print At Stop (PAS)—A small printer and DOI (DIAD Optical Interface) held in a carrying case. Note: A limited number of these are left in the field. Transmitting Data 1.
Print Printer Check Off List © Copyright 1999 United Parcel Service of America, Inc. All Rights Reserved.
Print 6. Press Enter è to continue or press Escape to cancel. 7. Ensure that the printer is online and paper is aligned. 8. Connect the DOI and verify that the correct address is displayed. 9. Press Enter è. The Printer Formatting and Transmitting screen appears. Formatting and Transmitting <121 The Delivery Record Data For SIR WILLIAM BLVD > Press ESCAPE to cancel printing Printer Formatting and Transmitting Screen 10. If there is a problem, press Escape to cancel printing. 11.
Delivery Link DEL LINK (Main Menu Option 8) UPS Delivery Link (“Del Link”) is a product that allows the transfer of delivery information from the DIAD to the customer’s computer within seconds. The software must be on the customer’s computer and running in order for you to transfer data. Using UPS Delivery Link Follow these steps to transfer information to the customer’s computer. 1.
Delivery Link 7. Verify that the UPS Delivery Link computer program is on the Main Menu and the computer monitor displays: “DIAD Communications: Enabled.” 8. Place the DIAD Optical Interface (DOI) in the correct position on the DIAD. Be sure to align the optical interface on the DIAD with the DOI. The DOI has to be a clip style DOI with DIAD III. Verify that the monitor displays: “Establishing connection with DIAD. Please continue with DIAD entry...” 9. Press Enter è. The following screen displays.
Delivery Link • Notify your supervisor about the data transfer failure and the need for a third copy for the customer. © Copyright 1999 United Parcel Service of America, Inc. All Rights Reserved.
P.M. Routine DIAD RESTART The DIAD is able to restart after certain recoverable faults. These might include network switch or certain hardware-related items. After a brief delay to restart the system, you can continue to use the DIAD with most of the previous data intact. 1. When the DIAD determines that a recoverable fault has occurred, the DIAD Restart screen displays. DIAD Restarting Unexpected Restart Please Wait.... DIAD Restart Screen 2.
P.M. Routine If a DIAD restart occurs while you are in the middle of a stop (prior to pressing Stop Complete), the last line of data must be re-entered. The DIAD will restart and return to the Delivery Address screen. You must go to the screen you were working on prior to the restart and key enter the last line of information. You should report any DIAD restarts to the center team at the end of the day. EXCEPTION REPORTING DIAD Drivers On Next Day Air and International or 2nd Day A.M.
P.M. Routine RECORDING ON THE PAPER DELIVERY RECORD If you are recording on a Delivery Information Record due to a DIAD failure, report the failure to your center and request a replacement DIAD. When recording on paper, keep in mind that tracking information must be phoned in to the CSC to meet the transmission-time commitments. When you phone in, provide the CSC (or the center) with: • Your name. • SLIC number. • Package tracking number.
P.M. Routine QUICK REFERENCE – P.M. ROUTINE P.M. Routine 1. Press 5 (“Statistics”) from the Main Menu. 2. Press 2 (“Inside Bldg”) from the Statistics Card Menu. Enter the return-to-building time and wash information. • Verify or enter totals for: Ø Recovery Ø High Value Ø Waybills 3. Press 9 (“Vehicles”) on the Statistics Card Menu. • Enter the ending mileage. • Record fuel and oil as well as couple/uncouple of TP-60 trailers. 4.
P.M. Routine Turn-In Summary Screen At the end of the day, when you are ready to turn in the C.O.D. amounts collected, use the following screen to enter the appropriate denominations. Currency Coins | Cash Recd 12.00 |-Vouchers .34 |-M/O |=Cash Due | |Currency |Coins |Over/Short Edit 12.34 0.00 0.00 12.34 12.00 0.34 0.00 NoBarCd Turn-In Summary Screen When the turn-in is complete, the amount over/short should be $0.00. Scanning a Daily Turn-In Envelope 1.
P.M. Routine Turn-In Signature Screen The total tags and checks displayed on the Turn-In Signature screen must be reconciled to the physical documents enclosed in your daily turn-in envelope. 1. Press Signature − The Turn-In Signature screen will appear. Tot Tags: 1 Tot Checks: 0 Cash Turn-In: Amt Ov/Sht: 12.34 0.00 W. Kong Driver Signature Cash Env 1 Ovrride Turn-In Signature Screen 2. Count the number of C.O.D. tags and the total number of checks collected. 3.
P.M. Routine DIAD III Maintenance • While the DIAD III is designed to be rugged and resistant to damage, it is still a sensitive piece of electronic equipment. Ø Use only the stylus marked “DIAD III ONLY” when obtaining a customer or turn in signature. Using any other object will damage the display screen. Ø Special care needs to be taken to protect the display from scratches. Ø The DIAD III is equipped with a handle, which retracts when not in use.
Soft Key Function Definitions Soft key Function Definitions The following table lists all DIAD III functions that can be selected by the five Soft key ¤ and gives a definition for each. Most of these functions are identical to the function of the same name in DIAD II. Only the method of selection is different. Soft key Functions Function Designation Function Definition “Center” On Road Call Screen, indicates that a breakdown was at the center.
Soft Key Functions Definitions Soft key Functions Function Designation Function Definition “NonPU Displays Non-Pickup Menu to allow selection of the reason for non-pickup. “Ovrride” Allows entry of address information that is not contained in DIAD Loop Detail database. Also used to enter multiple checks on COD Calculation screen and accesses Paper record screen from “Shipper Number” field. “+Paper” Displays Paper record Screen when selected from “Shipper Number” field.