
User's Guide


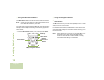
Table Of Contents
- Declaration of Conformity
- Important Safety Information
- Software Version
- Informations importantes sur la sécurité
- Version du logiciel
- Computer Software Copyrights
- Documentation Copyrights
- Disclaimer
- Getting Started
- Preparing Your Radio for Use
- Identifying Radio Controls
- Identifying Status Indicators
- General Radio Operation
- Advanced Features
- Advanced Call Features
- Contacts
- Scan Lists
- Scan
- Call Alert Paging
- Emergency Operation
- Man Down
- Automatic Registration Service (ARS)
- Text Messaging Service (TMS)
- Accessing the TMS Features
- Sending a Quick Text Message
- Using the Priority Status and Request Reply Features
- Appending a Priority Status to a Text Message
- Removing a Priority Status from a Text Message
- Appending a Request Reply to a Text Message
- Removing a Request Reply from a Text Message
- Appending a Priority Status and a Reply Request to a Text Message
- Removing a Priority Status and a Reply Request from a Text Message
- Managing Text Messages
- Managing Sent Text Messages
- Secure Operations
- The Global Positioning System (GPS)
- Trunking System Controls
- Mission Critical Wireless - Bluetooth® -
- Turning the Bluetooth On
- Turning the Bluetooth Off
- Re-Pair Timer
- Bluetooth Drop Timer
- Pairing Bluetooth Device with the Radio
- Indicating Bluetooth Connection is Lost
- Turning On the Bluetooth Audio (Routing the Audio from the Radio to the Headset)
- Turning Off the Bluetooth Audio (Routing the Audio from the Headset to the Radio)
- Adjusting the Volume of the Radio from Bluetooth Audio Device
- Viewing and Clearing the Bluetooth Device Information
- Clearing All Bluetooth Devices Information
- Viewing the Bluetooth Friendly Name
- Programming Over Project 25 (POP 25) (ASTRO 25 and ASTRO Conventional)
- Utilities
- Viewing the Recent Calls
- Selecting the Power Level
- Selecting a Radio Profile
- Enabling and Disabling the Radio Alias
- Selecting the Audio Speaker
- Controlling the Display Backlight
- Locking and Unlocking the Keypad and Controls
- Turning Keypad Tones On or Off
- Turning Voice Mute On or Off
- Using the Time-Out Timer
- Setting the Time and Date
- Using the Conventional Squelch Operation Features
- Using the PL Defeat Feature
- Using the Digital PTT ID Feature
- Using the Smart PTT Feature (Conventional Only)
- IMPRES™ Battery Annunciator
- Accessing the General Radio Information
- Voice Announcement
- Helpful Tips
- Accessories
- Appendix: Maritime Radio Use in the VHF Frequency Range
- Glossary
- Commercial Warranty

Preparing Your Radio for Use
English
7
Attaching the Belt Clip
Align the grooves of the belt clip
with those of the radio and
press upward until you hear a
click.
To remove the clip, use a flat-
bladed object to press the belt
clip tab away from the radio.
Then, slide the clip downward
and away from your radio.
Turning On the Radio
Press and hold the Multi-Function Knob (MFK) until the radio
display lights up, then release the MFK.
If the power-up test is successful, you see the Home screen.
Note: If the power-up test is unsuccessful, you see Error
XX/YY (XX/YY is an alphanumeric code).
Turn off your radio, check the battery, and turn the
radio back on. If your radio fails the power-up test
again, record the Error XX/YY code and contact
your dealer.
Tab