
User's Manual

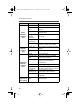
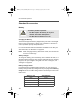
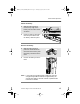
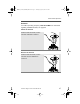
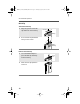

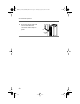
Table Of Contents
- Contents
- Safety and General Information
- General Radio Operation
- Notations Used in This Manual
- Your XTS 5000 Model III Radio
- Physical Features of the XTS 5000 Model III Radio
- Programmable Controls
- Display
- Keypad
- LED Indicators
- Alert Tones
- Standard Accessories
- Radio On and Off
- Zones and Channels
- Receive / Transmit
- Common Radio Features
- Selectable Power Level
- Radio Lock
- Mute or Unmute Keypad Tones
- Conventional Squelch Operation
- PL Defeat
- Time-out Timer
- Emergency
- Lists
- Scan
- Individual Calls
- Status Calls (Trunked Radios Only)
- Repeater or Direct Operation
- Smart PTT (Conventional Only)
- Special Radio Features
- Helpful Tips
- Accessories
- Glossary
- Commercial Warranty
- Index

14
General Radio Operation
Standard Accessories
Battery
Charging the Battery
The Motorola-approved battery shipped with your radio is uncharged.
Prior to using a new battery, charge it for a minimum of 16 hours to
ensure optimum capacity and performance.
For a list of Motorola-authorized batteries available for use with your
XTS 5000 radio, see “Batteries” on page 95.
Note: When charging a battery attached to a radio, turn the radio off
to ensure a full charge.
Battery Charger
To charge the battery, place the battery, with or without the radio, in a
Motorola-approved charger. The charger’s LED indicates the charging
progress; see your charger’s user guide. For a list of chargers, see
“Chargers” on page 96.
Battery Charge Status
If programmed by a qualified radio technician, you can check your
battery’s charge status by holding down the pre-programmed Battery
Gauge button on the radio. Charge status is shown by the color of the
radio’s LED.
To avoid a possible explosion:
• DO NOT replace the battery in any area
labeled “hazardous atmosphere”.
• DO NOT discard batteries in a fire.
Battery Level LED Indicator
High Green
Sufficient Yellow
Low Flashing Red
Very low None
!
W A R N I N G
!
95C08-O_XTS5k_800MHz_Mdl3.book Page 14 Thursday, August 23, 2001 2:52 PM