
User's Guide

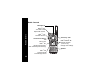

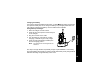
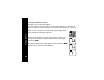
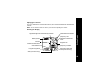
Table Of Contents
- Introduction
- FCC Licensing Information
- Interference Information
- RF Energy Exposure Awareness and Control Information and Operational Instructions for Occupational Use
- Federal Communication Commission (FCC) Regulations
- Compliance with RF Exposure Standards
- RF Exposure Compliance and Control Guidelines and Operating Instructions for Two-Way Radio Operations
- Electromagnetic Interference/Compatibility
- Use of Communication Devices While Driving
- Acoustic Safety
- Operational Warnings
- Operational Warnings (Continued)
- Operational Cautions
- Hazard Locations (Intrinsically) Safe Radio Information
- Operational Cautions for Intrinsic Safe Equipment
- Warnings for Radios Approved as Intrinsically Safe
- Repair
- Radio Controls
- Getting Started
- Installing the Swivel Belt Holster
- Installing the Batteries
- Charging the Battery
- Turning Your Radio On and Off
- Adjusting the Volume
- Reading the Display
- Talking and Receiving
- Basic Radio Operation
- Signal Strength and Channel Busy Indicators
- Talk Range
- Handsfree Use (VOX) (CLS1410 only)
- Locking the Keypad
- Monitoring a Channel
- Scanning (CLS1410 Only)
- Programming Mode
- Factory Default Settings
- Entering Programming Mode
- Cloning Radio Settings
- Advanced Features
- Troubleshooting
- Use and Care
- Frequencies and Bandwidths
- Spirit GT Series Programming
- Limited Warranty for Motorola Personal Communications Products Purchased in the United States and Canada
- Warranty
- I. What This Warranty Covers
- II. What the Period of Coverage Is
- III. Who is Covered
- IV. What We Will Do to Correct Warranty Problems
- V. How to Obtain Warranty Service or Other Information
- VI. What This Warranty Does Not Cover
- VII. Some Other Limitations
- VIII. Patent and Software Provisions
- _Series Programming Quick Reference

Getting Started
21
Charging the Battery
Use only the charger supplied with the radio, or other
_Series power accessories.
For optimum battery life, do not charge the battery for prolonged periods after it is
fully charged. Charging the battery over the weekend is acceptable.
Using the Drop-in Charger
1. Place the charger on a flat surface.
2. Insert the plug of the power cord into the jack
on the charger.
3. Plug the cord into an AC outlet.
4. Turn the radio off. If the radio is on while
charging, it will take longer to fully charge.
5. Insert the radio (with battery installed) into
the front charging pocket.
Note:
The radio will fit in the charger with the
holster on.
The drop-in charger will also sequentially charge a spare SNN5571 Li Ion battery.
The spare battery will not begin to charge until the radio battery is fully charged. Both
batteries will charge in approximately 2 to 6 hours.