
Users Manual Part 2
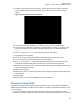
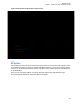
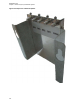
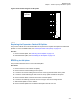
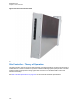

Figure 164: Schematic Diagram of RX Splitter
DC
brick
Splitter
BR6
BR5
BR7
BR8
RX
RX
RX
RX
RX
Prime
Cabinet
DC
brick
DC
brick
DC
brick
7.4.1.1
Replacing the Expansion Cabinet RX Splitter
This process outlines the recommended tasks to be performed to replace the Expansion Cabinet RX
Splitter. For a list of available FRUs, see Field Replaceable Units (FRUs) on page 478.
Process:
1 Remove the RX splitter, see Removing the RX Splitter on page 315.
2 Reinstall the RX splitter, see Reinstalling the RX Splitter on page 316.
7.4.1.1.1
Removing the RX Splitter
This procedure describes how to remove the RX Splitter.
Procedure:
1 Remove the door of the cabinet completely.
2 Remove the four screws holding the front panel.
3 Loosen the two screws holding the front section of the top panel and slide off the panel.
4 Loosen the screws fastening the rear section of the top panel and slide off the panel.
5 Remove the RX cables connected to the back of the RX Splitter.
6 Loosen the two fastening screws at the front enough to free the mounting bracket.
7 Slide the RX Splitter out of the cabinet.
8 Remove the RX Splitter from the bracket and replace with the new unit.
6802800U74-AP
Chapter 7: Radio Frequency Distribution System
315