R12 Tablet PC Model R001 User’s Guide
© 2014 Motion Computing, Inc. All rights reserved. This document contains information protected by copyright. No part of this document may be reproduced in any form without written consent from Motion. The information in this document is provided “as is” and is subject to change without notice. Motion is not liable for errors or omissions in this document. Motion, Motion Computing, View Anywhere, and SnapWorks are trademarks or registered trademarks of Motion Computing, Inc. in the U.S.A.
Contents Chapter 1 Getting Started . . . . . . . . . . . . . . . . . . . . . . . . . . . 6 Optional features. . . . . . . . . . . . . . . . . . . . . . . . . . . . . . . . . . . . . . . . . . . . . . . . . . . . . . . . . . . . . . . . 7 Mobile broadband with GNSS. . . . . . . . . . . . . . . . . . . . . . . . . . . . . . . . . . . . . . . . . . . . . . . . . 7 Discrete GPS with WAAS, EGNOS, and MSAS. . . . . . . . . . . . . . . . . . . . . . . . . . . . . . . . . . . 7 Security . . . . . . . . . . . . . .
Using handwriting recognition. . . . . . . . . . . . . . . . . . . . . . . . . . . . . . . . . . . . . . . . . . . . 28 Using the on-screen keyboard . . . . . . . . . . . . . . . . . . . . . . . . . . . . . . . . . . . . . . . . . . . . . . . 28 Using the Function buttons . . . . . . . . . . . . . . . . . . . . . . . . . . . . . . . . . . . . . . . . . . . . . . . . . . . . . 29 Configuring the Function buttons. . . . . . . . . . . . . . . . . . . . . . . . . . . . . . . . . . . . . . . . . . . .
Restoring your system . . . . . . . . . . . . . . . . . . . . . . . . . . . . . . . . . . . . . . . . . . . . . . . . . . . . . . . . . . 57 Creating a system image. . . . . . . . . . . . . . . . . . . . . . . . . . . . . . . . . . . . . . . . . . . . . . . . . . . . . 57 Restoring your system image from Windows Control Panel . . . . . . . . . . . . . . . . . . . 58 Restoring your system image if you can’t start Windows 7 . . . . . . . . . . . . . . . . . . . .
Getting Started 1 The Motion R12 Tablet PC is a sleek and lightweight FHD 12.5” rugged tablet that provides robust computing power and a variety of integrated features to enable any mobile workflow. The R12 Tablet PC includes these features: • Intel® Core™ i5 or i7 vPro™ Processors (i7 Processor includes Intel vPro™ technology) • Windows® 7 Professional 64-bit • USB 3.0 and HDMI ports and SD card slot • Integrated 8.0 MP documentation camera and 2.
Optional features This section describes the optional features available when you purchase your R12. Mobile broadband with GNSS You can purchase an R12 Tablet PC with an optional embedded mobile broadband with Global Navigation Satellite System (GNSS) module that enables you to connect to a variety of mobile broadband networks for sending and receiving data wirelessly. You can typically use mobile broadband anywhere you can use your mobile phone.
TPM With the built-in TPM 1.2 and Infineon Security Platform Tools, you can create and manage digital certificates, user and device authentication, full disk data encryption, and restricted network access. These features are most commonly used by enterprises and enabled by the system administrator. To download and install TPM, go to http:// www.motioncomputing.com/us/products/rugged-tablets/r12#prod_specs, select Security, and then click the link for TCG Trusted Platform Module (TPM) 1.2 .
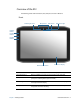
Overview of the R12 The following photos show the buttons, slots, and ports on the R12 Tablet PC.
Web camera Interact with people online, stream video, or capture color images with a 2MP web camera. Web camera light Indicates that the web camera is active and provides lighting for images and video. Windows Home button Opens the Windows Start menu. Touchscreen display Use your finger or pen to access all the functions of the R12 on the 12.5” display.
Back Microphone Volume buttons Documentation camera light Documentation camera Battery Battery charge indicator light button Battery latch Battery charge indicator lights Speakers Microphone Used for detecting sound when the documentation camera is in use. Documentation camera light Provides light for the documentation camera. Documentation camera 8MP auto-focus camera that takes photos you can save to your hard drive in BMP, JPG, and TIFF formats.
Right side USB port Power adapter port HDMI port Audio out port SIM card slot SD card slot Fingerprint reader Pen bay Pen tether anchor Power adapter port Connect the power adapter. Audio out port Supports external stereo speakers, a stereo headset, or a stereo headset with microphone using a standard TRS or TRRS 3.5mm plug. USB port Connect a USB device such as a mouse, digital camera, printer, or external storage device.
Pen The R12 Tablet PC supports touch with a pen as well as with your finger with an R12-Series digitizer pen. You may find the pen handy when you want to write a quick email or take notes. The pen is particularly effective for precise data entry and navigation. The R12 digitizer pen includes a pressure-sensitive tip and a function button. The pen contains no batteries and requires no external power. Function button Tip You can purchase additional pens from the Motion Computing Accessories page.
3. Press and release the power button located in the center of the left side of the R12 to turn it on. Power button Security button Battery charging indicator Step 2: Connect to a wireless network The R12 comes with built-in Wi-Fi and Bluetooth. Your Tablet PC may also be equipped with mobile broadband. To set up available wireless networks, follow these steps:. Step 1. Enable wireless from Motion Dashboard 1. From the Windows taskbar, tap the Motion Dashboard icon . 2. Tap Wireless. 3.
NOTE: If you purchased the optional mobile broadband module with GNSS, your R12 has GNSS capabilities. You can use GNSS with your preferred mapping applications to find your current and destination locations. Step 4. Set up Bluetooth The R12 has a built-in Bluetooth adapter to connect to other Bluetooth-enabled devices. To add a Bluetooth device: 1. From the notification area, tap the Bluetooth icon and select Add a Device. 2.
Lock and unlock the Tablet PC To lock the Tablet PC, either: • Press the security button on the right side of the tablet. OR • If a keyboard is attached, press Ctrl+Alt+Delete. To unlock the tablet: • Press the security button or Ctrl+Alt+Delete again. Sleep mode Place your tablet in Sleep mode when you go away for a short period of time. Sleep mode conserves battery power while you’re away and when you return, your desktop is the same as you left it.
Optional setup tasks Create a recovery image Once you’ve set up your R12 the way you like it, including installing your applications, create a system image on an external USB drive. This is a safety measure in the event that your system stops working. A system image is an exact copy of a drive and includes Windows 7, your system settings, programs, and files. For more information, see Creating a system image on page 57.
For more information This User’s Guide introduces the full set of R12 features and provides instructions for common tasks you’ll perform. The rest of this book is organized as follows: • Using your R12—Provides instructions for basic R12 tasks including how to customize your tablet to fit the way you work using Motion Dashboard, how to use the cameras, how to set up speech recognition, and more. • Caring for your R12—Provides suggestions for the care and maintenance of your Tablet PC.
Using your R12 2 This chapter provides information about performing the following tasks: • Using Motion Dashboard on page 21 • Using touch on page 23 • Using handwriting recognition on page 28 • Using the Function buttons on page 29 • Using the Windows Home button on page 30 • Setting display options on page 30 • Using the built-in microphones on page 32 • Using the cameras on page 32 • Using the SlateMate (optional) on page 38 • Using the barcode scanner on page 38 • Using the RFID reader on page 40 • U
The R12 desktop and applications When you start up your R12 for the first time, the desktop may look like the following illustration. Motion Computing applications appear in the taskbar and Windows® notification area. Getting Started document Motion Dashboard Motion OmniPass Taskbar Windows Notification Area The Motion Computing applications are described below. Chapter 2 Using your R12 Motion Getting Started Document that contains tips for getting started with your R12 Tablet PC.
Using Motion Dashboard Motion Dashboard provides a convenient way to change common tablet-related settings. To open Motion Dashboard: • Press Function button 1, which is located on the front left side of the Tablet PC. (See Using the Function buttons on page 29.) OR • From the Windows taskbar, tap the Motion Dashboard icon . Motion Dashboard is organized into categories, which are listed on the left of the Dashboard. Tap a category button to display its settings.
Dashboard Category Task Display • • • • • Rotate the display orientation. Adjust the brightness of the display. Set advanced graphic properties. Set up an external display. Dim the display automatically. Audio • • • • Adjust speaker and microphone volume. Adjust advanced audio settings. Suppress background noise. Balance speakers. Pen & Tablet • Configure your Tablet PC to use touch only, pen only, or both simultaneously. • Adjust touch to left-handed setting.
Arrow Wireless indicator Motion utilities Power indicator Motion icons in the Windows notification area Tap the Motion icon to display: • Motion Dashboard—Opens the Motion Dashboard. • Options—Lists options you can set: – Show Hard Drive Activity—When selected, the Motion icon blinks when there is hard drive activity. – Automatic Display Rotation—When selected, the R12 automatically changes the viewing orientation (landscape to portrait or vice versa) when the tablet is physically rotated.
Calibrate pen and touch Calibrate the pen and your finger so that they can be detected more accurately on the touchscreen display. You should do so when you first start using the Tablet PC and whenever the pointer doesn’t align with your pen or finger. To calibrate the digitizer: 1. Open Motion Dashboard. 2. Tap Pen & Tablet. 3. Under Pen & Tablet, tap Calibrate Digitizer. 4. Tap the Calibrate button in the Display tab. 5. Choose Pen input or Touch input in the following pop-up display. 6.
3. Tap Touch Settings. 4. From the Digitizer Options tab, under Input Mode tap the desired mode. Adjusting touch settings You can adjust how the Tablet PC interprets your finger movements.
Adjusting pen settings If the pen doesn’t respond as accurately as you would like, you can make adjustments. For example, you can: • Use the button on the pen to perform the right-click action or act as an eraser • Adjust how quickly the tablet responds when you double-tap the pen • Adjust how quickly the tablet responds when you press and hold the pen button To change pen settings: 1. Open Motion Dashboard. 2. Tap Pen & Tablet. 3. Tap Pen & Input Devices. 4. Tap the Pen Options tab. 5.
3. Tap Tablet PC Settings. 4. Tap the Display tab. 5. Tap Setup next to “Configure your pen and touch displays.” 6. Tap Touch Input. 7. Press the Enter key until you see the instructions appear on the display that you want to use for touch input. 8. Follow the on-screen instructions. 9. Press Esc to end the process. Entering text You can enter text either by writing on a virtual note pad (called the writing pad) or by tapping characters on the on-screen keyboard.
Using handwriting recognition Handwriting recognition is enabled by default. The more you write, the quicker your handwriting is recognized because your Tablet PC has an automatic learning tool that collects data about the words you use and how you write them. This data is stored under your user profile. To train the R12 to recognize your handwriting style: • Open Motion Dashboard. Tap Pen & Tablet, tap Pen & Input Devices, then tap the Handwriting tab. Select Use automatic learning (recommended).
Using the Function buttons You can use the LED Function buttons on the front of the Tablet PC to perform many functions without having to use the pen. The buttons are customizable, so you can modify their functions to suit the way you work.
7. Select the appropriate action for the button. You can select an action for Press and another for Press and hold. For some actions, you must enter more information, such as the location of a program to start. NOTE: To reset the buttons to their default values, tap the Reset button. Using the Windows Home button The Windows Home button is located on the front of the R12 at the bottom center. Press this button to open the Windows Start menu.
TIP: For optimal battery conservation and viewability, set the brightness scale to the mid-point or slightly above. Rotating the display orientation You can easily change the screen orientation to fit your current task. For example, you may want to use the portrait orientation for filling out forms or reading a PDF or e-book. At other times, you may want a landscape orientation for web browsing or sketching. To rotate the display: 1. Open Motion Dashboard. 2. Tap Display. 3. Tap the Rotate Screen button.
Resetting touch after adding other monitors After setting up an external monitor, touch might be disabled on your tablet because Windows 7 assumes that the external display is for touch input. You can enable touch on the correct display from the Motion Dashboard by following the procedure below. You’ll need a keyboard. To enable touch when your tablet is connected to an external display: 1. If it isn’t already, attach a keyboard to the tablet. 2. Open Motion Dashboard. 3. Tap Pen & Tablet. 4.
Using the web camera The web camera is a 2MP camera that supports color images and streaming video. It’s located on the front of your tablet. You can use the web camera for web-based video communication. Use the software of your choice to operate the web camera. Using the documentation camera You can use the documentation camera to take pictures and save them to your hard drive in BMP, JPG, and TIFF formats. The documentation camera is an 8MP, auto-focus camera.
The SnapWorks camera screen is displayed. 2. Point your camera at the subject you want to photograph. You can use the grid and center circle to help you line up your subject(s). 3. Tap the camera icon take a picture. on the right side of the screen or press Function button 2 to To zoom in or out on your subject, use the zoom adjustment slider on the left side of the screen. 4. Your photo is saved and stored in the image storage location specified in the SnapWorks settings.
Setting TIP: Description Camera Resolution Change the resolution of your photos (Note: These resolution values apply to the documentation camera only.) Image Storage Specify the location where your photos are stored. Default Saved Image Type Use to select the image format you want to use for your photos. GPS Stamp Visible Tap On to include a GPS location stamp on your photo. You can see the GPS stamp when you annotate (edit) your photo.
Editing a photo in SnapWorks 1. Tap the Gallery icon in the upper left-hand corner of the screen to open the directory where your photos are stored. You’ll see the most recent photos you have taken. 2. Double-tap the photo you want to edit. The photo opens and you’ll see two icons at the bottom left-hand corner of the screen that you can tap to open the SnapWorks photo editing tools. 3. Tap the Adjust Image icon to access editing tools to rotate, crop, or create a mirror image of your photo.
Sending, printing, and copying your photos 1. To send your photo via email, tap the Gallery icon in the upper left-hand corner of the screen to open the directory where your photos are stored. 2. Tap your photo once to select it, then tap the Send icon . You’ll see a pop-up window that tells you to choose a method to send your image. 3. Tap the Email icon to send your photo as an email attachment. 4. Select the resolution of the image you want to email in the following pop-up window.
Using the SlateMate (optional) The R12-Series SlateMate is a 3-in-1 factory-installed personality module consisting of a Barcode Scanner (BCS), High Frequency RFID reader (HF RFID), and a serial port. The R12Series SlateMate includes either a 3-in-1 module (BCS, HF RFID Reader, and Serial Port) or a 2-in-1 module (HF RFID Reader and Serial Port) configuration.
The following barcode symbologies are enabled by default: • Aztec • Code 128 • GS1-128 • Code 39 • Interleaved 2 of 5 • Micro PDF417 • UPC-A • UPC-E • EAN-8 • EAN-13 • PDF417 • QR Code Other barcode types can be enabled by using the EasySet application, which is available through Motion Computing Support. To use the barcode scanner: 1. Open the application that you want to receive the barcode data and place the insertion point in the appropriate field. 2.
Barcode scanner tips • You’ll typically get the best scans if the lens is six to seven inches from the barcode. • If you’re having trouble scanning a barcode, use two hands to steady the tablet while you scan. Using the RFID reader Your Tablet PC may include an integrated 13.56 MHz RFID reader that you can use to retrieve information from RFID tags. Motion provides a sample application capable of reading these tags.
Using the battery The R12 includes a high-capacity Lithium-ion battery that fits into the back of the unit. Battery life varies by configuration, applications in use, utilized features, and operating conditions. Maximum battery capacity decreases with time and use. DANGER: To avoid personal injury, handle the battery with care. Don’t open, puncture, short, or expose it to fire or water. Keep the battery in an environment with ambient temperature of less than 104°F (40°C).
Removing and replacing the battery Before you remove the battery, ensure that the tablet is plugged in, turned off, or in Hibernate or Sleep mode. If you’re hot-swapping the battery (page 43), you can do so while the tablet is on and running on battery power. To remove the battery: 1. With the back of the unit facing you, hold and slide the battery latch to the left. 2. Insert your finger under the finger grip and lift up to remove the battery from the battery compartment.
To replace the battery: 1. Place the tabbed end of the battery into the battery compartment. 2. Press the battery down until it locks into place. Hot-swapping the battery Changing a tablet battery while the tablet is in use and running on battery power is called hot-swapping. You can hot-swap a battery only if you have a second charged battery to replace the battery that is low on power. While hot-swapping the battery, you will notice the following behaviors: • The tablet’s display gets dimmer.
Long-term battery storage Don’t store any batteries with a full charge; this can cause a permanent loss of charging capacity. For long-term storage, ensure that the charge level is between 20% and 40% (two contiguous LEDs illuminated), and remove the battery from the tablet. Check stored batteries every 90 days to determine the charge status. If only one LED or no LED is illuminated, recharge the batteries to a level between 20% and 40%. For optimum care, store the battery in a cool, dry environment.
Changing the power plan By default, the R12 uses the Motion Optimized power plan that is designed specifically for Motion Computing tablets. It balances the need to save power while maximizing tablet performance. When the tablet senses no current activity, it goes into Power Saver mode automatically.
3. Under Power Switch on battery, select what you want to happen when the power switch is pressed while the tablet is running on battery. 4. Under Power Switch plugged in, select what you want to happen when the power switch is pressed while the tablet is plugged into an outlet. Using Wi-Fi (802.11a/g/n) and Bluetooth The R12 comes with built-in Wi-Fi and Bluetooth. Your Tablet PC may also be equipped with mobile broadband. Configure wireless To set up a wireless connection: 1. Open Dashboard. 2.
Using Bluetooth The R12 has a built-in Bluetooth adapter to connect to other Bluetooth-enabled devices. Before you can set up a Bluetooth device, you must enable the Bluetooth adapter on the tablet. After you enable Bluetooth, the Bluetooth icon appears in the notification area. You can tap on this icon to get shortcuts to the Bluetooth Settings window and the Add New Connection Wizard.
9. Once the device is added, Windows displays a confirmation that the Bluetooth device has been added. 10.Tap Devices and Printers to verify that the device has been added or click Close to close the window. To add a Bluetooth device: 1. From the notification area, tap the Bluetooth icon and select Add a Device. 2. Make sure the Bluetooth device is discoverable according to the device manufacturer’s instructions.
NOTE: Before you can connect to a mobile broadband network, you must have an active account with a cellular network provider and obtain a SIM card for mobile broadband access. To set up Mobile Broadband with GNSS (optional): 1. Start AirCard Watcher™. From the Start menu, select All Programs > Sierra Wireless > AirCard Watcher. Note: AirCard Watcher will be rebranded as Skylight™ effective June 2014. 2. Tap Connect to connect to your wireless networks.
Using the discrete GPS receiver with WAAS, EGNOS, and MSAS The discrete GPS receiver uses satellites to provide the current location, altitude, heading, and horizontal velocity of the tablet through a virtual communications port.
If you use the fingerprint reader, you can avoid having to enter passwords for your applications and websites. For example, instead of entering various passwords to your different website accounts, you can use your fingerprint to serve as a master password that works for all your accounts. Fingerprint reader tips • Be consistent. Hold your finger and scan at the same angle each time. For example, if you enroll your finger with your hand open, hold your hand this way each time you scan.
NOTE: You may have to swipe your finger over the sensor twice for it to be read completely. After you have successfully enrolled, you’ll be asked whether you want to log on to Windows. The next time you restart your Tablet PC, you’ll be able to log in with your fingerprint. Additionally, you’ll use your fingerprint to open OmniPass. Modifying your OmniPass You can change your OmniPass to use either a PIN or your Windows password instead of your fingerprint. To modify your OmniPass: 1.
3. Select either Use a PIN as my OmniPass or Use my Windows password as my OmniPass then tap Next. To use a PIN: 1. Select Use a PIN as my OmniPass then tap Next. 2. Create your PIN using the on-screen keypad and then confirm your PIN. 3. Tap Next. 4. After you have successfully enrolled, you’ll be asked whether you want to log on to Windows. The next time you restart your Tablet PC, you’ll be able to log in with your PIN. Additionally, you’ll use your PIN to open OmniPass. To use your Windows password: 1.
Using WinMagic® SecureDoc™ WinMagic SecureDoc is an application that enables you to encrypt your hard drive. This application is included with your R12, but you have to enable it to implement hard drive encryption. To enable WinMagic SecureDoc: 1. From the Start menu, select All Programs > SecureDoc Disk Encryption> SecureDoc Control Center. The SecureDoc Control Center opens, where you can choose either Getting Started or Advanced Mode. 2.
4. After you have enabled encryption, reboot your Tablet PC, and manually restart SecureDoc to complete the encryption process. For more information about WinMagic SecureDoc, go to http://www.winmagic.com/ products/full-disk-encryption-for-windows. Using the SIM card reader The SIM card slot holds one SIM card. You need to use a SIM card only if you’re using mobile broadband on a GSM/UMTS/HSPA network. Contact your service provider for additional information. To insert a SIM card: 1. Turn off the tablet.
2. Open the port cover. 3. Push the card in slightly until it pops out. Using the SD card reader The R12 includes an SD card slot that you can use with an SD memory card to play media files, view files from your camera or other devices, or to use for extra file storage. To insert an SD card: 1. Turn off the tablet. 2. Open the port cover and locate the SD card slot. SD card slot 3. Push the SD card with the contacts facing down into the slot until it clicks into place. To remove an SD card: 1.
Backing up your system To protect against loss or accidental deletion, schedule backups to occur automatically on a regular basis. Windows 7 includes a backup tool that you can use to configure what you want to backup and schedule backups on a regular basis. Restoring your system Windows 7 includes specialized tools for restoring your system in case of system failure.
Restoring your system image from Windows Control Panel Use the Recovery tool from the Control Panel to restore your system if you can still access Windows 7 or if you’re restoring your system image onto a different computer. To restore your system from Windows Control Panel: 1. Locate the external drive that contains your system image. 2. From the Windows Control Panel, tap System and Security category, then tap Backup your computer. 3.
Restoring your system without a system image If you need to restore your Windows 7 system and you don’t have a system image, you can restore Windows to its original factory image. This does not restore any of your files or any programs that you have installed. To reinstall the original factory image: 1. Ensure that a keyboard is attached to the tablet. 2. Press the tablet’s power button to start the tablet. 3. Press and hold the F8 key to display the Windows Advanced Boot Options screen.
Caring for your R12 3 Proper care and maintenance will keep your R12 Tablet PC working and in good condition. For general information about care of the tablet and its components and accessories, see the Safety and Regulatory Guide included with your Tablet PC. WARNING: Follow the guidelines listed below when caring for your R12 Tablet PC and its components. Improper use may damage the Tablet PC and its components and void the warranty.
Caring for the display Follow these suggestions to keep your display clean: • Clean fingerprints and smudges from the display surface by wiping it with the cloth provided. • If needed, use a cleaning solution recommended by Motion Computing to clean the display. Spray the solution on a cloth then wipe the display. Never spray directly onto the display surface and never use an abrasive cleaner.
NOTE: To order pens or new pen tips, go to Motion Computing Accessories. Replacing pen tips Pen tips eventually wear down or get damaged, so the pen includes extra tips and a tool for replacing them. With typical use, you should change the pen tip every 90 days. If you use the pen in a dirty or dusty environment, you should change the pen tip every 30 days. Particles can become embedded in the pen tip and scratch the display. To replace the pen tip: 1. Grasp the old tip with the replacement tool.
Traveling with your R12 Tablet PC Use the following tips when you travel with your R12 Tablet PC: • Put the Tablet PC in a case to protect the display. Motion Computing sells a variety of cases for the R12. You can purchase one at the Motion Computing Accessories page. • Store the pen in the pen bay located on the right side of the tablet. • Pack the Tablet PC securely in a briefcase or hand-carried luggage and keep it separate from toiletries, liquids, and food. Don’t pack it in checked luggage.
R12 Troubleshooting and FAQs 4 Motion Computing Tablet PCs are thoroughly tested for performance and quality, but occasionally issues can still occur. If you don’t find the information you’re looking for in this section, go to Motion Computing Support. NOTE: Enterprise users should contact their support organization for assistance with resolving tablet, application, or connectivity issues. Troubleshooting Use the information in this section to identify and resolve common issues.
The tablet won’t enter Hibernate mode • Hibernate mode might not be enabled. Enable hibernation by adjusting the power button behavior from Motion Dashboard. See Changing how the power button functions on page 45. The tablet doesn’t return from Hibernate mode while on battery power • The battery might be depleted. Plug the Tablet PC’s power adapter into an AC outlet and into the Tablet PC. The power button is blinking but nothing is happening • The tablet is in Sleep mode.
Display issues When I connect to an external monitor, the cursor appears on the external monitor and not on my tablet • This is a known Windows® 7 issue. If you’ve connected multiple touch-enabled displays, Windows® may not assign touch to the correct display. To fix this issue, make sure a keyboard is attached to your tablet and then open Motion Dashboard. Tap Pen & Tablet, then tap Tablet PC Settings. Tap the Display tab, then tap Setup next to “Configure your pen and touch displays.
Touch or pen issues The Tablet PC doesn’t respond to the pen I’m using • Use only the R12-Series pen with the tablet. The Tablet PC doesn’t respond to other digitizer pens, even Motion Computing pens for other models. When I add an external display, touch input doesn’t appear on the desired display • Run touch setup on the desired display. Make sure a keyboard is attached to your tablet and then open Motion Dashboard. Tap Pen & Tablet, then tap Tablet PC Settings.
Ports and connectors issues The tablet doesn’t recognize the USB device • Windows® 7 may take a short time to recognize the USB device. Wait a few moments to see if Windows® recognizes the device. • The device may not be connected properly. Check the connection and ensure it is inserted properly into the USB port. • The correct driver might not be included with Windows® 7. Check the manufacturer’s website for a current driver.
Bluetooth issues I can’t connect to a Bluetooth device • Ensure that Bluetooth is enabled.Open Motion Dashboard, tap Wireless, and tap the checkbox next to Enable Bluetooth Internal Wireless. • Your Bluetooth device must be paired. From the Windows® notification area, tap the Bluetooth icon and select Add a Device. Make sure the Bluetooth device is discoverable according its manufacturer’s instructions. Select the desired Bluetooth device from the list of available devices.
Bluetooth wireless tips Motion Computing and its Bluetooth partners have worked to ensure a positive experience with this technology and to ensure Bluetooth interoperability. In doing so, we have found the following issues: • Interference—If you’re running Bluetooth and Wi-Fi at the same time, interference can affect the Bluetooth performance.
Audio issues No sound is coming from the built-in or external speakers • Ensure that nothing is connected to the audio in/out jack. Connecting headphones or external speakers disables the built-in speaker. • The volume may be set too low or muted. You can use Motion Dashboard to increase the volume or turn mute off. Open Motion Dashboard, then tap Audio, and move the slider to the desired volume. • The integrated audio components may have been overwritten.
Power saver power plan. Open Motion Dashboard, tap Power. Tap Power Options and select Power saver. • Use the Dynamic display setting. This automatically controls the display to conserve power. Open Motion Dashboard, tap Display, then tap Dynamic. • Set the display to the dimmest level you’re comfortable viewing. Open Motion Dashboard, tap Display, then move the Brightness slider to the desired level. • Disconnect any Ethernet connections that aren’t being used.
How can I stop the display screen from rotating automatically? • From the navigation area, tap the Motion icon then tap Options and clear Automatic Display Rotation. What do I need to use the Tablet PC in another country? • You will need a travel plug adapter, which you can find in airports and travel stores. You don’t need to buy a voltage converter; the Motion AC adapter will automatically adjust to different voltages.
Index Numerics 802.
a docking station 32 rotating 31 scratch resistance 6 scratches 72 settings 30–32 touch with multiple 26, 32 troubleshooting 66 turning off automatic rotation 73 using 30 disposing of used batteries 44 docking station 17 documentation camera 11, 33 light 11 double-tap 23, 24, 26 downloads, free 59 E enabling Bluetooth 47 Entering text 27 Esc button configuring 29 external display 31 F features optional 7 fingerprint reader 12, 50 about 50 tips 51 flicks 23, 25 free downloads 59 Function button configuring
N notification area 22 O OmniPass 51 about 50 modifying 52 set up a PIN 52, 53 settings 53 use your Windows password 53 on-screen keyboard 28 optimization battery 44 power plan 45 optional features 7, 8 Computrace® Complete 8 mobile broadband with GPS 7 security 7 TPM 8 P pen adjust settings 26 calibrating 24 care and maintenance 61 disable function button 26 disabling pen input 24 taking care of 61 troubleshooting 67 Pen & Input Devices 25 pen bay 12 pen tether 17 pen tether anchor 12 portrait mode 31 po
21 optional features 7 shutting down 45 software 59 training tutorials 73 Tablet PC settings adjusting 26 taking a photo 33 taskbar 14, 21 text entering 27 touch adjust settings 25 and pen 24 customize 24 disabling touch input 24 gestures 25 on multiple displays 32 pointer, adjusting 25 pointer, show or hide 25 resetting after adding other monitors 32 setting speed and duration 26 troubleshooting 67 using 23 using multiple monitors 26 touchscreen display 10 caring for 61 TPM 8 training classes corporate 73