
User's Guide


Chapter 2 Using your R12 Using the cameras 36
T
IP: You can press and hold Function button 2 to open the Pictures directory to view your
photos.
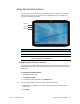
5. If you want to take a photo with the web camera, tap the Flip icon in the upper
right-hand corner of the screen.
After you take your photo, you can tap the Flip icon again to return to the
documentation camera viewfinder.
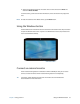
6. To activate the flash, press the flash icon once if you want to use the flash for taking
all photos. Press the flash icon twice to initiate auto flash mode, which activates the flash
only when required by the ambient lighting conditions.
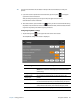
Configuring SnapWorks settings
1. Tap the Settings icon in the upper left-hand corner of the screen.
The SnapWorks configuration screen is displayed.
Setting Description
Camera Resolution Change the resolution of your photos
(Note: These resolution values apply to the documentation
camera only.)
Image Storage Specify the location where your photos are stored.
Default Saved
Image Type
Use to select the image format you want to use for your
photos.
GPS Stamp Visible Tap On to include a GPS location stamp on your photo. You
can see the GPS stamp when you annotate (edit) your photo.
Time Stamp Visible Tap On to include a time stamp on your photo. The time
stamp will be visible when you annotate (edit) your photo.
Language Select your preferred language for the SnapWorks interface.