R12 Tablet PC Model R001 User’s Guide
© 2014 Motion Computing, Inc. All rights reserved. This document contains information protected by copyright. No part of this document may be reproduced in any form without written consent from Motion. The information in this document is provided “as is” and is subject to change without notice. Motion is not liable for errors or omissions in this document. Motion, Motion Computing, View Anywhere, and SnapWorks are trademarks or registered trademarks of Motion Computing, Inc. in the U.S.A.
Contents Chapter 1 Getting Started . . . . . . . . . . . . . . . . . . . . . . . . . . . 6 Optional features. . . . . . . . . . . . . . . . . . . . . . . . . . . . . . . . . . . . . . . . . . . . . . . . . . . . . . . . . . . . . . . . 7 Mobile Broadband with GNSS. . . . . . . . . . . . . . . . . . . . . . . . . . . . . . . . . . . . . . . . . . . . . . . . . 7 Discrete GPS with SBAS . . . . . . . . . . . . . . . . . . . . . . . . . . . . . . . . . . . . . . . . . . . . . . . . . . . . . . . 7 Security . .
Location Services . . . . . . . . . . . . . . . . . . . . . . . . . . . . . . . . . . . . . . . . . . . . . . . . . . . . . . . . . 28 Show Map. . . . . . . . . . . . . . . . . . . . . . . . . . . . . . . . . . . . . . . . . . . . . . . . . . . . . . . . . . . . . . . . 28 Know Your Motion Tablet. . . . . . . . . . . . . . . . . . . . . . . . . . . . . . . . . . . . . . . . . . . . . . . . . . . . . . . 28 Entering text and using the handwriting panel . . . . . . . . . . . . . . . . . . . . . . . . . . . .
Cleaning the fingerprint reader . . . . . . . . . . . . . . . . . . . . . . . . . . . . . . . . . . . . . . . . . . . . . . . . . 59 Caring for the tablet battery . . . . . . . . . . . . . . . . . . . . . . . . . . . . . . . . . . . . . . . . . . . . . . . . . . . . 59 Traveling with your R12 Tablet PC. . . . . . . . . . . . . . . . . . . . . . . . . . . . . . . . . . . . . . . . . . . . . . . 60 Chapter 4 R12 Troubleshooting and FAQs . . . . . . . . . .61 Troubleshooting . . . . . . . . . . . . . . . . .
Getting Started 1 The Motion R12 Tablet PC is a sleek and lightweight FHD 12.5” rugged tablet that provides robust computing power and a variety of integrated features to enable any mobile workflow. The R12 Tablet PC includes these features: • Intel® Core™ i5 or i7 vPro™ Processors (i7 Processor includes Intel vPro™ technology) • Windows® 8.1 Pro 64-bit • USB 3.0 and HDMI ports and SD card slot • Integrated 8.0 MP documentation camera and 2.
Optional features This section describes the optional features available when you purchase your R12. Mobile Broadband with GNSS You can purchase an R12 Tablet PC with an optional embedded mobile broadband with Global Navigation Satellite System (GNSS) module that enables you to connect to a variety of mobile broadband networks for sending and receiving data wirelessly. You can typically use mobile broadband anywhere you can use your mobile phone.
WinMagic® SecureDoc™ WinMagic SecureDoc is an application that you can use to encrypt your hard drive. This application is included with your R12 Tablet PC and must be enabled to activate. For additional information, Using WinMagic® SecureDoc™ on page 49. TPM With the built-in TPM 1.2 and Infineon Security Platform Tools, you can create and manage digital certificates, user and device authentication, full disk data encryption, and restricted network access.
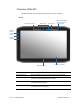
Overview of the R12 The following photos show the buttons, slots, and ports on the R12 Tablet PC.
Web camera Interact with people online, stream video, or capture color images with a 2MP web camera. Web/documentation camera activation indicator light Indicates that the web or documentation camera is active. Windows button Opens the Windows Start screen or the Windows desktop. Touchscreen display Use your finger or pen to access all the functions of the R12 on the 12.5” display.
Back Microphone Volume buttons Documentation camera light Documentation camera Battery Battery charge indicator light button Battery latch Battery charge indicator lights Speakers Microphone Used for detecting sound when the documentation camera is in use. Documentation camera light Provides light for the documentation camera. Documentation camera 8MP auto-focus camera that takes photos you can save to your hard drive in BMP, JPG, and TIFF formats.
Right side Power adapter port Audio in/out port USB port HDMI port SIM card slot SD card slot Fingerprint reader Pen bay Pen tether anchor Power adapter port Connect the power adapter. Audio in/out port Supports external stereo speakers, a stereo headset, or a stereo headset with microphone using a standard TRS or TRRS 3.5mm plug. USB port Connect a USB device such as a mouse, digital camera, printer, or external storage device.
Pen The R12 Tablet PC supports touch with a pen as well as with your finger with an R12-Series digitizer pen. You may find the pen handy when you want to write a quick email or take notes. The pen is particularly effective for precise data entry and navigation. The R12 digitizer pen includes a pressure-sensitive tip and a function button. The pen contains no batteries and requires no external power. Function button Tip You can purchase additional pens from the Motion Computing Accessories page.
3. Press and release the power button located in the center of the left side of the R12 to turn it on. Power button Security button Battery charging indicator Step 2: Connect to a wireless network The R12 includes built-in Wi-Fi and Bluetooth. Your Tablet PC may also be equipped with mobile broadband. To set up available wireless networks, follow these steps:. Step 1. Set up Wi-Fi 1. Enable Wi-Fi: a. Swipe in from the right side of the screen and tap Settings. b. Tap the wireless network icon . c.
a. Select location and tap OK. 4. Select the desired network service provider. 5. Follow the on-screen instructions. NOTE: If you purchased your R12 with the optional Mobile Broadband with GNSS module or the optional GPS with SBAS module, your R12 has GPS capabilities. You can use GPS with your preferred mapping application to find your current and destination locations. Step 3: Get familiar with your R12 Tablet PC Once you’ve set up your R12, take a few minutes to get familiar with your Tablet PC.
Sleep mode Place your tablet in Sleep mode when you go away for a short period of time. Sleep mode conserves battery power while you’re away and when you return, your desktop is the same as you left it. To put the tablet in Sleep mode: • Save your files (this isn’t required, but it’s a good precautionary measure). • Press and release the power button . Note: While in Sleep mode, the power button blinks. To wake up the tablet from Sleep mode: • Press and release the power button .
Attach the pen tether The R12 pen comes with a tether so that you can attach the pen to your tablet to avoid misplacing it. To attach the pen tether: 1. Slip one end of the tether through the hole at the end of the pen, then pull the pen through the loop until it is tight. 2. Slip the other end of the tether through the attach point on the R12, then pull the pen through the loop until it is tight. You can purchase additional pen tethers from the Motion Computing Accessories page.
This User’s Guide describes the full set of R12 features and provides instructions for common tasks you’ll perform. The rest of this book is organized as follows: • Using your R12—Provides instructions for basic R12 tasks including how to customize your tablet to fit the way you work using Motion Tablet Center, how to use the cameras, how to set up speech recognition, and more. • Caring for your R12—Provides suggestions for the care and maintenance of your Tablet PC.
Using your R12 2 This chapter provides information about performing the following tasks: • Using Motion Tablet Center on page 20 • Using Know Your Motion Tablet on page 28 • Entering text and using the handwriting panel on page 29 • Using the Function buttons on page 32 • Using the Windows button on page 33 • Connect an external monitor on page 33 • Using the built-in microphones on page 34 • Using the cameras on page 34 • Using the SlateMate (optional) on page 39 • Using the barcode scanner on page 39 •
Motion Computing applications Your R12 includes some Motion Computing applications that will help you configure your Tablet PC to fit your needs, manage common Windows 8.1 settings, and access resources for additional information: Motion Tablet Center Provides a central location for accessing and configuring the most commonly used Windows 8.1 settings. Know Your Motion Tablet Provides easy access to R12 documentation and the Motion Support and Tablet PC accessories websites.
Tablet settings The following configuration options are available in Motion Tablet Center’s Tablet settings: • Pen and Touch—Provides access to Windows Pen and Touch configuration options. • Tablet PC Settings—Use these settings to configure your display and button actions and set handedness options. • Wireless Settings—View, configure, and connect to available wireless networks. • Advanced Settings—View all system information for your Tablet PC. Pen and Touch To configure pen settings: 1.
7. To adjust the sensitivity of flick recognition, move the slider in the Sensitivity section of the Flicks tab. You can adjust how the Tablet PC interprets your finger movements.
7. Adjust the screen orientation sequence setting by tapping the Go to Orientation link and choose the order in which your screen rotates. You can customize the Function buttons on the front of the R12 to start your favorite program, run a command, or enter a key combination. 8. To configure the Function buttons, tap Tablet PC Settings in Motion Tablet Center then tap the Buttons tab. 9.
3. Tap your mobile broadband network, which is displayed in the Mobile broadband section. To find more available broadband networks, tap Find more. 4. If you want to connect automatically in the future, select the Connect automatically checkbox. 5. If you want to roam automatically, select the Allow data roaming checkbox. 6. Tap Connect. If prompted, enter the access point name (APN) or access string, the user name, and the password.
Advanced settings You can use Motion Tablet Center’s Advanced settings to view all system information for your Tablet PC. System Information lists categories in the left pane and details about each category in the right pane. The categories include: • System Summary—Displays general information about your computer and the operating system, such as the computer name and manufacturer, the type of basic input/output system (BIOS) your computer uses, and the amount of memory that's installed.
If you want to disable unused devices so that you can extend your Tablet PC’s battery life, tap the switch beside the devices that are on to turn them off. To enable these devices, tap the switch to turn them on. By default, the R12 uses the Motion Optimized power plan that is designed specifically for Motion Computing tablets. It balances the need to save power while maximizing tablet performance. When the tablet senses no current activity, it goes into Power Saver mode automatically.
You can change how the power button behaves when it is pressed either to hibernate or to shut down the tablet. You can set the behavior individually, depending on whether the tablet is running on battery or plugged in. To change what happens when the power button is pressed: • Tap the drop-down menu beside Power switch on battery: and select the action the power button performs when your Tablet PC is on battery power.
Compass The on-screen compass displays the direction of the magnetic north pole relative to the orientation of the tablet. Additionally, the compass accuracy status is displayed; if the compass needs to be calibrated, you’ll see a notification alerting you to calibrate the compass. To calibrate the compass, tap Calibrate Compass and follow the on-screen instructions. Location Services Location Services provides information about the R12’s current position—latitude, longitude, heading, and accuracy.
Getting Started—Opens the R12 Getting Started Guide, which provides basic information about operating your Tablet PC. Support—Links to the Motion Computing Support website, which provides information about Motion products, technical support, and customer and professional services. User’s Guide—Enables you to open or save this R12 User’s Guide. Accessories—Links to the Motion Computing store, where you can view and purchase accessories for your Motion Computing Tablet PC. To use Know Your Motion Tablet: 1.
Using the Windows 8.1 on-screen keyboard To open the on-screen keyboard, either: • Tap in a text field or other area where you can type, such as the URL field in a web browser. • Tap the keyboard icon in the Windows notification area when you’re in the Windows desktop. The default on-screen keyboard will appear at the bottom of the screen. In addition to the default on-screen keyboard, Windows 8.1 provides other keyboard layouts for entering text.
Using the Windows 8.1 handwriting panel To open the handwriting panel: 1. Tap in a text field or other area where you can type, such as the URL field in a web browser. 2. In the lower right-hand corner of the touch keyboard, tap the keyboard icon to change keyboards. 3. Tap the handwriting icon . The handwriting panel will open. Use your digitizer pen to begin writing in the handwriting panel. Your handwriting will then be converted to text. TIP: The more you write, the more accurately Windows 8.
Using the Function buttons You can use the LED Function buttons on the front of the R12 to perform many functions without having to use the pen. The buttons are customizable, so you can modify their functions to suit the way you work.
6. Select the appropriate action for the button. You can select an action for Press and another for Press and hold. For some actions, you must enter more information, such as the location of a program to start. NOTE: To reset the buttons to their default values, tap the Reset button. Using the Windows button The Windows button is located on the front of the R12 at the bottom center. Tap this button to open the Windows Start screen.
Using the built-in microphones You can use the integrated array microphones to record audio, dictate notes, and use voice commands. The two front microphones can be used at the same time to optimize sound detection for speech recognition and voice recording. Another microphone on the back of the R12 is used when the rear camera is in use. Using the cameras Your R12 includes both web and documentation cameras.
SnapWorks™ by Motion® The R12 includes an application called SnapWorks that enables you to shoot, save, edit, email, print, and copy your photos. Taking a photo with SnapWorks 1. Press Function button 2 to activate the camera and open the viewfinder. Function button 2 The SnapWorks camera screen is displayed. 2. Point your camera at the subject you want to photograph. You can use the grid and center circle to help you line up your subject(s). 3. Tap the camera icon take a picture.
TIP: You can press and hold Function button 2 to open the Pictures directory to view your photos. 5. If you want to take a photo with the web camera, tap the Flip icon in the upper right-hand corner of the screen. After you take your photo, you can tap the Flip icon again to return to the documentation camera viewfinder. 6. To activate the flash, press the flash icon once if you want to use the flash for taking all photos.
TIP: Tap the Left Arrow icon to return to the previous screen. Tap the Close icon to exit SnapWorks. SnapWorks help Tap the Help icon to open the Key screen where you can view all SnapWorks icon descriptions. Editing a photo in SnapWorks 1. Tap the Gallery icon in the upper left-hand corner of the screen to open the directory where your photos are stored. You’ll see the most recent photos you have taken. 2. Double-tap the photo you want to edit.
Sending, printing, and copying your photos 1. To send your photo via email, tap the Gallery icon in the upper left-hand corner of the screen to open the directory where your photos are stored. 2. Tap your photo once to select it, then tap the Send icon . You’ll see a pop-up window that tells you to choose a method to send your image. 3. Tap the Email icon to send your photo as an email attachment. 4. Select the resolution of the image you want to email in the following pop-up window.
Using the SlateMate (optional) The R12-Series SlateMate is a 3-in-1 factory-installed personality module consisting of a Barcode Scanner (BCS), High Frequency RFID reader (HF RFID), and a serial port. The R12Series SlateMate includes either a 3-in-1 module (BCS, HF RFID Reader, and Serial Port) or a 2-in-1 module (HF RFID Reader and Serial Port) configuration.
The following barcode symbologies are enabled by default: • Aztec • Code 128 • GS1-128 • Code 39 • Interleaved 2 of 5 • Micro PDF417 • UPC-A • UPC-E • EAN-8 • EAN-13 • PDF417 • QR Code Other barcode types can be enabled by using the EasySet application, which can be installed from C:\Motion\Software\EasySet. To use the barcode scanner: 1. Open the application that you want to receive the barcode data and place the insertion point in the appropriate field. 2.
Barcode scanner tips • You’ll typically get the best scans if the lens is six to seven inches from the barcode. • If you’re having trouble scanning a barcode, use two hands to steady the tablet while you scan. Using the RFID reader Your Tablet PC may include an integrated 13.56 MHz RFID reader that you can use to retrieve information from RFID tags. Motion provides a sample application capable of reading these tags.
Using the battery The R12 includes a high-capacity Lithium-ion battery that fits into the back of the unit. Battery life varies by configuration, applications in use, utilized features, and operating conditions. Maximum battery capacity decreases with time and use. DANGER: To avoid personal injury, handle the battery with care. Don’t open, puncture, short, or expose it to fire or water. Keep the battery in an environment with ambient temperature of less than 104°F (40°C).
Press to view charge level Battery charge indicator lights Removing and replacing the battery Before you remove the battery, ensure that the tablet is plugged in, turned off, or in Hibernate or Sleep mode. If you’re hot-swapping the battery (page 44), you can do so while the tablet is on and running on battery power. To remove the battery: 1. With the back of the unit facing you, hold and slide the battery latch to the left. 2.
To replace the battery: 1. Place the tabbed end of the battery into the battery compartment. 2. Press the battery down until it locks into place. Hot-swapping the battery Changing a tablet battery while the tablet is in use and running on battery power is called hot-swapping. You can hot-swap a battery only if you have a second charged battery to replace the battery that is low on power. While hot-swapping the battery, you will notice the following behaviors: • The tablet’s display gets dimmer.
Long-term battery storage Don’t store any batteries with a full charge; this can cause a permanent loss of charging capacity. For long-term storage, ensure that the charge level is between 20% and 40% (two contiguous LEDs illuminated), and remove the battery from the tablet. Check stored batteries every 90 days to determine the charge status. If only one LED or no LED is illuminated, recharge the batteries to a level between 20% and 40%. For optimum care, store the battery in a cool, dry environment.
Changing the power plan By default, the R12 uses the Motion Optimized power plan that is designed specifically for Motion Computing tablets. It balances the need to save power while maximizing tablet performance. When the tablet senses no current activity, it goes into Power Saver mode automatically.
4. Beside Power Switch plugged in, select what you want to happen when the power switch is pressed while the tablet is plugged into an outlet. Using Mobile Broadband with GNSS Your Tablet PC may be equipped with an optional embedded Mobile Broadband with GNSS module. Use the information in this section to enable Mobile Broadband and the GNSS receiver. Mobile Broadband access requires an account with a Mobile Broadband network carrier.
Using Bluetooth You can use Bluetooth to connect to accessory devices or other computers. The devices can communicate with each other when they are in range. To access Windows 8.1 bluetooth settings: 1. Swipe in from the right side of the screen and tap Search. 2. Type bluetooth in the search field and then tap Bluetooth settings. 3. Make sure the Bluetooth device is discoverable according to the device manufacturer’s instructions.
Fingerprint reader tips • Be consistent. Hold your finger and scan at the same angle each time. For example, if you enroll your finger with your hand open, hold your hand this way each time you scan. • The scanner is bi-directional. You can move your finger from right to left or left to right. • Read the prompts carefully and ensure that you wait for the prompt before you swipe. • Swiping too quickly or too slowly can make a capture unsuccessful.
2. Tap Getting Started to configure hard drive encryption on your Tablet PC. Tap Quick Wizard to begin the configuration process. 3. Follow the on-screen instructions. 4. After you have enabled encryption, reboot your Tablet PC, and manually restart SecureDoc to complete the encryption process. For more information about WinMagic SecureDoc, go to http://www.winmagic.com/ products/full-disk-encryption-for-windows.
3. Push the SIM card with the notched side toward the tablet and the contacts facing down into the slot until it clicks into place. To remove a SIM card: 1. Turn off the tablet. 2. Open the port cover. 3. Push the card in slightly until it pops out. Using the SD card reader The R12 includes an SD card slot that you can use with an SD memory card to play media files, view files from your camera or other devices, or to use for extra file storage. To insert an SD card: 1. Turn off the tablet. 2.
Locating your serial number You can locate the serial number for your R12 in these places: • White label underneath the battery, which is located on the back of the tablet. The number begins with “S/N.” To remove the battery, see Removing and replacing the battery on page 43. • Windows Start menu—right-click the Windows icon on the taskbar on the Windows Desktop then select System.
4. Tap Advanced Settings to modify the way that File History works. • Save copies of files—the default setting for backups is hourly back-ups, but you can vary this period from 10 minutes to 24 hours. • Size of offline cache—use this option to set a limit on the amount of disk space used for backups. • Keep saved versions—specify how long you want to keep old versions of your files. 5. Tap Turn on. 6. To restore files, tap Restore Personal Files in the File History window and follow the instructions.
Microsoft’s website provides additional information about creating a Windows 8.1 USB recovery drive: http://windows.microsoft.com/en-us/windows-8/create-usb-recovery-drive. Using the Windows 8.1 recovery drive If you have issues with your Windows 8.1 installation, you can boot from the recovery drive you created to access recovery and troubleshooting tools. NOTE: A Recovery Drive is bit specific—if you create a Recovery Drive in a 64-bit version of Windows 8.
configuration settings. If it detects any of these problems, it automatically attempts to fix them so that your system can boot normally. • Command Prompt—use this tool to access the command line tools. Note: This option is for advanced users only. 6. Select the option that best fits your needs and follow the instructions displayed on your screen. Using System Restore System Restore is a recovery feature in Windows 8.1 includes that allows you to restore your computer to a previous state.
Finding other software For information about other software for your tablet, go to Motion Computing Accessories and the Motion Computing Store. You will find links to software solutions for purchase as well as free downloads from Motion Computing and its service partners.
Caring for your R12 3 Proper care and maintenance will keep your R12 Tablet PC working and in good condition. For general information about care of the tablet and its components and accessories, see the Safety and Regulatory Guide included with your Tablet PC. WARNING: Follow the guidelines listed below when caring for your R12 Tablet PC and its components. Improper use may damage the Tablet PC and its components and void the warranty.
Caring for the display Follow these suggestions to keep your display clean: • Clean fingerprints and smudges from the display surface by wiping it with the cloth provided. • If liquid is spilled on the display, wipe it up immediately with a soft cloth like the one provided with the tablet. • Use only the R12 pen or your finger to write on the display. Any other object could damage the display surface. • Protect the display surface from unnecessary contact by using a case when transporting the Tablet PC.
With typical use, you should change the pen tip every 90 days. If you use the pen in a dirty or dusty environment, you should change the pen tip every 30 days. Particles can become embedded in the pen tip and scratch the display. To replace the pen tip: 1. Grasp the old tip with the replacement tool. Use the notch on the ring to grab the tip. 2. Pull the old tip out of the pen. 3. Insert a new tip, placing the flat end of the pen tip in first. 4. Apply slight pressure to push the tip in to place.
Traveling with your R12 Tablet PC Use the following tips when you travel with your R12 Tablet PC: • Put the Tablet PC in a case to protect the display. Motion Computing sells a variety of cases for the R12. You can purchase one at the Motion Computing Accessories page. • Store the pen in the pen bay located on the right side of the tablet. • Pack the Tablet PC securely in a briefcase or hand-carried luggage and keep it separate from toiletries, liquids, and food. Don’t pack it in checked luggage.
R12 Troubleshooting and FAQs 4 Motion Computing Tablet PCs are thoroughly tested for performance and quality, but occasionally issues can still occur. If you don’t find the information you’re looking for in this section, go to Motion Computing Support. NOTE: Enterprise users should contact their support organization for assistance with resolving tablet, application, or connectivity issues. Troubleshooting Use the information in this section to identify and resolve common issues.
The tablet won’t enter Hibernate mode • Hibernate mode might not be enabled. Enable hibernation by adjusting the power button behavior from Motion Tablet Center. See Changing how the power button functions on page 46. The tablet doesn’t return from Hibernate mode while on battery power • The battery might be depleted. Plug the Tablet PC’s power adapter into an AC outlet and into the Tablet PC. The power button is blinking but nothing is happening • The tablet is in Sleep mode.
screen, tap Search, and type projector in the Search field. Select Project to a second screen from the list of search results. Select the PC screen only option. • The display resolution might not match the native resolution of the LCD. You can use other display resolutions, but you will get the best display quality when the display resolution matches the native resolution of the LCD.
The pen function button doesn’t work • You may not be pressing the button early enough. Try pressing and holding the pen function button before you touch the pen to the display surface. • The pen function button may be disabled. To enable it, open Motion Tablet Center and tap Pen and Touch. Tap the Pen Options tab, and select the checkbox beside Use the pen button as a right-click equivalent.
Wi-Fi issues I can’t connect to a Wi-Fi network • Your R12 may not have located a Wi-Fi network. Open Motion Tablet Center and tap Wireless Settings. Ensure that the switch for Wi-Fi is set to On. Select the network to which you want to connect from the list of available networks. • You may not have access to the network. Obtain a user name and password from a network administrator. • Your tablet’s security settings may prevent a connection.
Bluetooth wireless tips Motion Computing and its Bluetooth partners have worked to ensure a positive experience with this technology and to ensure Bluetooth interoperability. In doing so, we have found the following issues: • Interference—If you’re running Bluetooth and Wi-Fi at the same time, interference can affect the Bluetooth performance.
working. If this happens, reinstall the audio drivers. After you install these, if you still have issues with audio, contact your system administrator or service provider. System issues I forgot my BIOS password and can’t access my tablet • You can enter several incorrect passwords before the BIOS temporarily locks the system. You can try again by restarting the system. If you still can’t log on, contact your system administrator. The tablet seems to be operating slower than usual • Reboot.
How do I clean the display screen? • To clean the display screen, wipe it with a soft cloth (like the one supplied). Don’t spray cleaners, pour any liquid, or wipe any abrasive cleaner on the screen or any surface of the Tablet PC. Don’t use tissues or paper towels to clean the screen. They contain wood fibers that may scratch the surface. Will scratches affect the performance of the display or digitizer? • Our testing has not found appreciable loss of performance on a scratched display.
Index A Airplane mode 23 ambient light sensor 9 audio drivers 67 troubleshooting 66 audio in/out port 12 B backing up your system 52 File History 52 barcode scanner 39 battery checking status 42 conditioning 59 health 59 hot-swapping 44 optimizing 45, 67 swapping 44 tips 45 troubleshooting 62 using 42–45 battery gauge charging indicator 13 BIOS password 67 blinking power button 62 Bluetooth 48 discovery 65 setting up 66 tips 66 troubleshooting 65 brightness adjust 27 buttons configuring 23 using 32 C cam
F M features optional 7 fingerprint reader 12, 48 tips 49 flicks settings 21 free downloads 56 front panel buttons configuring 23 Function buttons 32 configuring 32 Function button 1 9, 32 Function button 2 9, 32 Function button 3 9, 32 using 32 microphone rear 11 microphones 34 front 9 using 34 mobile broadband connecting to 23 mobile broadband with GNSS troubleshooting 66 mobile Broadband with GNSS module 7 mobile Broadband with GPS module 47 Motion Computing applications Know Your Motion Tablet 28 Mot
pen and touch settings 21 pen bay 12 pen tether 17 pen tether anchor 12 power adapter port 12 power button 46 blinking 62 change behavior 27 power plan change 26 create 27 customize 27 Motion Optimized 26, 46 Power Saver 67 power settings 25 Power Switch on battery or plugged in 46 R R12 locating serial number 51 overview 9 back view 11 front view 9 left view 12 right view 12 setting up 13 recovery drive creating 53 refresh your PC 54 reset your PC 54 using 54 using a Windows 8 recovery drive 54 recovery i
taking a photo 35 text entering 29 touch pointer, adjusting 22 pointer, show or hide 22 troubleshooting 63 touch settings 22 touchscreen display 10 caring for 58 TPM 8 training classes corporate 68 training tutorials 68 traveling with your tablet PC 60 troubleshooting audio 66 battery 62 display 63 input 63 U USB troubleshooting 64 USB port 12 Index using microphones 34 power plans 46 sleep mode 46 using a Windows 8 recovery drive 54 V volume buttons 11 W web camera 10, 34 light 10 Wi-Fi troubleshootin