
User's Guide


Chapter 1 Getting Started Optional setup tasks 17
Optional setup tasks
Create a recovery image
Once you’ve set up your R12 the way you like it, including installing your applications,
create a system image on an external USB drive. This is a safety measure in the event that
your system stops working.
A system image is an exact copy of a drive and includes Windows 7, your system settings,
programs, and files. For more information, see Creating a system image on page 57.
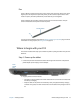
Attach the pen tether
The R12 pen comes with a tether so that you can attach the pen to your tablet to avoid
misplacing it.
To attach the pen tether:
1. Slip one end of the tether through the hole at the end of the pen, then pull the pen
through the loop until it is tight.
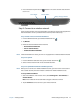
2. Slip the other end of the tether through the attach point on the R12, then pull the pen
through the loop until it is tight.
You can purchase additional pen tethers from the Motion Computing Accessories page.
Connect the tablet to a docking station
A variety of docking solutions for the R12 are available for purchase on the Motion
Computing Accessories page.
The docking station for the R12 adds functionality to your tablet, including port expansion
for Ethernet, VGA and HDMI monitors, and USB devices such as printers, keyboards, and
mice. The docking station also charges the tablet and includes a charging bay for an extra
battery. Mobile docks are also available for your R12 and enable you to mount your Tablet
PC in a variety of vehicles. For details on installing and using the docking station, see the
User’s Guide that accompanies your docking station.
Connect the tablet to a display monitor
Connect a display monitor to your R12 Tablet PC using either the VGA or HDMI port located
on the docking station.
After connecting the monitor, set up the external display from the Motion Dashboard as
described in Setting up an external display on page 31.