
User's Guide

Chapter 1 Getting Started 5
Setting up the LE1700
The LE1700 is self-contained, so you can start using it immediately. You should connect AC
power until the battery is fully charged. Use the following steps to get started:
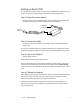
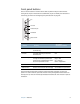
Step 1: Plug in the power adapter
• Plug the power cord in to the power adapter. Insert the power cord into an outlet and
the power adapter plug into the power adapter port on the Tablet PC.
Step 2: Connect the cables
• If you want to connect your Tablet PC to a network, insert an Ethernet cable into the
Ethernet port.
To connect to a wireless network, see “Using Wi-Fi (802.11a/b/g)” on page 47. To connect
using docking stations and other accessories, refer to the documentation for that product.
Step 3: Turn on the Tablet PC
• Slide the power switch on.
As the Tablet PC starts, the power light comes on.
The first time Windows starts, the Windows Vista Welcome Center appears. If you do not
want this screen to appear every time you start the computer, clear the Run at startup
check box. To return to the Welcome Center later, go to System and Maintenance in Control
Panel.
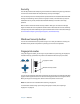
Step 4: Calibrate the digitizer
With a Tablet PC, you frequently use a tablet pen instead of a mouse and keyboard for input.
Use the pen to move the pointer around the screen, and tap the screen to click. Use
Tablet PC Input Panel and handwriting recognition to enter text.
The digitizer detects the position of the pen on the display. You should calibrate the
digitizer the first time you start the Tablet PC, and again whenever the pointer does not
align with the pen tip.
To Tablet PC
To wall
outlet
power port