
Instruction Manual
Chapter 1 Getting Started Optional setup tasks 14
Optional setup tasks
Create a recovery image
Once you have configured your J3600 Tablet PC—including installing your applications—
create a system image on an external USB drive. This is a safety measure in case your system
stops working.
A system image is an exact copy of a drive and includes Windows® 7, your system settings,
programs, and files. For more information, see Creating a system image on page 67.
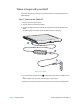
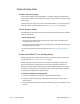
Attach the pen tether
The J3600 digitizer pen comes with a tether so that you can attach the pen to your Tablet PC
to prevent misplacing it.
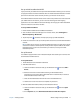
To attach the pen tether:
1. Slip one end of the tether through the hole at the end of the pen, then pull the pen
through the loop until it’s tight.
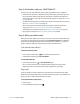
2. Slip the other end of the tether through the attach point on the J3600 then pull the pen
through the loop until it’s tight.
You can purchase additional pens and tethers from the Motion Computing Accessories
page.
Connect the Tablet PC to a docking station
The docking station for the J3600, called a FlexDock, is a separate accessory that you can
purchase from the Motion Computing Accessories page.
The docking station adds functionality to your Tablet PC, including port expansion for
Ethernet, VGA monitors, and USB devices such as printers, keyboards, and mice. The
docking station also charges the Tablet PC and includes a charging bay for an extra battery.
For details on installing and using the docking station, see the J-Series Tablet PC FlexDock
User’s Guide that accompanies the docking station.
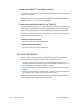
To connect the Tablet PC to a docking station:
1. Connect the AC adapter to the port on the back of the docking station.
2. If desired, connect a mouse and/or a keyboard to the USB ports on the back of the
docking station.
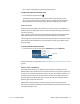
3. Hold the J3600 upright and, with the front of the dock facing you, slip the Tablet PC into
the dock.