J3400 Tablet PC User’s Guide
© 2009 Motion Computing, Inc. All rights reserved. This document contains information protected by copyright. No part of this document may be reproduced in any form without written consent from Motion. The information in this document is provided “as is” and is subject to change without notice. Motion is not liable for errors or omissions in this document. Motion, Motion Computing, Speak Anywhere, and View Anywhere are trademarks or registered trademarks of Motion Computing, Inc. in the U.S.A.
Contents Chapter 1 Getting Started . . . . . . . . . . . . . . . . . . . . . . . . . . . 1 Finding information . . . . . . . . . . . . . . . . . . . . . . . . . . . . . . . . . . . . . . . . . . . . . . . . . . . . . . . . . . . . . 1 Overview. . . . . . . . . . . . . . . . . . . . . . . . . . . . . . . . . . . . . . . . . . . . . . . . . . . . . . . . . . . . . . . . . . . . . . . . 2 Setting up the J3400. . . . . . . . . . . . . . . . . . . . . . . . . . . . . . . . . . . . . . . . . . . . . . . . . . .
Chapter 3 Using your Tablet PC . . . . . . . . . . . . . . . . . . . .23 Using Motion Dashboard . . . . . . . . . . . . . . . . . . . . . . . . . . . . . . . . . . . . . . . . . . . . . . . . . . . . . . . 24 Using the Motion utility in the notification area . . . . . . . . . . . . . . . . . . . . . . . . . . . . . . . . . 25 Using the pen . . . . . . . . . . . . . . . . . . . . . . . . . . . . . . . . . . . . . . . . . . . . . . . . . . . . . . . . . . . . . . . . . . 25 Using Tablet PC Input Panel . . . .
Setting up a hard disk drive (HDD) password . . . . . . . . . . . . . . . . . . . . . . . . . . . . . . . . . 53 Using Wi-Fi (802.11a/g/n) . . . . . . . . . . . . . . . . . . . . . . . . . . . . . . . . . . . . . . . . . . . . . . . . . . . . . . . 54 Enabling or disabling Wi-Fi . . . . . . . . . . . . . . . . . . . . . . . . . . . . . . . . . . . . . . . . . . . . . . . . . . 54 Setting up a Wi-Fi connection. . . . . . . . . . . . . . . . . . . . . . . . . . . . . . . . . . . . . . . . . . . . . . . .
Appendix A Troubleshooting and Support. . . . . . . . . .67 Troubleshooting . . . . . . . . . . . . . . . . . . . . . . . . . . . . . . . . . . . . . . . . . . . . . . . . . . . . . . . . . . . . . . . 67 Power . . . . . . . . . . . . . . . . . . . . . . . . . . . . . . . . . . . . . . . . . . . . . . . . . . . . . . . . . . . . . . . . . . . . . . 67 Battery. . . . . . . . . . . . . . . . . . . . . . . . . . . . . . . . . . . . . . . . . . . . . . . . . . . . . . . . . . . . . . . . . . . . . . 68 Display.
Getting Started 1 The Motion Computing J3400 is a full-featured Tablet PC, combining performance, long battery life, and a lightweight, sleek design. The J3400 offers the latest innovations in mobile computing: a user-focused design, unmatched mobility, and state-of-the-art security. If you are new to Tablet PCs, use the information in this section to get started quickly. If you are already familiar with tablet computers, you can skip to the next chapter to learn about the features of the J3400.
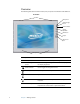
Overview The following illustrations show the buttons, slots, and ports on the Motion J3400 Tablet PC. Front View Speakers Microphone Ambient light sensor Camera shutter Motion QuickNav Dashboard Escape Directional pad Microphones 2 Speakers Listen to music or other audio. Microphones Record sounds and use for speech recognition. Ambient light sensor Measures background light and can automatically adjust the display brightness. Camera shutter Use to trigger the integrated camera.
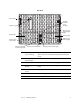
Rear View Camera light FlexDock connector (cover showing) Camera lens Battery power indicator lights (right) Battery (left) Battery (right) Battery gauge button (right) Battery gauge button (left) Battery power indicator lights (left) Battery release switch (left) Battery release switch (right) FlexDock connector (cover showing) Connects to the FlexDock when docked.
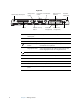
Right Side Shoulder strap attach point Battery status light Air vent 4 Fingerprint reader Windows Security button Power button Smart card slot (optional) Card slots cover removed Express card slot (optional) Pen tether attach point Pen Shoulder strap attach point Attach point for the shoulder strap. Air vent Dissipates heat from the tablet. Battery status light Indicates amount of remaining battery power. Windows Security button Use to log on to or lock your tablet.
Left Side Air vent Security slot Headphone port Microphone port USB ports Ethernet port Video port (VGA) Port covers removed Power adapter port Shoulder strap attach point Security slot Connect a security cable to protect your tablet from theft. Air vent Dissipates heat from the tablet. Audio in/ Microphone port Connect a microphone or other audio source using a 3.5 mm jack. Audio out/ Headphone port Connect headphones, speakers, or audio equipment using a 3.5 mm jack.
Setting up the J3400 The J3400 is self-contained, so you can start using it immediately. You should connect AC power until the battery is fully charged. Use the following steps to get started: Step 1: Plug in the power adapter • Plug the power cord into the power adapter and the tablet, then plug the power cord into an outlet. Step 2: Connect the cables • If you want to connect your Tablet PC to a network, insert an Ethernet cable into the Ethernet port.
Step 3: Turn on the Tablet PC • Press the power button. As the Tablet PC starts, the power light comes on. The first time Windows starts, the Windows Vista Welcome Center appears. If you do not want this screen to appear every time you start the computer, clear the Run at startup check box. To return to the Welcome Center later, go to System and Maintenance in Control Panel. Step 4: Calibrate the digitizer With a Tablet PC, you frequently use a tablet pen instead of a mouse and keyboard for input.
8 Chapter 1 Getting Started
Features 2 The Motion Computing J3400 Tablet PC has the power and features of a notebook computer, while giving you the added mobility and versatility of a tablet computer. Use the information in this chapter to get more familiar with the hardware features of your J3400 Tablet PC, such as buttons, slots, connectors, and wireless adapters. The J3400 Tablet PC includes the following integrated features: • Intel® Core™2 Duo Processor • Mobile Intel® GS45 Express Chipset • Wi-Fi (802.
Pen An important difference between traditional PCs and Tablet PCs is that you frequently use the tablet pen to interact with the computer instead of a mouse and keyboard. The pen includes a pressure-sensitive tip, a function button and an eraser. The pen contains no batteries and requires no external power. Eraser Function button Tip For information about using the pen, see “Using the pen” on page 25.
Front panel buttons You can use the buttons on the front of the tablet to perform many functions without having to use the pen. The buttons are customizable, so you can modify their functions to suit the way you work. See “Configuring front panel buttons” on page 28. Camera shutter Motion QuickNav Dashboard Esc Directional pad Button Primary Secondary (Press and hold button for one second) Camera shutter Use to trigger an exposure in the built-in camera. Opens Windows Photo Gallery.
Battery status light You can use the indicator light on the right side of the tablet to monitor the status of the battery. The following illustration and table show the battery status light and the various power state descriptions. Battery status light Status 12 Description Steady green The battery is fully charged and the tablet is running on AC power Steady amber One or more batteries charging Off Not charging. The tablet is running on battery power.
Motion QuickNav Motion QuickNav allows you to quickly enter text using a selection of numeric pads or QWERTY keyboard layouts, in addition to giving you quick access to the J3400 Camera*, Audio, and GPS*. For example, you can quickly snap a picture using the camera button or QuickNav num pad, record or playback a voice note, or acquire GPS location and launch a web browser. To start Motion QuickNav • Press the Motion QuickNav quick-launch button or go to Start -> All Programs.
Camera You can use the built-in 2-megapixel auto-focus camera to take pictures and save them to the hard disk drive. The camera lens is on the back of the unit, and includes a light to illuminate the subject. The camera produces pictures in JPG format with a resolution up to 1600 × 1200 pixels. The following table shows detailed specifications for the camera. Item Value Sensor array CMOS sensor 2.0 megapixel Pixel size 2.2μm x 2.2μm Optical format 1/4” S/N ratio 40dB F number 2.
Security The J3400 provides a safe computing environment that enables strong security protection and serves as the foundation for complementary security technologies. The core security features include InsydeH20 Extensible Firmware Interface (EFI) BIOS, a built-in fingerprint reader, a universal security lock, the Dashboard Security Center, TPM (Trusted Platform Module), and a Smart Card-ready platform.
Display The J3400 includes a 12.1-inch display with the following features: • A highly readable LCD (liquid crystal display). • WXGA, 1280 × 800 resolution. • A protective layer that offers a firm writing surface and minimizes glare. • A digitizer panel that enables handwritten entry with the tablet pen. View Anywhere display (optional) The View Anywhere™ display option enhances outdoor viewing and bright-light viewing environments.
Ambient light sensor (ALS) If you have dynamic brightness selected and are running on battery power, the ambient light sensor measures the surrounding light and adjusts the display brightness and contrast accordingly. This ensures that you have proper settings for all lighting conditions. To enable dynamic brightness, see “Adjusting the display brightness” on page 32.
Security slot You can use the security slot to attach your tablet to a desk, table or other fixture. You must purchase a security lock separately. VGA port You can use the VGA port to connect standard VGA monitors. When you attach an external monitor, you can use the external monitor only, or the external monitor and the Tablet PC display together. See “Setting up an external display” on page 33.
Express card slot (optional) The Express card slot holds one Express card for networking, memory expansion, or accessories. • To insert an Express card, remove the card slot cover and place the Express card in the slot with the label side up. • To remove the card, pull the card out of the slot and replace the card slot cover. The J3400 includes a cover for the Express card slot. To protect the Express card slot, you should leave the cover in place when you do not have an Express card in the slot.
Mobile Broadband (optional) The J3400 Tablet PC is available with an optional Mobile Broadband adapter that you can use to send and receive data wirelessly. By using Mobile Broadband, you can browse the Internet, send and receive email, connect to your company’s intranet, or use Web-based applications. Mobile Broadband is based on cellular network technology, so you can use it in more places than other wireless technologies.
Battery The J3400 includes two battery bays for containing up to two high-capacity Lithium-ion batteries that are installed on the back of the Tablet PC. If only one battery is included with the tablet, a battery bay cartridge (non-functioning) is included for occupying the second battery bay. Do not discard the battery bay cartridge.
J-Series Mobile Keyboard (optional) The J-Series Mobile Keyboard is a thin-profile, portable, full size keyboard solution for entering data in the J-Series Tablet PC. When in the closed position, the Mobile Keyboard has a thin profile and can be attached to the back of the J-Series Tablet PC for easy transporting. When opened, the Mobile Keyboard provides a stable docking tray for mounting the J-Series Tablet PC and a full size keyboard for easy data entry.
Using your Tablet PC 3 The J3400 Tablet PC runs Microsoft Windows Vista, which includes ink-to-text and word recognition, voice recognition, and improved security to help defend against viruses, worms, and other threats. And unlike PDAs or other handheld devices, the J3400 can run any Windows Vista-compatible application.
Using Motion Dashboard Motion Dashboard puts many common tablet-related settings and tasks at your fingertips. For example, you can enable or disable Bluetooth and Wi-Fi, calibrate the digitizer, or check your remaining battery power. To start Motion Dashboard • Press the Dashboard button ( ) on the front of the tablet. Dashboard When you change a setting on Motion Dashboard, the change occurs immediately. You do not need to tap Apply or OK. For more information, see Motion Dashboard Help.
Using the Motion utility in the notification area You can click on the Motion utility icon ( ) in the notification area ( ) to access the following features: • Battery Health Selecting this option opens a window that shows information about correct battery conditioning to prolong the life of the battery and shows the current battery charge level. • Motion Dashboard Selecting this option opens the Motion Dashboard.
Store the pen in the pen bay when not in use. To store the pen in the pen bay, insert it into the bay and press it until it clicks. To remove the pen, press it again. If you have the pen tether attached, ensure that you have released the pen before you pull it out using the tether. The pen includes extra tips. You can use the included replacement tool to change the tips. See “Replacing pen tips” on page 63. Important: The Tablet PC responds only to the tablet pen.
Using Tablet PC Input Panel You can use Tablet PC Input Panel instead of a keyboard to enter text on your Tablet PC. Use the writing pad or the character pad to convert your handwriting to text, or tap characters using the on-screen keyboard. The following illustration shows Input Panel open to the writing pad. Writing pad Character pad On-screen keyboard To start Input Panel • Do one of the following: – Tap at the place you want to enter text, such as a text box.
Using personalized handwriting recognition You can use the Tablet PC Settings window to enable personalized handwriting recognition to improve your handwriting results. First enable personalized handwriting recognition 1. Open Motion Dashboard to the Pen & Tablet panel (page 24). 2. Tap the Tablet PC Settings button. 3. In the Tablet PC Settings window, tap the Handwriting Recognition tab. 4. Select Use the personalized recognizer and follow the instructions.
For some actions, you must enter more information, such as the location of a program to start. You can select an action for Press and another for Press and hold. For more information, tap What is press and hold? Using Motion QuickNav Motion QuickNav provides a Windows Vista interface for entering text, launching email, taking pictures with Geo Tag, and other features. You can create shortcut keys to launch applications you use most often.
Using the camera You can use the built-in camera to take pictures. For more information about the camera, see “Camera” on page 14. To use the camera 1. Press the Camera button to activate the camera and open the viewfinder. Note: If a picture is not taken after a short period, the viewfinder will automatically close. If this occurs, repeat step 1. 2. Press the Camera button again to take a picture. 3.
• Ensure you have adequate lighting. • You can use the Pictures window to take and review multiple pictures. Use the slider bar at the bottom of the Pictures window to switch among active pictures. Using the smart card reader (optional) Some tablets contain the optional smart card reader. Using smart card software, this device reads information from the smart card when the card is inserted into the reader.
Using the Express card reader (optional) The Express card slot holds one Express card for networking, memory expansion, or accessories. • To insert an Express card, remove the card slot cover and place the Express card in the slot with the label side up. • To remove the card, pull the card out of the slot and replace the card slot cover. The J3400 includes a cover for the Express card slot.
Rotating the display You can easily change the screen orientation to fit your current task. You may want to use the portrait orientation for filling out forms or reading an e-book. At other times, you may want a landscape orientation for Web browsing or sketching. To rotate the display 1. Open Motion Dashboard to the Display panel (page 24). 2. Tap the Rotate button. Note: If you change the screen orientation, you may need to recalibrate the tablet pen. See “Calibrate the digitizer” on page 7.
5. For Display Scheme, select one of the following: • Mirror Display. Duplicates the Tablet PC display on the external monitor or projector. The same desktop is visible on both displays. The external monitor must use the same display resolution as the Tablet PC. Document Document External monitor Tablet PC • Extended with Monitor Primary. Enlarges the desktop area to include the external monitor as the primary monitor. The external monitor can use a different display resolution than the Tablet PC.
You can connect an external microphone or headset to the microphone port using a 3.5 mm plug. When a microphone is connected, the internal microphones are disabled. Using speech recognition You can use speech recognition to interact with your Tablet PC by voice. You can dictate documents and emails, or use voice commands to control programs. • Dictation mode. With Dictation mode, your computer listens to everything you say and converts your words to text.
Taking the Speech Tutorial You can use the Speech Tutorial to learn basic commands and dictation. The Speech Tutorial takes about 30 minutes to complete. To take the speech tutorial 1. In Control Panel, open Speech Recognition. 2. Tap Take Speech Tutorial. 3. Follow the instructions in the tutorial program. Using Dictation and Voice Commands After you have set up speech recognition, you can start it from Control Panel. To use Dictation and Voice Commands 1. In Control Panel, open Speech Recognition. 2.
3. On the Power Options page, select a power plan. For information about creating a custom power plan, see “Creating a power plan” on page 37. Changing power plan settings You can edit the particular settings of an existing power plan. To create your own power plan, see “Creating a power plan” on page 37. To change power plan settings 1. Open Motion Dashboard to the Power panel (page 24). 2. Tap the Power Options button. 3.
5. In the Plan name box, enter a name for the plan, and then click Next. 6. Choose the settings that you want your computer to use, then click Create. Using Sleep Sleep is a state in which your display and hard disks turn off, so that your computer uses less power. When you want to use the computer again, it comes out of Sleep quickly, although you may have to log on again. Use Sleep to save power when you will be away from the computer for a short time.
3. Do one or more of the following: • For Power Switch on battery, select Hibernate. • For Power Switch plugged in, select Hibernate. 4. To put your computer on Hibernate, press the power button. To turn your computer back on, press the power button. Using the battery The Tablet PC runs on battery power when it is not plugged in. The battery, included with the Tablet PC, is installed on the back of the tablet. To increase your battery life, you can install a second battery in any of the two battery bays.
For each battery, you can check the remaining battery power from the battery itself. To check the battery status using the gauge on the battery • Locate the battery gauge button and the battery power indicator lights and press the battery gauge button. The indicator lights show the remaining charge. Each light represents approximately 20% of the available charge.
cools to room temperature before recharging it. For more information, see the Safety and Regulatory Guide included with the Tablet PC. Battery and power management tips • To lengthen the battery’s usable life, use AC power when you can. The battery will charge automatically while you run on AC power, so leave the battery in the tablet while you are working. • For optimal battery life, use AC power when using a CD or DVD player.
Removing and replacing the battery You can remove the battery to check the remaining power, or to replace it with a fully charged battery. To remove the battery 1. Ensure that the Tablet PC is plugged in to AC power or turned off. 2. Turn the Tablet PC over so that the back side is up. 3. For the battery you want to remove, slide the battery release switch until the battery is partially ejected, and then pull the battery out of the battery bay.
To determine which battery needs to be replaced, see “Checking battery power” on page 39. Important: Use only Motion Computing J-Series batteries with the J-Series Tablet PC. Battery maintenance To maximize the performance of the tablet batteries, deplete each battery’s charge level to less than 10% every 30 days. To deplete the charge, install the battery on the tablet and use the tablet without AC power until the battery charge is depleted to less than10%.
Removing and replacing the SIM To remove and replace the SIM, perform the following procedures. To remove the SIM 1. Turn off the tablet. 2. Remove the battery or battery bay cartridge (non-functioning) from the right battery bay. Slide the battery release switch until the battery is partially ejected, and then pull the battery out of the battery bay.
3. Lift the corner of the plastic film covering the SIM slot and slide the SIM out of the slot. SIM 1 2 SIM slot SIM SIM 4. If you are not replacing the SIM, replace the battery or battery bay cartridge by placing the two tabs of the battery or battery bay cartridge into the two slots in the battery bay, and then press the other end of the battery into the battery bay until you hear a click or feel the battery lock into place. If you are replacing the SIM, perform the following procedure.
To replace the SIM 1. With the tablet turned off and the battery or battery bay cartridge removed from the right battery bay, lift the plastic film covering the SIM slot and slide the SIM into the slot with the metal contacts facing downward and the notched corner positioned as shown in the illustration. SIM slot 1 SIM Notched corner of SIM 2 SIM 2.
Using Motion OmniPass and the fingerprint reader Motion OmniPass offers a secure and convenient system for managing your passwords and providing confidentiality for your sensitive data through file encryption. To start Motion OmniPass • In the notification area, double-tap the Motion OmniPass icon ( ). You can also start Motion OmniPass from the Security panel of Motion Dashboard. To create a new user and capture a fingerprint in OmniPass, see “Capturing a fingerprint” on page 47.
4. Place the selected finger over the fingerprint reader and slowly drag your finger across the sensor in a downward motion or in an upward motion. If the capture is successful, a green fingerprint image will appear in the capture area. If the capture is unsuccessful, follow the instructions on the screen to improve the scan. After you have successfully captured your fingerprint, scan your fingerprint one more time for verification. 5.
Fingerprint reader tips • Be consistent. Hold your finger and scan at the same angle each time. For example, if you enroll your finger with your hand open, hold your hand this way each time you scan. • The scanner is bi-directional. You can move your finger in an upward or downward motion across the sensor. • Read the prompts carefully and ensure that you wait for the prompt before you swipe. • Swiping too fast or too slow can make a capture unsuccessful.
6. If prompted, swipe your fingerprint or enter your master password to authenticate these settings. Using the password wizard Certain applications require more sophisticated user input for authentication. For these applications, you may need to use the password wizard to set up password replacement. To run the password wizard 1. Start Motion OmniPass (page 47). 2. In the left pane, tap Password Wizard. 3. Follow the instructions in the wizard program.
Using Windows Security Center Windows Security Center provides a central location for you to manage your computer’s security settings and learn more about improving security. If a problem is detected (such as an out-of-date antivirus application), the Security Center sends you an alert and provides recommendations for how to remedy the situation. Windows Security Center manages the following: • Windows Firewall.
Setting up Windows user accounts You can use Windows user accounts to help secure the files on your computer from other users. You must have an administrator account on the computer to add a new user to the computer. To set up a Windows user account 1. In Control Panel, open User Account Control Panel. 2. Tap Manage another account. 3. Tap Create a new account. 4. Enter the appropriate information for the new user account and tap Create Account.
Setting up a hard disk drive (HDD) password You can use a HDD password to protect the computer and the hard disk drive. The computer cannot be started without the HDD password, and the data on the disk drive cannot be accessed, even if it is removed and attached to a different computer. To set up a hard disk drive password 1. Start the Tablet PC. 2. When the Motion Computing splash screen appears, press the Dashboard button ( ). When access is enabled, you will hear an alert sound.
Using Wi-Fi (802.11a/g/n) Use the information in this section to set up a Wi-Fi connection. Wireless access requires an 802.11a, 802.11g, or 802.11n access point. Internet access requires a working Internet connection. DANGER: FAA regulations require that you disable any wireless connection when traveling by air. Failure to disable the wireless connection on the Tablet PC while traveling by air can cause communications problems with aircraft instruments.
Activating your Mobile Broadband service Before you can use the Mobile Broadband service, you must activate your service with the service provider you chose when you ordered your Tablet PC. You may be able to activate your service using the connection manager, or you may have to call your service provider to activate. For more information about starting the connection manager, see the Mobile Broadband document in the Tablet PC box.
Enabling or disabling Bluetooth Before you can set up a Bluetooth device, you must enable the Bluetooth adapter on the Tablet PC. After you enable Bluetooth, the Bluetooth icon ( ) appears in the notification area. You can tap on this icon to get shortcuts to the Bluetooth Settings window, the Bluetooth File Transfer Wizard, and the Add New Connection Wizard. To enable or disable Bluetooth 1. Open Motion Dashboard to the Wireless panel (page 24). 2. Select or clear Enable Internal Bluetooth Wireless.
The Bluetooth device is ready to use. Paired devices are shown in the Bluetooth Settings window. The following illustration shows a Bluetooth Settings window with a Bluetooth keyboard and mouse. If the device is not discovered… If the Bluetooth device is not detected after multiple attempts, try the following: • Ensure that Bluetooth is enabled (page 56). • Ensure that the device you are adding is discoverable. See the manufacturer’s documentation for more information.
Bluetooth wireless tips Motion Computing and its Bluetooth partners have worked to ensure a positive experience with this technology, and to ensure Bluetooth interoperability. In doing so, we have found the following issues: • If you are running Bluetooth and Wi-Fi at the same time, interference can affect the Bluetooth performance. This is most noticeable when you try to transfer large amounts of data, such as file transfers or printing large documents.
Care and Maintenance 4 Proper care and maintenance will keep your Tablet PC working and in good condition for a long time. For general information about care of the Tablet PC and its components and accessories, see the Safety and Regulatory Guide included with your Tablet PC. This chapter describes the care and maintenance procedures for your XX1x00 Tablet PC. WARNING: Follow the guidelines listed below when caring for your Tablet PC and its components.
Standard display • Clean fingerprints and most marks from the display surface by wiping it with the soft cloth (provided). Never spray or pour liquids directly onto the display surface itself. Never use an abrasive cleaner on the display. If liquid is spilled on the display, wipe it up immediately. • If needed, spray a soft cloth (not directly on the display) with a window-type cleaner and wipe the display. • Avoid using tissues or paper towels to clean the display surface.
Cleaning in a health care environment This section describes the cleaning procedures for a Tablet PC in a health care environment. Disinfecting procedures You should periodically disinfect the tablet according to the institutional polices of surface and equipment safety and cleanliness.
Cleaning solutions This section describes various cleaning solutions that have been tested by Motion Computing. Please review the manufacturer's guidelines for proper use of the product. Reference: http://www.motioncomputing.com/products/tablet_pc_c5.asp Product Type Manufacturer Comments Alcohol Prep Pads Dynarex For general purpose use only. Not considered a disinfectant for health care environments. Cavi-Wipes Metrex Can be difficult to clean off. Can leave a film on the product.
Pen • Store the pen in the pen bay or in a case when not in use. • Do not store the pen vertically on the tip. Constant pressure on the tip can affect the pen-to-digitizer interaction. • Change the pen tip regularly. See “Replacing pen tips” on page 63. • Do not immerse the pen in liquid. It contains electronic components that could be damaged. • In certain environments, particles or debris can stick to the pen tip or the Tablet PC display.
Traveling with your Tablet PC Use the following tips when you travel with your Tablet PC: • Remove all accessories and cables. Remember to pack those you will need while traveling, including at least one tablet pen. • Put the Tablet PC into a portfolio or other case to protect the display. • Protect the pen by keeping it in the pen bay or in a case during travel. • Pack the Tablet PC securely in a briefcase or hand-carried luggage, and keep it separate from toiletries, liquids, and food.
Creating a backup archive If you want to roll back your tablet to a predetermined state, you can create a backup archive. To create a complete PC backup archive 1. From the Start menu, tap Backup Status and Configuration. 2. Tap Complete PC Backup. 3. Tap Create a backup now and follow the instructions to create a backup copy of your entire computer. Note: You will need an external USB hard disk drive or DVD drive attached to store the backup copy. To back up individual files 1.
To restore from your complete PC backup archive 1. After your tablet restarts after the initial BIOS display screen, press and hold the F8 key. 2. On the Advanced Boot Options screen, select Repair your computer and press the Enter key. 3. Select a keyboard layout and click Next. 4. Select a user name and enter the password, and then click OK. 5. Attach the USB hard disk drive or DVD drive that you used to store your complete PC backup archive. 6.
Troubleshooting and Support A Motion Computing Tablet PCs are thoroughly tested for performance and quality, but occasionally problems still occur. If you do not find the information you are looking for in this section, go to the Motion Computing support page at www.motioncomputing.com/ support. Troubleshooting Use the information in this section to identify and resolve common issues. If an issue has more than one potential cause, the most common cause is listed first.
The display goes black while the Tablet PC is still turned on • The computer might have turned off the display to save power. To restore the display, touch the screen with the tablet pen or press a button. • The computer might have gone into Sleep mode. In Sleep mode, the power status light flashes blue. Press and hold the power button for about one second. • The computer might have gone into low-battery Hibernation mode. In low-battery Hibernation mode, the power status light is off.
The display is too dim • The brightness may be set too low. Use Motion Dashboard to increase the brightness. See “Adjusting the display brightness” on page 32. The display is unreadable or distorted • The screen resolution and color quality may be set incorrectly. Use Windows Display Properties to reset the display settings. 1. In Control Panel, open Personalization. 2. Tap Display Settings. 3. For Resolution, select the appropriate resolution for your display (1280 × 800 for WXGA displays). 4.
The pen function button does not work • The pen function button may not be enabled. – You can use the Pen and Input Devices window to enable the button. Open Help and Support and search for “Pen and Input Devices “. • You may not be pressing the button early enough. Try pressing the pen function button before you touch the pen to the display surface. The eraser does not work • The eraser may not be enabled. – You can use the Pen and Input Devices window to enable the eraser.
I cannot connect to a network using the Ethernet adapter • The Ethernet cable may not be connected properly. Remove and reconnect the Ethernet cable or replace the cable. Audio No sound is coming from the built-in speakers • Ensure that nothing is connected to the audio out port. Connecting headphones or external speakers disables the built-in speakers. Disconnect the headset or external speakers if not in use. No sound is coming from any speakers • The volume may be set too low or muted.
Frequently asked questions How can I make the battery charge last longer? • For maximum conservation, you can use the Power saver power plan. See “Selecting a power plan” on page 36. • Use the Dynamic brightness display setting. This automatically controls the display brightness to conserve power. See “Adjusting the display brightness” on page 32. • Set the display brightness to the dimmest level you are comfortable with. See “Adjusting the display brightness” on page 32.
system into suspend or shutting it down. Connecting through legacy ports such as serial, parallel, and PS2 often requires suspending or restarting the system, which prevents you from moving between desktop mode and mobile mode seamlessly in one docking/ undocking step. How do I adjust the Tablet PC for left-handed use? • Open the Tablet PC Settings window. You can select left- or right-handed and change the location of the menus.
74 Appendix A Troubleshooting and Support
Index Numerics 10/100/1000 Base-T Ethernet about 18 using 29 802.
digitizer pen about 10, 25 calibrating 7 directional pad 2, 11 disabling the eraser 27 the pen button 27 display about 16 brightness 32 dynamic brightness 32 extended 34 features 16 fixed brightness 32 mirrored 34 rotating 33 using 32 disposing of used batteries 43 docking port 5, 18 document, about 1 dynamic brightness 32 E enabling 802.
LCD P about 16 care and cleaning 60 View Anywhere 16 Li-ion battery 21 liquid crystal display See LCD Lithium-ion battery See Li-ion battery logging on to a remembered site 50 password replacement about 49 using 50 pen 4 about 10, 25 actions 10, 25 calibrating 7 care and maintenance 63 configuring options 27, 28 storing 26 tether 26 Pen and Button Options 27, 28 pen tether 4 plug 20 port covers 5 portrait mode 33 power adapter about 20 port 5 power button 4 power cord about 20 M maintenance backup 65 re
setting up 802.
wireless 802.
80 Index