
Installation Guide

Option A
32 4 5 6
7
8 9 10 11 12 13
32 4 5 6
7
8 9 10 11 12 13
32 4 5 6
7
8 9 10 11 12 13
Option B
Step 1: Measure the area to be cut and
covered with the panel. This can be done
either by
A. Placing the access panel against the wall
and drawing around the lip of the panel to
mark the area to be cut, or
B. Using a tape measure to draw lines that
mark the area to be cut. Be sure not to
over-cut the measurement of the lip of the
panel to ensure a snug t.
Step 2: Cut around the area you just marked.
Make sure the frame ts well into the
opening, and it has the desired hinge
orientation. Shims can be used to further
ne-tune positioning.
Lightly sand around the edges if needed.
CAUTION: Be sure to cut carefully and avoid
damaging any wires, pipes, etc. in the wall.
Step 3: Apply construction adhesive to the
inner lip of the panel.
Step 4: Push the panel frame into the hole.
Remove any displaced adhesive with a
damp cloth.
Note: Allow the adhesive to fully cure as
indicated in its directions for use.
Lastly, click the door intothe frame by
clicking the protruding ball into the
corresponding indentation.
MORVAT 6x9 Access Panel User Guide & Care Instructions
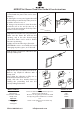
What You’ll Need:
Pen / Pencil
Drywall saw
Construction adhesive
Damp cloth
Optional:
Measuring tape
Level
Sand paper
©MORVATBRANDS
Note:
Panel can withstand temperatures up to 90°
Celsius / 194° Fahrenheit.
The door can be gently opened at the small
slots by using a at screwdriver or a similar
tool.
Panel can be painted over to match any
decor.
info@morvat.com
ITEM #: MOR-PAP-69-A
Available in sizes:
6”x9”
8”x8”
12”x12”
14”x14”
1
2
3
4
1
2