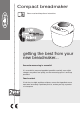
Compact breadmaker Please read and keep these instructions getting the best from your new breadmaker... Accurate measuring is essential It is essential to measure ingredient quantities carefully, even slight changes may effect loaf quality, use the measuring spoon’s and cup provided. Yeast content If loaf rises too high and then collapses ensure the ingredients were measured accurately. If problem persists, reduce yeast by a quarter of a teaspoon.
Important safety instructions Other safety considerations The use of any electrical appliance requires the following of basic common sense safety rules. Primarily there is danger of personal injury and secondly the danger of damage to property and the appliance. These are indicated in the text by the following two conventions: WARNING: Danger of personal injury IMPORTANT: Damage to the appliance In addition we offer the following essential safety advice.
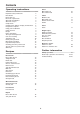
Contents Operating instructions Important safety instructions Introduction Before first use Electrical requirements About this breadmaker About the recipes Components Control panels buttons, display and functions Program descriptions Using your breadmaker Using the timer Beeper Power interuption Slicing and storing bread Care and cleaning Storing the unit Know your ingredients Measuring ingredients Ingredient temperatures Creating your own yeast breads Special glazes for yeast breads Other tips 2 4 4 4 4 4
Introduction The smell of homemade bread wafting around the home is one of those great smells. Bread, fresh out of the oven, with melting butter is a memorable taste sensation. The Belling automatic breadmaker can create that experience every morning. There's very little effort on the part of the baker, because the breadmaker is a sophisticated appliance with a computer memory that does all the work for you. It’s as simple as one-two-three. 1 Put in the ingredients.
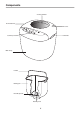
Components Viewing window Removable lid Air vents Lid handle Control panel Main body Handle Baking pan Kneading blade Rotating shaft 5
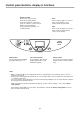
Control panel buttons, display & functions Display window Shows crust colour selected Shows the program number Shows time left before completion (3:20, for example, is 3 hours and 20 minutes; 0:20 is 20 minutes) Shows temperature warning - see ‘Troubleshooting’ Menu button For choosing the bread making program from the list 1 to 9 Timer delay buttons Use to delay the start of bread making (all programs except Fastbake and pasta) Start Press to start for approx 1 second, a beep sounds and the colon (:) f
Program descriptions 1 Basic white (2:50) For white and brown bread. Also for flavoured breads with added herbs and raisin. 2 Wholewheat (4:30) For the baking of bread containing significant amounts of wholewheat. This setting has longer preheat time to allow the grain to soak up the water and expand. The kneading blade does not turn during this 30 minute rest period. It is not advised to use the delay timer as this can produce poor results.
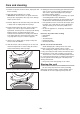
Using your breadmaker 1 Take out the pan Open the lid and remove the pan by lifting the handle, and lifting out. Place on the work surface. It is important that the pan is filled with ingredients outside the machine so that any accidental spillage is not ignited by the heating elements. 11 Finish When the program is completed and the bread is baked the display shows the default program time and the beeper will sound.
Using the timer Use the timer when you want the bread ready later, or in the morning. A maximum of 12 hours can be set. Check if function is available by consulting ‘Baking cycle times’ section. Do not use this function with recipes that use perishable ingredients such as eggs, fresh milk, sour cream, or cheese. 1 Decide when you want the bread to be ready and calculate the difference in time between now and then. For example, if you want a loaf at 8am, and it is now 8.30pm, the difference is 11 1/2 hours.
Care and cleaning 1 Caution: To prevent electrical shock, unplug the unit before cleaning. 2 Wait until the breadmaker has cooled. • IMPORTANT: Do not immerse or splash either the body or lid in any liquid as this may cause damage and/or electric shock. 3 Exterior: Wipe the lid and outer body of the unit with a damp cloth or slightly dampened sponge. 4 Brown staining of the lids inner surface and vents may be seen. This is vapour residue from the ingredients carried up in the escaping steam during baking.
Know your ingredients Understanding baking It is often said that cooking is an art relying on the creativity of the chef while baking bread is much more of a science. This means that the process of combining flour, water and yeast results in a reaction that produces bread. You have to remember that when the ingredients combine with each other they produce a specific result.
Liquids/milk Liquids such as milk or a combination of powdered milk and water, can be used when making bread. Milk will improve flavour, provide a velvety texture and soften the crust, while water alone will produce a crispier crust. Some liquids call for juice (orange, apple, etc) to be added as a flavour enhancer. Note: For most recipes we suggest the use of dry skimmed milk. measurement. A ‘guesstimate’ is not good enough as it could throw out the critical balance of the recipe.
• There are 2 spoons provided to cover all combinations of quantities in the recipes. Tablespoon tbsp, teaspoon and 1/2 teaspoon (marked with line) and a 1/4 tsp. 1tsp = 5 millilitres 1 tbsp = 3 tsp = 15 millilitres Hint measure dry ingredients first with the tablespoon, then wet (oil) last. Your breadmaker produces delicious baked goods with ease. This machine requires only that you carefully follow the recipe instructions.
Recipes All of the following recipes use this same general method: 1 Measure ingredients into baking pan. 2 Use tepid water 21-28˚C. 3 Insert baking pan securely into unit, close lid. 4 Select appropriate bread setting. 5 Push start button. 6 When bread is done, remove pan from unit using oven mitts. 7 Remove bread from baking pan, (and kneading blade from bread if necessary). 8 Allow to cool before slicing. This method is modified by notes, if applicable, at the end of each recipe.
Malt loaf Cheddar pepper bread 11/2 lb 7/ cup Water 8 Salt 1 tsp Sunflower oil 2 tbsp 1/ cup Black treacle 4 1/ cup Malt extract 4 Plain flour 21/2 cup Fast action yeast 1 tsp 1/ cup Sultanas* 4 Use setting 1 Basic *add sultanas when beep sounds - Refer to baking cycle times. Note : When measuring black treacle and malt extract smear cup in oil first to ease pouring out.
Granary loaf 11/2 lb Water 11/8 cup Skimmed milk powder 2 tbsp Soft brown sugar 21/2 tbsp Salt 11/4 tsp Sunflower oil 2 tbsp Granary malted brown bread flour** 3 cups Fast action yeast 11/2 tsp Vitamin C tablet* 1 x 100mg Use setting* 2 Wholewheat *Optional: By adding a vitamin C tablet, the rise of the bread can be improved. Crush tablet between 2 teaspoons and add. *Some wholemeal flours do not require the longer rest period and will be more suitable using the 1 basic setting.
Use the 1.5lb setting for all cakes Madeira cake Parkin Ingredients group 1 Butter (softened) Vanilla essence Eggs (beaten) Lemon juice cup tsp 3 medium 2 tbsp Ingredients group 2 Plain flour Baking powder Castor sugar Use setting 15/8 cup 2 tsp 3/ cup 4 6 Cake 1/ 2 1/ 4 Method 1 Mix group 1 together in a separate bowl. 2 Sieve group 2 together in a second bowl. 3 Combine groups 1 and 2 together until mixed. 4 Pour mixture into breadpan.
8 Recipes for dough Pizza base White bread rolls Water Skimmed milk powder Sugar Salt Sunflower oil Strong white bread flour Fast action yeast Use setting 11/4 cups 1 tbsp 2 tbsp 11/2 tsp 2 tbsp 31/4 cups 11/4 tsp 8 Dough Method 1 Knead and shape the dough into 6 rolls 2 Place on a greased baking tray 3 Brush lightly with melted butter 4 Cover for 20-25 minutes 5 Allow to rise until they are double in size and glaze 6 Bake for approx 15-20 minutes at 190°C, 375˚F gas mark 5.
Raspberry braid Water Beaten egg Butter (softened) Castor sugar Salt Strong white bread flour Fast action yeast Use setting 1 cup 1 med 2 tbsp 1/ cup 4 3/ tsp 4 33/4 cup 11/2 tsp 8 Dough Method Makes 2 braids. 1 Measure ingredients into a baking pan. 2 Insert baking pan securely into baking unit, close lid. 3 Select dough setting. 4 Push start button. 5 When dough is ready remove dough from pan and on a lightly floured surface divide dough into half.
Madeira cake Gluten free recipes Ingredients group 1 Gluten free breads are yeast leavened breads, where Gluten a protein part of the wheat (also found in Oats, Barley and Rye) is removed. People who cannot tolerate Gluten in their diet (known as Coeliacs) can obtain this flour on prescription. It is found in most high street chemists and health food stores, it is expensive! Belling has developed these recipes using one particular brand ‘ Nutricia Glutafin’ Gluten free white flour mix and fibre mix.
Baking cycle times Operation sequence and cycle times MENU SETTING TOTAL MAXIMUM TIME DELAY BASIC LIGHT 1.5lb 02:38 11:48 BASIC MEDIUM 1.5lb 02:50 12:00 BASIC DARK 1.5lb 03:05 12:15 WHOLE WHEAT LIGHT 1.5lb 04:23 11:53 WHOLE WHEAT MEDIUM 1.5lb 04:30 12:00 WHOLE WHEAT DARK 1.5lb 12:09 04:39 FRENCH LIGHT 1.5lb 03:34 11:54 FRENCH MEDIUM 1.5lb 03:40 12:00 FRENCH DARK 1.5lb 03:44 12:04 RAPID LIGHT 1.5lb 01:57 11:57 RAPID MEDIUM 1.5lb 01:58 11:58 RAPID DARK 1.
Need help? Questions about general performance and operation Question 1 What should I do when the kneading blade comes out with the bread? Remove carefully when cold slicing the bread. Since the blade can be disconnected from the pan, it is not a malfunction if it comes out in your bread. Question 2 Why does my bread sometimes have some flour on the side crust? In some cases, the flour mix may remain on the corners of the baking pan.
Questions about ingredients and recipes Question 14 Why is my breadmaker making a loud noise? The pan may not be correctly located, press it until it locks into place. Question 15 How come my bread comes out too moist? What can I do? Humidity may affect the dough. Add an extra tablespoon of flour. Also, high altitude may have the same effect. Decrease the amount of yeast by 1/4 teaspoon and decrease the sugar and/or water/milk slightly.
Troubleshooting Possible cause Solution Bread sinks in the centre Too much liquid or liquid too warm Measure ingredients accurately.
Bread under baked with soggy centre Too much liquid from fresh or canned fruit Always drain liquids well as specified in the recipe. Water may have to be reduced slightly Large amounts of rich ingredients like nuts, butter, Measure ingredients accurately. Never exceed the dried fruits, syrups and grains will make dough heavy.
Two-year guarantee • It is important to retain the retailers receipt as proof of purchase. Staple your receipt to this back cover for future reference. Please quote the following information if the product develops a fault. These numbers can be found on the base/or rear of the product. Model no. Serial no. All Belling Products are individually tested before leaving the factory.