47160 rev3_Layout 1 02/09/2011 13:57 Page 1 CM47160 MUK Rev 3 * Upon registration with Morphy Richards (UK & ROI only) Espresso and Filter Combination 47160 For competitions, product hints and tips and more join us at www.homeofthehouseproud.com www.facebook.com/morphyrichardsuk www.twitter.com/loveyourmorphy * Register online for your 2 year guarantee. See back of this instruction book for details.
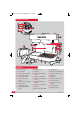
47160 rev3_Layout 1 02/09/2011 13:57 Page 2 Product overview 17 18 19 21 20 1 2 12 3 4 5 22 23 13 6 14 8 7 9 10 11 24 15 2 25 28 27 15 26 16 Features 2 (1) Steam Control (10) On/Off Switch (19) Filter Holder (2) Steam Wand (11) Drip Tray (20) Filter Coffee Water Gauge (3) Espresso Brewing Head Filter Coffee Indicator (12) Filter Coffee Anti Drip Valve (21) Permanent Mesh Filter (4) (5) Filter Coffee Switch (13) Espresso Water Tank (14) Filter Coffee Keep Warm Plate
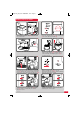
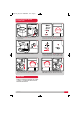
47160 rev3_Layout 1 02/09/2011 13:57 Page 3 Making espresso coffee 2 1 Fill the Espresso Water Tank (13) and place into the coffee maker. Ensure the On/Off Switch (10) and Steam Control (1) are set to Off. Select Coffee (8). 4 3 Place the relevant Filter (26) or (27) into the Espresso Filter Holder (24). Fill with espresso coffee and tamp with Tamping Spoon (28), or use an E.S.E. pod. Plug the coffee maker into the mains.
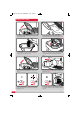
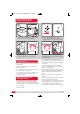
7160 rev3_Layout 1 02/09/2011 13:57 Page 4 Making filter coffee 1 Press down on the Lid (17) to release the catch and open the Lid. 3 Fill the Permanent Mesh Filter (21) with filter coffee grinds. Use 7g (or one level Tamping Spoon (28),) of coffee per cup. Fill the Water Tank (18) with water. Do not exceed the Max line on the Water Gauge (20). 4 Place the Permanent Mesh Filter into the Filter Holder (19). Ensure the Filter Holder is placed correctly into the main unit and clicks into place.
47160 rev3_Layout 1 02/09/2011 13:57 Page 5 Using the Steam Wand to froth milk 2 1 Fill the Water Tank (13) and place into the coffee maker. Ensure the On/Off Switch (10) and Steam Control (1) are set to Off. Select Steam (8). 4 3 Slide the On/Off Switch (10) to On. The Espresso Temperature Indicator Light (9) will stop flashing when the coffee maker is ready. Plug the coffee maker into the mains. 6 5 Place the Steam Wand (2)10mm deep into a jug of milk. Turn the Steam Control (1) On.
47160 rev3_Layout 1 02/09/2011 13:57 Page 6 Using the Steam Wand to dispense hot water 4 Slide the On/Off Switch (10) to On. The Espresso Temperature Indicator Light (9) will stop flashing when the coffee maker is ready. Follow steps 1,2,3 of ‘Making espresso coffee’ on Page 3. Then refer to the following. 6 5 Place an empty mug under the Steam Wand (2). Turn the Steam Control (1) to Steam. When done, turn the Steam Control to Off BEFORE removing the mug from underneath the Steam Wand.
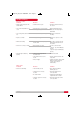
47160 rev3_Layout 1 02/09/2011 13:57 Page 7 Adjusting the height of the Drip Tray Temperature Indicator light The Temperature Indicator Light (9) flashes slowly when the boiler is heating, this is normal. You can adjust the height of the Drip Tray to reduce splashing when dispensing coffee into smaller cups such as espresso cups. The Temperature Indicator Light will flash fast and the coffee maker will not work when there is a problem.
47160 rev3_Layout 1 02/09/2011 13:57 Page 8 the Filter Holder clean we recommend you periodically run the machine with the Espresso Filter Holder in place, without coffee, using water only. Rinse the Filter Water Tank occasionally with cold water. Do not use a cloth as any residue or lint may be left behind to clog the coffee maker. Should the holes in the Espresso Filter become blocked with coffee grinds, use a fine bristled brush to help clean.
47160 rev3_Layout 1 02/09/2011 13:57 Page 9 Troubleshooting Espresso coffee Problem Reason Solution • Water is dispensing from the Steam Wand • Steam Control is open • Rotate the Steam Control so its closed • The coffee temperature is too cold • Heater block is not hot enough before dispensing • Before dispensing Coffee, make sure the ready light is illuminated • The coffee grinds are wet after use • Coffee is not compact enough • Tamp the coffee before inserting • Espresso is weak • Wrong cof
47160 rev3_Layout 1 02/09/2011 13:57 Page 10 Notes 10
47160 rev3_Layout 1 02/09/2011 13:57 Page 11 Health and Safety • Do not use the coffee maker for anything other than its intended purpose. Mains cable The use of any electrical appliance requires the following common sense safety rules. • The mains cable should reach without straining from the socket. Primarily there is danger of injury or death and secondly the danger of damage to the appliance.
47160 rev3_Layout 1 02/09/2011 13:57 Page 12 CM47160 MUK Rev 3 09/11 Registering your 2 year guarantee Exclusions Your standard one year guarantee is extended for an additional 12 months when you register the product within 28 days of purchase with Morphy Richards. If you do not register the product with Morphy Richards within 28 days, your product is guaranteed for 1 year. To validate your 2 year guarantee register with us online at www.morphyrichards.co.