
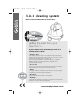
Carpet Cleaner User Manual


Features
In addition to the components previously
mentioned under the ‘Wet & Dry’ section, the
following will be used when shampooing:
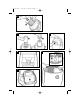
Foam filter E2
Ò Foam filter locking plate E2
Ù Clean water tank
ı Filler cap
ˆ Filter
˜ Feed pipe
¯ Cleaning solution
˘ Water inlet
Shampoo tube
Shampoo Nozzle
Tube connector
Shampoo jet
Upholstery shampoo nozzle
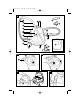
Assembly
For best results, carpets to be
shampooed should be vacuumed first using
the standard floor nozzle.
After following the assembly instructions
in the wet and dry section, remove the filler
cap from the clean water tank and add up to
3.5 litres of water. Warm water may be used,
but never hot. Add cleaning solution to the
water following instructions on the bottle J.
Replace the filler cap ensuring the filter is
on the end of the feed pipe (using without
the filter may damage your machine and
invalidate the guarantee). Fit the clean water
tank into the tool storage cart. Push the
nozzle on the other end of the feed pipe into
the water inlet K.
Ensure the bucket is fitted inside the
waste tank. It is possible to shampoo
without using the bucket although it is far
simpler to empty dirty water when the
bucket is used. Fit the hose end into the
waste tank after the bucket has been
installed.
Remove the cartridge filter from
underneath the motor housing (see
‘Cartridge Filter’ in the Wet & Dry section). Fit
the foam filter in its place.
IMPORTANT: The foam filter must always
be fitted when you are shampooing.
The filter should be pushed up against
the base of the motor housing and secured
by use of the foam filter locking plate. The
locking plate is inserted beneath the foam
filter and rotated clockwise until it locks into
position E2 . Refit the motor housing.
Slide the coiled shampoo tube and hose
and extend to full length. L. Fit one end of
the shampoo tube into the main housing
connector and the other end into the
shampoo nozzle jet .
Controls
To shampoo press the rocker switch to
the II position, the pump will be activated
and water and cleaning solution will be
forced down the shampoo tube.
IMPORTANT: Do not switch the pump on
when there is no water in the clean water
tank - this will damage the pump.
36
35
Shampooing instructions
34
35
33
10
36
37
70223 Rev 2 9/8/04 4:00 PM Page 10