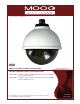
© 2012, Moog Videolarm, Inc. All Rights Reserved QSD QView™ Series QSD 12" Outdoor Surveillance Dome www.moogvideolarm.
IMPORTANT SAFEGUARDS 1 Read these instructions. 2 Keep these instructions. 3 Heed all warnings 4 Follow all instructions. 5 Do not use this apparatus near water. 6 Clean only with damp cloth. 7 CAUTION RISK OF ELECTRIC SHOCK DO NOT OPEN Do not block any of the ventilation openings. Install in accordance with the manufacturers instructions. 8 9 SAFETY PRECAUTIONS Cable Runs- All cable runs must be within permissible distance.
Limited Warranty for Moog Videolarm Products Moog Videolarm warrants these products to be free from defects in material or workmanship as follows: PRODUCT CATEGORY PARTS \ LABOR All Enclosures and Electronics* Five Poles/PolEvators™/CamEvator Three (3) Years Warrior Series™/Q-View™/IR Illuminators Five (5) Years SView Series™ Five (5) Years **6 months if used in auto scan/tour operation Controllers Five (5) Years Power Supplies Five (5) Years EcoKit Three (3) Years Accessory Brackets F
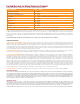
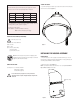
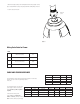
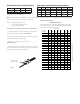
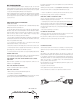
TO OPEN THE HOUSING CABLE AND POWER GUIDELINES This chart shows the proper current needed for power supplies for Q-View™ cameras. Use Class 2 Power only. Input voltage must be 24Vac/Vdc. CAMERAS VOLTAGE CURRENT 1. Open the housing by loosening the (3) security screws located on the housing ring next to the lower clear dome (Figure 1). POWER 1 24Vac/Vdc 102mA 2.
1. Mount the housing assembly to the mounting bracket and housing coupling. A safety cable is included with the housing to temporarily hold it while making wiring connections. 2. Clean the outside of the dome.
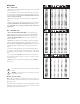
Video Cable Maximum Length (feet/meters) Cable Type RG-59 RG-6 RG-11 Wire Gauge 23 AWG* 18 AWG* 16 AWG* Max.
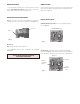
CAMERA ADJUSTMENT CAMERA SETTINGS 1. Access the cameras by removing the dome. Loosen the locking screws on the lip of the dome. DO NOT TAKE THESE SCREWS OUT. Once the screws are loosened, turn the dome counter clockwise until it stops, then pull the dome off. NOTE: To determine which camera is used in your unit, locate the serial number on the inside of the housing. Match the two letter prefix with the corresponding instructions included here for adjustments.
HIGH-RES COLOR, FIXED LENS COMPLETION OF INSTALLATION FIXED AND FIXED VARI-FOCAL LENSES. There are no user adjustable settings on these units (Figure 8) 1. When the desired focus is achieved for each camera, adjust the segmented bracket arms to the desired viewing angle. Once you've finished, put the dome back in place and check to be sure none of the cameras touch the dome. If one or more do, readjust the arm(s) until they are clear of the dome.
Wiring Notes Wire — What to DO 1. DO use point-to-point Unshielded Twisted Pair wire, gauge 24 or thicker, stranded or solid, Category 2, 3, 4, or 5. 2. The video signal may co-exist in the same wire bundle as other video, telephone, data, control signals, or low-voltage power. It is also OK to run NVT video signals in or near electromagnetic fields (in accordance with National Electrical Code, local, or other local safety requirements). 3. DO measure the wire distance.
NVT TROUBLESHOOTING If you are experiencing problems, attempt to simplify your setup. Test each cable segment separately. For example, test the camera and monitor together without the other equipment. Then add in the NVT transceivers, back-to-back. Test each segment of a long cable-run independently. Attempt to isolate the problem. Below are problems that may be encountered. If the suggestions below are not helpful, or the recommendations are not effective, please call NVT’s customer support.
TROUBLESHOOTING LINE LOCK If you experience problems with the camera picture please check these simple troubleshooting procedures for possible solutions before calling technical support. All cameras are all shipped from the factory with the line lock function disabled. If your application requires Line Lock contact Videolarm.
Product Registration/Warranty Thank you for choosing Moog Videolarm. We value your patronage and are solely committed to providing you with the highest quality products available and superior customer service. Should a problem arise, rest assured that Moog Videolarm stands behind its products by offering impressive 3 Year and 5 Year warranties, depending on the product purchased. See full warranty details at www.moogvideolarm.