
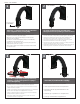
Operating instructions


2
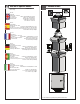
Teflon tape™ is wrapped around the pipe threads to
ensure a tight seal and to prevent galling.
• Cinta de Teon ™ se envuelve alrededor de las roscas de la tubería para
asegurar un sello hermético y para evitar el gripado.
• Ruban téon ™ est enroulé autour des letages pour assurer une bonne
étanchéité et éviter tout grippage.
• Teonband ™ ist rund um die Rohrgewinde gewickelt, um eine Abdichtung
zu gewährleisten und zu verhindern Fressen.
• Fita de Teon ™ é enrolado em torno das roscas do tubo para assegurar uma
selagem apertada e para evitar escoriações.
• Teon ™ nastro è avvolto intorno le lettature per assicurare una buona tenuta
e per prevenire l'usura.
•Special anti-seize tape
“DO NOT REMOVE”
3
Screw the coupling tightly onto the pipe threads by
inserting a screwdriver through slots in coupling to
ease in final tightening.
• Atornillar el acoplamiento rmemente en las roscas de las tuberías mediante la inserción de un
destornillador a través de las ranuras de acoplamiento para facilitar el apriete nal.
• Vissez le couplage serré sur le letage de tuyaux en insérant un tournevis dans les fentes de
couplage à l'aise dans le serrage nal.
• Schrauben Sie die Kupplung fest auf die Rohrgewinde durch Einführen eines Schraubendrehers
durch die Schlitze in der Kopplung in dem endgültigen Anziehen zu erleichtern.
• Parafuse o acoplamento bem para as roscas pela inserção de uma chave de fenda através
ranhuras para facilitar o acoplamento no aperto nal.
• Avvitare l'attacco saldamente sulle lettature inserendo un cacciavite nelle fessure di
accoppiamento ad allentarsi nel serraggio nale.
WM20G: SOLD SEPARATELY
SOLD SEPARATELY
SOLD SEPARATELY
SOLD SEPARATELY
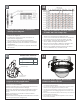
1
Securely mount bracket to wall. Pull wiring
through bracket and position grommet as shown.
• Con seguridad soporte del montaje a emparedar. Tire del cableado
a través del soporte y del ojal de la posición según lo demostrado.
• Solidement parenthèse de bâti à murer. Tirez le câblage par la
parenthèse et le canon isolant de position comme montré.
• Sicher Einfassung Haltewinkel wall. Ziehen Sie Verdrahtung durch
Haltewinkel und Position Gummimuffe, wie gezeigt.
• Firmemente suporte da montagem a wall. Puxe a fiação através do
suporte e do ilhó da posição como mostrado.
• Saldamente staffa del supporto da wall. Tiri i collegamenti tramite la
staffa ed il gommino di protezione di posizione come indicato.
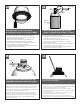
4
Screw the (2) bolts into the coupling.
• Atornille (2) los pernos en el acoplador.
• Vissez (2) les boulons dans l'accouplement.
• Schrauben Sie die (2) Schraubbolzen in die
Koppelung.
• Parafuse (2) os parafusos no acoplamento.
• Avviti (2) i bulloni nell'accoppiamento.
1
2
3
4