
Operating instructions
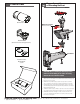
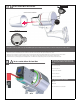

Make all nal connections in the rear cavity. To do so, rotate the rear cover by slightly loosing the screw marked (A) and completely loosing the
screw marked (B). Then make all of the nessecary wiring connections.
• Para girar la cubierta posterior, aoje levemente el (a) marcado tornillo y aoje totalmente el (b) marcado tornillo. Entonces haga todas las conexiones nessecary del cableado.
• An de tourner la couverture arrière, détachez légèrement le (a) marqué par vis et détachez complètement le (b) marqué par vis. Établissez alors tous les rapports nessecary de câblage.
• Um die hintere Abdeckung zu drehen, lösen Sie etwas das Schraube signikante (a) und lösen Sie vollständig das Schraube signikante (b). Stellen Sie dann alle nessecary Verdrahtungsbeziehungen her.
• A m girar a tampa traseira, afrouxe ligeiramente o (a) marcado parafuso e afrouxe completamente o (b) marcado parafuso. Faça então todas as conexões nessecary da ação.
• Per girare la copertura posteriore, allenti un po'la vite contrassegnata (A) e completamente allenti la vite contrassegnata (B). Allora faccia tutti collegamenti nessecary dei collegamenti.
(A- Slightly loosen)
(B- Completely loosen)
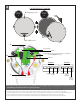
FACING REAR OF CAMERA
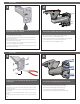
STEP
1
STEP
2
(A)
(B)
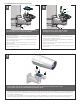
POWER *(Shipped from factory for 24Vac input. For 12Vdc input;
see 12Vdc ADDENDUM section)
DATA
RJ45 / PoE Input
Speaker Audio
Ground
Mic Ground Negative
DC (-)
AC (NEU)
Positive
DC (+)
AC (Live)
Detail M Detail N*
DETAIL
M
DETAIL
N
Alarm IN 1
Alarm IN 2
(+)
8