
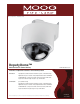
Operating instructions
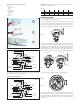
- 8 -
Filling and Relling
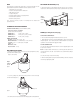
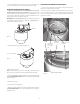
1. Attach the barb to the regulator.
2. Remove the cap from the Schraeder valve.
3. Set the gauge on the regulator to between 5 and 8 psi.
4. Place the air chuck on the Schraeder valve, just as you would on a tire, and press
down to begin lling. Continue until the regulator stops feeding nitrogen into the
housing and begins to let off excess pressure. In addition, as dry nitrogen is inserted
into the housing the humidity strip will change from pink to blue.
CAUTION: Do not attempt to ll beyond this point.
NOTE: The humidity sensitive tape will appear blue under normal dry conditions. The
tape will turn pink if exposed to moisture or humidity
5. Replace the metal cap on the Schraeder valve. The cap must be installed on the
Schraeder valve (air input valve) to ensure an airtight enclosure.
6. Check the pressure in the unit with a pressure gauge. It should be 5psi.
7. Reattach wall mount access cover plate.
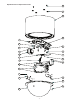
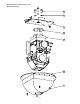
PROCEDURES FOR PRESSURIZED HOUSINGS
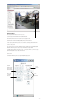
Pressurized housings provide maximum protection for CCTV cameras and lenses. The
charge of dry nitrogen inside the housing eliminates the effects of moisture, dust,
insects and corrosive exhaust fumes. This allows a longer lifetime for your surveillance
equipment.
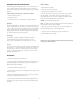
To ll (or rell) a pressurized housing, you must have the following:
1. A tank of dry nitrogen (or oxygen)
2. A regulator on the tank
3. A hose with air chuck to connect the regulator to the housing’s intake valve
Dry Nitrogen
Nitrogen is a readily available. To obtain supplies, check your local yellow pages for a
medical or industrial gas provider. If the tank is to be carried from location to location,
a size of 40 cubic foot is recommended. This should be enough to rell 30 individual
housings. Handle the tanks with care. Although nitrogen is an inert gas, the tank is
highly pressurized and if the valve or regulator is damaged the tank could be danger-
ous. Tanks of dry nitrogen can be kept for several years.
The Regulator
The tank will have a standard 580 tting, but a regulator will be required. A
recommended regulator for the tank would be a Harris #9296-15-580 or
#425-15-580. For local distribution you can contact Harris at 800-241-0804.
The Hose
The purge valve, called a “Schraeder” or “dill” valve, is similar to the air intake valve on
car or bicycle tires. To connect the regulator to the purge valve on the housing, you’ll
need a hose with a 1/4” barb on one end and an air chuck on the other. The barb
connects to the regulator, the air chuck to the Scraeder valve. These hoses can be
obtained at local auto parts stores.
PRECAUTIONS:
1. Always use safety goggles when servicing the unit.
2. Inspect the enclosure upon opening the product and be sure the unit has not been
damaged during shipping. Domes that have been cracked or show any signs of
damage should be replaced immediately.
3. Pressurize the unit with air or dry nitrogen only.
4. Do not ll the housing to more than 5 psi maximum pressure. Exceeding 5 psi will
damage the enclosure.
5. Never use an unregulated air supply to pressurize the enclosure. The valve should
be regulated to allow a maximum air pressure of 10 psi.
6. Be sure you periodically examine the unit and the attached supporting structure.
If the dome shows any signs of wear, such as stress cracking, it should be replaced
immediately.
NOTE: If you have removed the dome it must be reattached and oriented properly.
See page 5 for complete instructions.