
Specifications

PRODUCT INSTRUCTIONS
INSTALLATION PREPARATION
1. Determine the mounting location. Be sure that you'll be
mounting to a secure wall or ceiling. We also recommend
that for outdoor applications the housing be mounted in a
protected area.
2. Complete all wire and conduit runs prior to installation.
3. The WS2 and WS4 are designed to be mounted in a
standard deep double-gang box.
4. IMPORTANT REMINDER: For outdoor applications it is
strongly recommended that you use sealant. Place a light
bead of sealant around the perimeter of the back of the
housing and around the head of each screw connecting the
housing to the double-gang box.
REVISION DATE: 02-02-2009
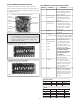
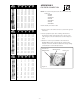
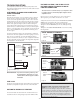
Depending on the voltage being used, refer to one of the formulas
below to select the correct power supply for cameras connected in
parallel (positive to positive, negative to negative):
Total current for a 12 VDC system:
TOTAL CURRENT = (350mA x total number of cameras)
Total current for a 24 VAC system:
TOTAL CURRENT = (202mA x total number of cameras)
VOLTAGE CURRENT POWER
12 VDC 350mA 4.2W
24 VAC 202mA 4.8W
CABLE AND POWER GUIDELINES
(Detailed info on Page 12)
This chart shows the proper current needed for power supplies for
Warrior Series cameras. Use Class 2 Power only. Output voltage
must be between 12-28 VDC or 15-28 VAC.
81-IN5236-06154 WARRIOR 2 & 4
WS2(T/C)-XXXX / WS4-XXXX
Figure 1
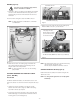
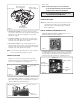
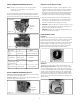
INSTALLATION PROCEDURE
1. Mount a double-gang box (not provided) using standard proce-
dures. Pull power and video wires through the gang box.
2. Using the security tool provided, loosen the four security
fasteners and remove the housing top.
NOTE: The housing top is held to the base by a lanyard.
3. Remove the bracket assembly by removing the (2) 10-32 screws
(Figure 1).
NOTE: The camera is connected to the power board. Be
careful not to pull the wire loose.
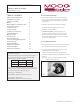
TABLE OF CONTENTS
Cable and Power Guidelines 1, 12
Installation Preparation 1
Installation Procedure 1
Wiring 2
Optional Warrior Test Monitor Cable 2
Camera Bracket Setup 2
Camera Focusing 3
Camera Settings 3
Completion of Installation 5
Dome/Window Care 5
NVT Instructions 6
IFS Instructions 7
Warranty Information 8
Service and Safeguard Information 9
Troubleshooting 10
Exploded View WS2 11
Replacement Parts WS2 12
Exploded View WS4 13
Replacement Parts WS4 14
© 2009, Videolarm, Inc. All Rights Reserved