
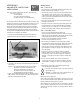
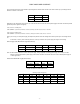
Specifications
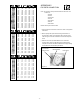

- 3 -
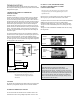
Figure 7
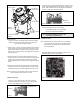
CAMERA FOCUSING
Fixed Lens: Loosen the set screw in the lens mount and to
manually rotate the lens until a clear picture is achieved. Once
the focus is set, retighten the set screw (Figure 7).
Figure 6
Set screw
Fixed lens
Lens Bracket
Lens Bracket
Thumb Screws
Camera Cradle
Horizon Adjustment
Thumb Screws
Pan Adjustment Screw
Horizon Leveling
Notches
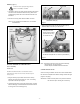
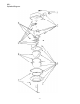
Bracket Alignment:
Wall mount: Be sure the rotating bracket is positioned vertically.
Ceiling mount: Be sure the rotating bracket is aligned to point
toward the desired viewing location.
1. Adjust the Pan: Loosen the two Camera Cradle thumb screws and
turn the camera lens to face toward the side of the housing. Use a
Phillips head screwdriver to loosen the screw holding the rotating
bracket in place. Adjust the bracket and retighten the screw to lock
the bracket in place.
2. Adjust the Horizon: The camera must be parallel to the ground.
To adjust the horizon, loosen the two thumb screws on the Camera
Cradle and tilt as needed. Notches are included on the rotating
bracket to help determine if the cradle is level. Retighten the thumb
screws.
3. Adjust the Tilt: Loosen the two thumb screws on the Lens Bracket
and tilt the camera/lens to the desired location. The lens can also
be adjusted up and down if needed. Retighten the thumb screws.
NOTE: Use Loctite™ or an equivalent product to secure the thumb
screws, especially where vibration is a concern.
Rotating
Bracket
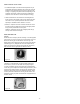
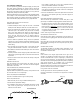
CAMERA SETTINGS
FIXED AND FIXED VARI-FOCAL LENSES. There are no user
adjustable settings on these units (Figure 9).
Figure 9
Fixed and Vari-Focal
Vari-Focal Lens: First, adjust the Magnication Lock Screw to the
desired magnication (telephoto to wide angle). Tighten the Lock
Screw. Next, adjust the Focus Lock Screw until a clear picture is
achieved. Tighten the Lock Screw (Figure 8).
Magnication lock screw
Focus lock screw
Fixed iris
vari-focal lens
Figure 8
Auto Iris Lens:
NOTE: THE AUTO IRIS LENS IS SET AT THE FACTORY.
• IF YOU EXPERIENCE VIDEO TOO LIGHT OR DARK
AUTO IRIS ADJUSTMENT MAY BE NEEDED.
SEE THE TROUBLESHOOTING SECTION FOR
ADJUSTMENT INFORMATION.
NOTE: To determine which camera is used in your unit, locate the
serial number on the inside of the housing. Match the two
letter prex with the corresponding instructions included
here for adjustments.