© 2011, Moog Videolarm, Inc. All Rights Reserved SM5 Compact Vandal-Resistant Surface Mount Dome-5” www.videolarm.com Installation and Operation Instructions for the following models: SM5C2N Outdoor 5” IP Ready surface mount housing for a small PTZ camera, conduit input from the side and the top of the housing. 24Vac input, with heater/blower. Polycarbonate body and dome. IP66. 1” NPT threads for pedant mount - includes 1.
IMPORTANT SAFEGUARDS 1 Read these instructions. 2 Keep these instructions. 3 Heed all warnings 4 Follow all instructions. 5 Do not use this apparatus near water. 6 Clean only with damp cloth. 7 CAUTION RISK OF ELECTRIC SHOCK DO NOT OPEN Do not block any of the ventilation openings. Install in accordance with the manufacturers instructions. 8 9 SAFETY PRECAUTIONS Cable Runs- All cable runs must be within permissible distance.
Limited Warranty for Moog Videolarm Products Moog Videolarm warrants these products to be free from defects in material or workmanship as follows: PRODUCT CATEGORY PARTS \ LABOR All Enclosures and Electronics* Five Poles/PolEvators™/CamEvator Three (3) Years Warrior Series™/Q-View™/IR Illuminators Five (5) Years SView Series™ Five (5) Years **6 months if used in auto scan/tour operation Controllers Five (5) Years Power Supplies Five (5) Years EcoKit Three (3) Years Accessory Brackets F
! Electrical Specifications Power 24VAC Class 2 Only 24 VAC Accessories: Camera Power: Tools Required: English Español Français Portuguese Italiano SM5C2N SM5CFN ISM5CN ISM5CF Heater/ Blower: 40 Watts SEE CAMERA MANUAL Phillips Head Screwdriver ⅝” Allen Wrench 24 VAC Accesorios: Calentador: 40 watts, Soplador: 40 Watts Energía De la Cámara fotográfica: SEE CAMERA MANUAL Las Herramientas Requirieron: Destornillador Principal Plano Del ⅝” Allen Wrench.
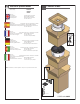
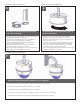
1 PACKETS (4) (8) For Surface Mounting using side conduit entrance (4) (1) Mounting Plate (1) 1/4 x 20 Bolt (1) 1/4 Flat Washer (1) 1/4 Lock Washer (4) M3 6mm Bolt (4) M3 Lock Washers (7) 8 x 32 x 3/8" bolts (2) 8 x 32 Nuts (2) 94-FSCT01 Fixed Etch knockout slightly with utility knife. Knock and hammer out ⅞ conduit opening with blunt screw driver.
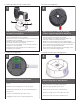
For Surface Mounting using side conduit entrance 1 For Surface mount applications 2 2 1 3 Drill out (3) mounting holes as shown for # 10 hardware (not supplied) • Taladre (3) los agujeros de montaje como se muestra para # el hardware 10 (not supplied) • Percez (3) les trous de montage comme montré pour # le matériel 10 (not supplied) • Bohren Sie (3) Entlüftungslöcher wie gezeigt für # Hardware 10 heraus (not supplied) • Fure (3) furos de montagem como mostrado para # a ferragem 10 (not supplied) • Est
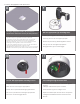
For Pendant or Wall mount applications For Pendant or Wall mount applications 5 6 Seal pipe threads with teflon tape supplied with outdoor housings Thread housing to optional pendent pipe or wall mount bracket • Hilos de rosca de pipa del sello con la cinta del Teflon suministrada las cubiertas al aire libre • Filetages de tuyauterie de joint avec la bande de teflon fournie avec les logements extérieurs • Dichtungsrohrgewinde mit dem Teflonklebeband geliefert mit im Freiengehäusen • Linhas de tubulaçã
For indoor ceiling application with electrical box 8 9 Housing is designed to mount to 411/16 x 411/16” electrical box. Mount box securely to ceiling structure Drill out appropriate (2) mounting holes • La cubierta se diseña para montar a 411/16 x 411/16” caja eléctrica. Caja del montaje con seguridad a la estructura del techo • Le logement est conçu pour monter dans 411/16 x 411/16 » boîte électrique.
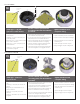
12 Axis M-10 Axis 207 Camera hole pattern Adding Spacers Attach Axis camera mount to camera base plate. Use (4) 1” spacers and attach camera base plate to housing. • Ate el montaje de cámara del eje al embase de la cámara. Utilice (4) los” espaciadores 1 y ate el embase de la cámara a la cubierta. • Attachez la monture de caméra d'axe à l'embase d'appareil-photo. Employez (4) les » entretoises 1 et attachez l'embase d'appareilphoto au logement.
Axis 216 CAMERA 14 (13mm) ½" Use this hole pattern (52mm) 2" Install (4) .5” + (4) 2.0” spacers to center bosses • Instale (4) .5” + (4) 2.0” espaciadores para centrar los jefes Secure camera quick release mounting plate with #8 hardware provided • Pletina segura del lanzamiento rápido de la cámara con el hardware #8 proporcionado Tighten hardware and complete wiring • Apriete el hardware y termine el cableado • Installez (4) .5 » + (4) 2.
AXIS 215 CAMERA 16 (13mm) ½" Use this hole pattern (25mm) 1" Install (4) .5” + (4) 1.0” spacers to center bosses Secure camera quick release mounting plate with #8 hardware provided • Instale (4) .5” + (4) 1.0” espaciadores para centrar los jefes • Pletina segura del lanzamiento rápido de la cámara con el hardware #8 proporcionado • Installez (4) .5 » + (4) 1.
Canon VC-C50iR CAMERA 18 Use this hole pattern (25mm) 1" (25mm) 1" Install (4) .5” + (4) 1.0” spacers to center bosses Secure camera quick release mounting plate with #8 hardware provided • Instale (4) .5” + (4) 1.0” espaciadores para centrar los jefes • Pletina segura del lanzamiento rápido de la cámara con el hardware #8 proporcionado • Installez (4) .5 » + (4) 1.
Acti ACM 8201/ ACM 8211 CAMERA 20 Use this hole pattern Install (4) 1” spacer to center bosses • Instale (4) 1” espaciador para centrar los jefes (25mm) 1" Secure camera quick release mounting plate with #8 hardware provided • Pletina segura del lanzamiento rápido de la cámara con el hardware #8 proporcionado • Installez (4) 1 » entretoise pour centrer des patrons • Le plat de support bloqué de dégagement rapide d'appareil-photo avec le matériel #8 a fourni • Bringen Sie (4) 1“ Distanzscheibe an, um
Panasonic BB-HCM381 / BBHCM580 / KX-HCM280A CAMERA 22 Use this hole pattern Install (4) ½” spacers to center bosses • Instale (4) espaciadores del ½ los” para centrar los jefes • Entretoises installez (4) ½ des » pour centrer des patrons • Bringen Sie (4) ½“ Distanzscheiben an, um Chefs zu zentrieren • Instale (4) espaçadores do ½” para centrar saliências • Installi (4) distanziatori del ½„ per concentrarsi le sporgenze (13mm) ½" Secure camera quick release mounting plate with #8 hardware provided • Pl
Panasonic WV-NF284 - WV-NF302 CAMERA 24 (25mm) 1" Install (4) 1” spacer to center bosses • Instale (4) 1” espaciador para centrar los jefes • Installez (4) 1 » entretoise pour centrer des patrons • Bringen Sie (4) 1“ Distanzscheibe an, um Chefs zu zentrieren • Instale (4) 1” espaçador para centrar saliências • Installi (4) 1„ distanziatore per concentrarsi le sporgenze Secure camera quick release mounting plate with #8 hardware provided • Pletina segura del lanzamiento rápido de la cámara con el hardwar
Toshiba IKWB21A CAMERA 26 (13mm) ½" Install (4) ½” spacers to center bosses Secure camera quick release mounting plate with #8 hardware provided • Instale (4) espaciadores del ½ los” para centrar los jefes • Pletina segura del lanzamiento rápido de la cámara con el hardware #8 proporcionado • Entretoises installez (4) ½ des » pour centrer des patrons • Le plat de support bloqué de dégagement rapide d'appareil-photo avec le matériel #8 a fourni • Bringen Sie (4) ½“ Distanzscheiben an, um Chefs zu ze
ELMO 401 CAMERA 28 (13mm) ½" (52mm) 2" Install (4) .5” + (4) 1.0” spacers to center bosses • Instale (4) .5” + (4) 1.0” espaciadores para centrar los jefes • Installez (4) .5 » + (4) 1.0 » entretoises pour centrer des patrons Secure camera quick release mounting plate with #8 hardware provided • Pletina segura del lanzamiento rápido de la cámara con el hardware #8 proporcionado • Le plat de support bloqué de dégagement rapide d'appareil-photo avec le matériel #8 a fourni • Bringen Sie (4) .5“ + (4) 1.
31 32 Wire Gauge 5.5 10 20 30 40 50 60 70 24 VAC OUTPUT FOR CAMERA 80 Power requirements for Heater/Blower 40 watt • Requisitos de energía para el calentador/el soplador 40 vatios • Alimentation électrique pour le réchauffeur/ventilateur 40 watts • Leistungsbedarf für Heizung/Gebläse 40 Watt • Exigências de poder para o calefator/ventilador 40 watts • Requisiti di potere del riscaldatore/ventilatore 40 watt 33 (1.
35 36 12VDC Power Connector Locate 12VDC Power Connector Connect power and control wires to camera • Disposición del modelo con la fuente de alimentación 12VDC • Conecte la energía y controle los alambres a la cámara • Disposition de modèle avec l'alimentation de l'énergie 12VDC • Reliez la puissance et commandez les fils à l'appareilphoto • Plan des Modells mit 12VDC Spg.
40 39 Clean dome with MILD soap and water ONLY Secure Dome Assembly to housing • Limpie la bóveda con el jabón y agua SUAVES SOLAMENTE • Nettoyez le dôme avec de l'eau le savon et DOUX SEULEMENT • Säubern Sie Haube mit NUR MILDER Seife und Wasser • Asegure la asamblea de la bóveda a la cubierta • Fixez l'Assemblée de dôme au logement • Befestigen Sie Haube an Gehäuse • Limpe a abóbada com o sabão e água SUAVES SOMENTE • Pulisca la cupola con sapone ed acqua DELICATI SOLTANTO • Fixe o conjunto da abób
Product Registration/Warranty Thank you for choosing Moog Videolarm. We value your patronage and are solely committed to providing you with the highest quality products available and superior customer service. Should a problem arise, rest assure that Moog Videolarm stands behind its products by offering impressive warranty plans: 3 Years on all Housings, Poles, Power Supplies, and Accessories and 5 Years on camera systems (SView, QView, Warriors), and InfraRed Illuminators.