
Operating instructions
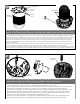


This is what the typical path of illumination will look like with the setting at 30 degrees.
• Termine el cableado a la cámara fotográfica. Una el montaje de la cámara fotográfica a la cubierta resbalando
(3) las ranuras abiertas del tornillo sobre los tornillos en la cubierta; apriete los sujetadores en el soporte.
• Accomplissez le câblage à l'appareil-photo. Attachez l'appareil-photo au logement en glissant (3) les fentes
ouvertes de vis au-dessus des vis dans le logement ; serrez les attaches sur la parenthèse.
• Führen Sie die Verdrahtung zur Kamera durch. Bringen Sie die Kamera zum Gehäuse an, indem Sie die (3) geöffne-
ten Schraube Schlitze über den Schrauben im Gehäuse schieben; ziehen Sie die Befestiger am Haltewinkel fest.
• Termine a fiação à câmera. Una o conjunto da câmera à carcaça deslizando (3) os entalhes abertos do parafuso
sobre os parafusos na carcaça; aperte os prendedores no suporte.
• Completi i collegamenti alla macchina fotografica. Fissi il complessivo della macchina fotografica all'alloggiamento
facendo scorrere (3) le scanalature aperte della vite sopra le viti nell'alloggiamento; stringa i fermi sulla staffa.
21
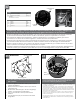
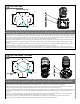
CONTROL
RJ45 Ethernet Connector
ALARMS
1 Alarm 1 Blue
2 Alarm 2 Violet
3 Alarm 3 Gray
4 Common White
POWER
1 Camera Power (24VAC) Red
2 Camera Power (24VAC) Orange
Captive
Screw
Open Screw
Slots
Cable
Ties
Complete the wiring to camera. Attach the camera assembly to the housing by sliding the (3)
open screw slots over the screws in the housing; tighten the fasteners on the bracket.
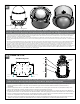
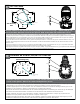
Axis 233D
Use the holes indicated above to mount
the camera.
• Utilice los agujeros indicados arriba para montar la
cámara fotográfica.
• Employez les trous indiqués ci-dessus pour monter
l'appareil-photo.
• Benutzen Sie die Bohrungen, die oben angezeigt
werden, um die Kamera anzubringen.
• Use os furos indicados acima para montar a
câmera.
• Usi i fori indicati sopra per montare la macchina
fotografica.
Mounting Hole
Mounting Hole
Machine
Screws
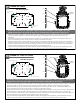
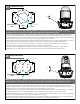
Disconnect the orange, red, and black wires. Remove the
power board in the housing by loosening screws on the
terminal block and the (4) machine screws.
• Desconecte los alambres anaranjados, rojos, y negros. Quite a tablero de
energía en la cubierta aflojando los tornillos en el bloque de terminales y (4)
los tornillos de la máquina.
• Débranchez les fils oranges, rouges, et noirs. Enlevez carte d'alimentation
dans le logement en desserrant des vis sur le TB et (4) les vis de machine.
• Trennen Sie die orange, roten und schwarzen Leitungen. Entfernen Sie das
Energie Brett im Gehäuse, indem Sie Schrauben am Klemmenblock und an
den (4) Maschine Schrauben lösen.
• Desconecte os fios alaranjados, vermelhos, e pretos. Remova a placa de
poder na carcaça afrouxando os parafusos no bloco terminal e (4) nos
parafusos da máquina.
• Stacchi i legare arancioni, rossi e neri. Rimuova il bordo di alimentazione
nell'alloggiamento allentando le viti sul blocchetto terminali e (4) sulle viti
della macchina.
Power
Board
23
24
22