
Operating instructions


1
2
3
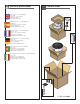
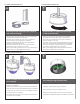
Drill out (3) mounting holes as shown for # 10
hardware (not supplied)
• Taladre (3) los agujeros de montaje como se
muestra para # el hardware 10 (not supplied)
• Percez (3) les trous de montage comme montré
pour # le matériel 10 (not supplied)
• Bohren Sie (3) Entlüftungslöcher wie gezeigt für
# Hardware 10 heraus (not supplied)
• Fure (3) furos de montagem como mostrado
para # a ferragem 10 (not supplied)
• Estragga (3) fori di montaggio come indicato
per # fissaggi 10 (not supplied)
WARNING: Ensure drill is
level to avoid damage to
the circuit board
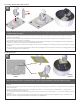
Mount securely to ceiling or mounting
surface using the appropriate hardware
• Monte con seguridad a la superficie del techo
o de montaje usando el hardware apropiado
• Montez solidement au plafond ou à la surface
de montage utilisant le matériel approprié
• Bringen Sie sicher zur Decke oder zur Befestigungsfläche
unter Verwendung der passenden Hardware an
• Monte firmemente à superfície do teto ou de
montagem usando a ferragem apropriada
• Monti saldamente alla superficie di montaggio
o del soffitto per mezzo dei fissaggi adatti
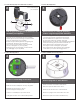
Connect conduit fitting to knockout.
• Conecte el conducto que cabe con el golpe de gracia.
• Reliez le conduit s'adaptant au coup de grâce.
• Schließen Sie das Rohr an, das an
Ausscheidungswettkampf passt.
• Conecte a canalização que cabe ao KO.
• Colleghi il condotto che si adatta all'espulsore.
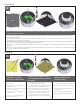
Remove plug with ⅝” Allen Wrench.
• Quite el enchufe con la llave Allen del ⅝”.
• Enlevez la prise clé Allen avec de ⅝ ».
• Entfernen Sie Stecker mit ⅝“ Inbusschlüssel.
• Remova o plugue com chave Allen do ⅝ de”.
• Rimuova la spina con chiave di Allen del ⅝„.
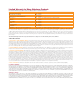
For Surface Mounting Using Side Conduit Entrance Continued
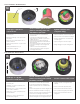
For Pendant Or Wall Mount Bracket ApplicationsFor Surface Mount Applications
For Surface Mount Applications
2 3
4 5