
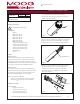
Operating instructions
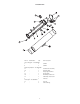

FrontFace
BreatherHole
LongEnd
Head
Frontof
Endcap
PullSeal
BreatherHole
Cradle
FrontEndcap
RearFaceofHeadShould
BeFlushwithFrontFace
ofFrontEndcap
GripandPull
!
3
Figure 7
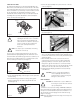
To install the pull seal:
1. Remove the cradle assembly from the housing.
2. Obtain a rubber pull seal from the hardware kit (Part Number 315
2569 001). An extra pull seal is also provided (Figure 8).
Figure 8
3. Insert the long end of the pull seal into the breather hole starting
from the front side of the endcap (Figure 9).
Figure 9
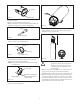
4. Grip the pull seal’s long end from the back of the front endcap.
Steadily pull the long end until the head of the pull seal is fl at
against the front of the endcap (Figure 10).
NOTE: The Pull Seal’s long end will stretch when pulled through
the breather hole.
Figure 10
1. Reinsert the cradle assembly. Turn the slot on the retaining ring to
the top of the rear cap (Figure 11).
2. Position the housing vertically and replace the cradle assembly by
applying pressure onto the rear cap until the retaining ring stops
against the housing. (see Figure 12).
Figure 11
Figure 12
3. Tighten the retention screw, making sure it is seated into the rear
cap groove. If the housing needs to be tamperresistant, the
HS9380TK (purchased separately) should be installed at this time.
4. Attach the housing to the appropriate mount or pan/tilt using the
instructions provided. According to the orientation of the housing,
the cradle assembly may need to be rotated. To rotate the cradle
assembly (while mounted), grasp the rear handle and rotate to the
desired position. View the monitor while rotating.
CAUTION: If a pull seal is installed in the breather hole, be
careful not to pinch the head of the pull seal.
Damage to the pull seal may allow water to
enter the housing, causing damage to the c
camera and lens.