QUICK OVERVIEW NOTE: Before launching Animoog, please open your iPad Settings, select General, and turn Multitasking Gestures off. ANISOTROPIC SYNTHESIS ENGINE The Anisotropic Synthesis Engine (ASE) is the heart of Animoog. It is a dynamic waveform animator that is comprised of an X/Y Grid with 8 Timbres, each containing 16 waveforms represented by a row of blocks. Timbres are sounds derived from sources that include Moog synthesizers, and Moogerfooger analog effects modules.
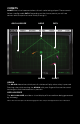
COMETS Comets are visual representations of each voice being played. These comets follow a configurable path. Depending on the chosen preset you will see comets orbit the path or travel fluidly through it. OSCILLOSCOPE NODE PATH ORIGIN COMET ORIGIN The Origin determines which part of a timbre will play when a key is pressed. Pressing a key while moving the Origin with your finger will cause the sound to change In real time based on its position.
COMETS Comets are visual representations of each voice that is triggered when a key is pressed. These Comets travel through the X/Y grid as visual feedback regarding each note’s place in a timbre. Note: If no Path or Orbit module parameters have been assigned, pressing a key simply causes the Origin to glow. PATHS AND ORBITS Each voice follows a path based on settings in the Path module. Voices can also be made to orbit a path by using the Orbit module.
ORBIT MODULE PARAMETERS Select the ORBIT tab to access the Orbit Module. RATE: Determines the speed at which a Comet will orbit a Path in the X/Y Grid. The X AMOUNT and Y AMOUNT controls determine how a Comet will orbit the Path in the X/YGrid. X AMOUNT: Defines left to right motion. Y AMOUNT: Determines top to bottom motion. At low Rate and Amount settings, voices follow the Path with minimal orbit. At medium Rate and Amount settings each voice will orbit in a circular motion as it follows the Path.
KEY SPACING The Key Spacing Control shifts the keyboard to display lower or higher notes in a scale. It also permits stretching or shrinking the number of keys displayed. To shift the keys, press and drag the center of the control. To increase or decrease the number of keys displayed, press and drag the end tab. MOD STRIPS Mod and Pitch strips are assignable in the Mod section and can be toggled On/Off in the Setup page. VOL, COR, AND GLIDE CONTROLS The VOL (volume) knob sets Animoog’s overall volume.
KB SCALE PAGE SELECT A SCALE Touch the kb scale tab on the main menu. Touch the SCALE button. A list of scales displays below. Select the desired scale, and the keyboard display will update to reflect the notes included in the scale.
You can add or remove notes from any scale by touching the keys in the keyboard display. SELECT A ROOT NOTE The root note is the first note used in a scale. Touch the root note button. A list of notes displays below. Select the desired note. MONO In Monophonic mode, only one note can be played at a time. This is the classic performance behavior found in many Moog synthesizers. LEGATO In Legato mode, playing a new note while holding down another note does not trigger a new envelope.
EFFECTS MODULES Thick Module Touch the THICK tab on the right to access the Thick module. CRUSH: Creates bit crushing effects with aliasing and digital distortion via bit and sample rate reduction. DRIVE: Adds analog-style overdrive saturation to the overall output of Animoog’s combined voices. DETUNE: Works in conjunction with the UNISON knob. When unison voices are added to a sound, this control allows you to detune the pitch of the additional voices.
EFFECTS MODULES CONT. FILTER Module Touch the FILTER tab on the right to access the filter module. Select a filter TYPE: • LP is a low pass filter that allows only frequencies below the cutoff frequency to pass. • BP is a band pass filter that allows only frequencies at and around the cutoff frequency to pass. • HP is a high pass filter that allows only frequencies above the cutoff frequency to pass. FREQUENCY: Determines the cutoff Frequency of the filter.
EFFECTS MODULES CONT. RECORD MODULE Touch the RECORD tab on the right to access the RECORD module. Set the record tempo using the BPM/Tap Tempo Control. Tap the RECORD button. A countdown timer counts off four beats before recording begins. The RECORD button displays a white ring to indicate the amount of recording time remaining. Touch the RECORD button again to end the current recording and automatically transition into Overdub mode.
AUDIOCOPY & AUDIOPASTE AudioCopy and AudioPaste tools are used in the Record module and 4 Track Recorder to allow sharing of audio files between them, and share audio with other apps. To open Audiocopy/Audiopaste double click on an audio file in the 4 track editor, select Audiocopy, and then follow the instructions. Images below illustrate AudioCopy and AudioPaste dialogs.
4-TRACK RECORDER Available for downoad in the Animoog Store. The 4-Track Recorder allows you to import, record, edit and mixdown four channels of audio. You can then export your work or share directly to Soundcloud. TRACK MENU AUDIO TRACK TRANSPORT CONTROLS TIMELINE METRONOME TRACK CONTROLS OPTIONS TIMELINE The Timeline is at the top of the 4 Track Recorder and displays time in Bars/Beats format. You can press and drag the timeline left or right to scroll to different sections of a song.
TRACK MENU & CONTROLS Each track contains controls for Volume/Pan, Arm to record, Mute, Loop, and Solo. Touching the volume slider opens a window with PAN and VOLUME controls. OPTIONS Touch the OPTIONS button to display the Options menu used for working with projects. Undo: Reverts the last edit to the current project. New project: Starts a new project. Load project: Loads a previously saved project. Save project as: Saves the current project as new.
RECORDING AND EDITING AUDIO TRACKS To get started, touch the OPTIONS button, then select New project. RECORDING Touch the Arm button to enable recording for a track. Touch the Record button, then start playing Animoog. To pause the recording, touch the Pause button. Touch it again to resume. Touch the Stop button to stop recording. Touch Rewind to go back to the starting point of the recording.
track menu You can paste a clip from the clipboard into a track or load a recording into the 4-track recorder from iTunes. Touch the Track menu to open it, then: Load Clip: Loads a recording stored in iTunes. Paste Clip: Pastes from the clipboard. Clear Track: Clears all clips from a track. AudioPaste: Pastes audio copied via AudioCopy. Moving Audio Clips Touch and drag a clip to move it within a track.
saving & loading projects To save a project: Touch the OPTIONS menu and select Save project as. Type in a project name then touch SAVE. To load an existing project: Select Load project from the OPTIONS menu. Select a project from the list, then touch LOAD. Mixing Down Projects You can mixdown a project to a stereo MP3 file for sharing on SoundCloud. From the OPTIONS menu select Mixdown Project. When mixdown is complete, login to SoundCloud to upload the file.
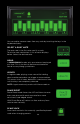
ENVELOPES & MODULATION Envelopes Touch the ENV/MOD tab on the Main menu. The Amplitude, Filter, and Modulation envelopes essentially automate the parameter they are assigned to by determining the Attack time, Decay time, Sustain Level, and Release time of each function. • AMP controls the dynamics of a sound. • FILTER tailors the timbre of a sound over time. • MOD can be selected as a modulation source for a Mod slot, but is only used when selected.
EDITING ENVELOPES Double tap the corresponding Envelope box to enlarge it. Touch and drag the Envelope Nodes to adjust the Attack, Decay, Sustain, and Release settings. Double tap the envelope to minimize the display. NOTE: You can also modify an envelope while minimized. LFO SECTION The LFO (low frequency oscillator) is a modulation source accessible via Mod slots 1-4. RATE: Adjusts the LFO frequency (how rapidly the LFO waveform cycles.
MODULATION SLOTS Source The Source is a constantly changing signal that is used to create mild to extreme modulation. Touch the SOURCE menu to select a source. Off: (A source is not necessary). You can use the Control to manipulate a destination, but a positive or negative value must be applied to the Amount. LFO: Applies the LFO to the Destination. Mod: Applies the Modulation Envelope to the Destination. Position-X: Applies modulation according to a voice’s X position on the X/Y Grid.
CONTROL Control scales and adjusts the level of a Source before using it to modulate a Destination, similar to a volume control. Touch the CONTROL menu to select a controller. Adjust the AMOUNT knob to scale (positive) or invert(negative) the Control. A setting of “0” means no scaling or inversion will occur. CONTROL AMOUNT If the Source is set to off, the selected Control is scaled by the Control Amount knobs and routed to the Destination.
TIMBRES PAGE Select a Timbre Touch the TIMBRES tab on the Main menu. The Timbres page contains two columns. The left column displays Timbres as they appear in the X/Y Grid. The right column displays all available Timbres. Previewing Timbres Press and hold the PREVIEW button to listen to a specific Timbre. Timbres evolve so be sure to press the button long enough to hear all the waveforms.
SETUP PAGE MIDI TAB Selecting a Midi Channel To control Animoog from an external MIDI device, specify a MIDI input channel that corresponds to the MIDI output source. If MIDI In is set to Omni Animoog will receive all messages sent on any MIDI channel. NOTE: An iPad appropriate MIDI connection device is required. Pitch Bend RANGE: Sets the Pitch Bend range to 2, 3, 4, 5, 7, or 12 semitones. LOAD FROM PRESET: Allows Animoog to load new Pitch Bend ranges as defined within a preset. Sends - CH.
MAPPING MIDI CCs To map a function, touch the desired parameter. (All controls outlined in red can be mapped.) The outline changes to green. Adjust the desired control on your connected MIDI device. The CC is now mapped, and the assigned CC number displays on the specified Animoog control. You can assign multiple CCs. When complete, be sure to turn off MAP CCs, save your preset, and save your CC Map. Manual Mapping Tap a control twice to display the MIDI CC MAPPING box, type in a value, then touch SAVE.
PRESETS TAB NEW PRESET: Creates a new preset. DELETE PRESET: Deletes the currently-selected preset. RANDOM PRESET: Loads a preset based on a completely random set of parameters and Timbres. IMPORT PRESETS: Import presets from iTunes. For more information see the Importing and Exporting Presets section. EXPORT PRESETS: Export your presets to iTunes. For more information see Importing and Exporting Presets section.
CONFIGURATION TAB BACKGROUND AUDIO: Toggles background audio on/off. MOD STRIPS: Toggles the Pitch and Mod Strips displayed on the keyboard on/off. OSCILLOSCOPE: Toggles the oscilloscope display on the X/Y Pad on/off. RECORDER BEEP: Toggles the recorder metronome beeps on/off. Importing and Exporting Presets Export Presets Touch the Export Presets button. All onboard presets are compressed into a zip file that can be saved to your iTunes application’s iPad data folder.
IMPORT PRESETS Connect the iPad to a computer with iTunes. Click on the iPad under the Devices menu in iTunes. Select the Apps tab at the top of iTunes. Scroll down until you see File Sharing. Select Animoog from the File Sharing list. Click the Add button (From here you can search and select a presets folder from your computer). Once you have selected a preset or multiple presets, press Open. Press the Import Presets button in Animoog’s Setup menu. Note: Specifications subject to change without notice.