* PLEASE READ CAREFULLY BEFORE PROCEEDING * Power Supply Please connect the designated AC adapter to an AC outlet of the correct voltage. Please be sure to use only an AC adapter which supplies 8V DC, 300mA, center minus. Unplug the AC power adapter when not using or during electrical storms. Connections Always turn off the power of this and all other equipment before connecting or disconnecting, this will help prevent malfunction and/or damage to other devices.
J Explanation Mode Mode is the status of different control functions. Effect module An effect module is a collection of effects within a particular category. Information about the on/off status and effect parameter settings used are comprised in each module. Effect type Some effect modules have several different effects which are referred to as effect types. Only one of these can be selected at a time. Patch A patch can be thought of as a combination of different effects.
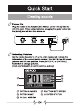
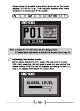
Quick St Plug the cable of AC Adapter (3V, 300mA, center minus) into the [DC 9V] Jack. When using batteries, plugging the guitar cable into the [input] jack will tum the device on. Selecting Patches Set the Mode Selector to [PL], the LCD display will indicate the information of the current patch number. The GE100 has 80 preset patches and 80 user patches. Press [PATCHY] or [PATCH] foot switch to change patches. {Hold one foot switch to switch patches quickly).
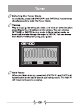
When choosing a patch, some effect modules on the mode display LED will be lit up. This indicates exactly what effect modules are being used in this patch. (PL FX D5 AMP NS EQ MOD DLY REV RS &§Y) Adjusting the Global Level Set the Mode Selector to [SY], rotate [VALUE] knob to choose [VOLUME], press the [VALUE] knob to enter the level control, the master volume of GE100 can be adjusted by rotating the [VALUE] knob. LCD display will indicate the current level.
Entering the Tuner Mode In any Mode, press both [PATCHY] and [PATCH] foot switches simultaneously to enter the Tuner Mode. Tuning Play a single guitar string at a time, and raise or lower the pitch according to the indications on the screen. You can choose [BYPASS] or [MUTE] tuning mode. In Mute tuning mode, no sound will phosphate through the output of GE100. You can choose from 435Hz~445Hz for tuning your guitar.
The GE100 has 8 effect modules, 66 types of effects in total, can offer up to 8 simultaneous effects. Each effect module has several different effect types, only one type of effect per module can be selected at a time. All effect types have various parameters that can be adjusted, the parameters change the tone and effect intensity.
Turn On/Bypass an Effect Module When adjusting an effect, press [PATCH A] foot switch to bypass this effect, the indication [OFF] will appears on the display and the module will be muted off. Press [PATCH A] foot switch once more will return the settings to the previous condition. You can save your edited tones in the users’ patches and recall them for future use. 1. In any mode, press the button [SAVE] on the function buttons panel. 2.
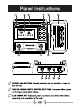
Panel Instructions GE100 SCALE LESSON Tania MoD © loan DEFINABLE eases ODE SELECTOR: Selects between all the function modes of 'SLUE KNOB WITH ENTER BUTTON: Chooses effect types or changes parameter values. D DISPLAY: Indicates patch numbers and other information regarding the operation of the unit.
PATCH] FOOT SWITCH: Selects patches (descending), starts/ plays loop recording/overdubbing, and other functions. PATCH[A] FOOT SWITCH: Selects patches (ascending), stops/ deletes loop, and other functions. EXPRESSION PEDAL: Adjusts the volume or some other specific effect parameters. EXP. PEDAL LED: Indicates the status of the expression pedal. MODE DISPLAY LED: Indicates the current mode. When you choose a specific effect module, the corresponding mode display LED will be lit up.
Connections AC adapter Multiplayer Guitar amplifier Battery Operation 1. Tum off the GE100 and open the battery holder on the bottom. 2. Insert 4 AA/LRS batteries and close the battery holder. Press Inch to release and then lift cover.
Volume Control If the [EXP. PEDAL] LED is not lit up, the expression pedal will act as a volume pedal. Effect Control If the [EXP. PEDAL] LED is lit up, the expression pedal will control the effect’s parameter which was set up in PEDAL settings. Pedal Effects Press down the function button [PEDAL], the LCD display will show the controlling effect of the expression pedal.
The responsiveness of the expression pedal on GE100 can be reset when necessary. If the effect change seems insufficient when pushing down the pedal, the volume/tone changes excessively even when the pedal is only lightly pushed, or if i's hard to switch the pedal mode, adjust the pedal according to these instructions: Set the Mode Selector to [SY] and choose [PEDAL], press the [VALUE] knob to enter Pedal Reset. A.
The [TAP] button on the front panel has two functions: 1. Set the time of the delay effect, LED will blink ORANGE. 2. Set the speed of the rhythm patterns, LED will blink BLUE. To Set a Tempo, simply push the [TAP] button twice with the desired speed To access the Rhythm Set mode, rotate the [MODE] selector to [R.S] mode. Rotate the [VALUE] knob to choose [DRUM] or [METRONOME]. 1. Rhythm Patterns: There are 40 drum and 10 metronome rhythm patterns in the GE100. Rotate the [VALUE] knob to choose one. 2.
Enter Cooper Mode Press down the [LOOP] button on the function panel fo enter Cooper mode. Loop Recording When in Cooper mode, press [PATCH ¥] [PLAY/RECORD] foot switch once to start recording, [REC] will appear on the LCD display. During first time recording, press [PATCH ¥] [PLAY/RECORD] foot switch again to set the loop end, recording will be stopped and loop playback will begin.
Cooper Function Delete Loop If you want to delete the loop, press and hold down the [PATCH] foot switch for 2 seconds, all the loopier data will be deleted. Exit Cooper Mode When in Cooper mode, press the [LOOP] button on the function keys panel, the GE 100 will rectum to its previous status. Selecting effects and Patch In Cooper Mode When in Cooper mode, you can select patches and adjust effects as well. Set the Mode Selector to [PL] mode, you can select patches by rotating the [VALUE] knob.
The GE100 has lesson function which includes 192 scales and 216 chords, enabling you to get access to the included library for reference. Enter Scale&Chord Lesson Press the [LESSON] button on the function button panel. Rotate the [VALUE] knob to select SCALE LESSON or CHORD LESSON. Press the [VALUE] knob to switch from [TONIC] or [MOD]. Quit Scale&Chord Lesson Press the [LESSON] button on the function button panel again, the GE100 will return to its previous status.
Factory Reset The Factory Reset function will reinitialize all setting of GE100 (All the saved presets will be lost). To perform a factory reset, follow these instructions: A. Rotate the Mode Selector to [SY] to enter the system settings. B. Rotate the [VALUE] knob to choose [RESET], press the [VALUE] knob to enter and press [YES] to reset all the setting, press [NO] if you want to rectum to the system setting mode.
Expression Pedal Reset Please refer to Page 13 numeral 5 of this manual. Global Level The Global Level controls the overall output level of the GE100. To adjust the Global Level, do the following: A. Rotate the Mode Selector to [SY] to enter the system setting mods. B. Rotate the [VALUE] knob to choose [VOLUME], press the [VALUE] knob. C. Rotate the [VALUE] knob again to choose the desired value for the GE100's Global Level. LCD Brightness LCD Brightness controls the brightness of the GE100 screen.
Output Mode Setting You can choose the type of output. To do this, conform to the following instructions: A. Rotate the Mode Selector to [SY] to enter the system setting mode. B. Rotate the [VALUE] knob and choose [OUTPUT], and then press [VALUE]. You can choose from: 1. [LINE OUT]: Send output to equipment such as a mixer or an audio interface. 2. [TO AMP]: Send output to your guitar amp. Display Mode Setting You can choose from two different display modes.
Effects Explanation General Instruction Effect Chain Modules ~ GE100 has 8 effect modules, 66 types of effects in total, and it can offer up to 8 simultaneous effects. Each effect module has several different effect types, only one type of effect per module can be selected at a time. When choosing a patch, some effect modules on the mode display LED will be lit up. This indicates exactly what effect modules are used in this patch.
Effects Explanation to Monkey Instead of the effect belong controlled by the expression ped, as on a standard haw-wah, this effect alters the sound automatically. Touch Wah putrefactive the weh sound according (0 input intensity. Slow Engine “This effect cuts off the sound attack, producing a violin sound. } This affect provides a wide range of sampling rala/depth Drop Bit reduction.
Effects Explanation Type Name Effect Explanation PIF = This effect creates the sound of Elactro-Harmonix® Big Muff PI*. * uz The parameter's value controls the Ges. Fuzzball dm | THIS erect crates he sound of Alas-Arbtor FUZZFAGE™. © ‘ace Fuzz The parameters values controls the Gain. “This effect cravat the sound of Color sound Tons bender. * Bond Fuzz Sa The parameter’ values controls the Gain. “This effect cravat the sound of Isaiah Harmontx® Hogs Fork.
Effects Explanation NS(Noise Gate) Module Type Name Affect Explanation Noel Gate This effect reduce the signal which excess the threshold tasting. Equalizer) Module Type Name Effect Explanation This controls the lower band of the equalizer, the central 160 aquaplane is 160Hz. a0 This controls tha middle band of tho equalizer, tho central frequency ls 800Hz. 220 This controls the high band of the equalizer, the central frequency is 3.2kHz.
Effects Explanation Delay) Module Type Name Effect Explanation Repeats the signal with no special processing, creates th moat Dial clean delay sound. Anal ‘Stimulus an analog delay equipment, produces a warm end vintage log delay sound. Dynamic Dynamic delay, the delay sound is low while playing, but increases ‘wham playing stops. Tape Echo ‘Si mutates a Tampa Echo machine, recreating ts characteristic sound. Echo ‘Simulates the real Echo, authentic and natural daisy sound.
specification No. of Effect Modules: No. of Effect Types: Preset Patch Memory: User Patch Memory: INPUT Jack: OUTPUT [PHONES] Jack: Power requirements: Dimensions: Weight Accessories: 8 Modules (Max.
Troubleshooting Can not power on Check power connection. —— Make sure the power is connected correctly. Check the adapter. —— Make sure the adapter’s type is DC 9V/300mA/center minus. When using battery, check whether the cable is inserted entirely to the INPUT jack. —— Make sure the battery is at work and the INPUT jack is connected with an audio cable. No sound or low volume Check connection of cables. —— Make sure all the cables are connected firmly.
aoJol=Tgle [1 Patch List £ 5 *roast aitch ‘anal arch lame arch n PO1 DYN CLEAN P21 METAL RHYTHM P02 MODERN DRIVE P22 METAL LEAD P03 WAH SOLO P23 STUTTER CLEAN PD4 CLEAN PHASE P24 CLEAN START POS BLUES P25 BLUES ROCK PO8 FLYING CHORUS P2g§ AC DC DRIVE PO7 MODERN METAL P27 | TREMOLO CLEAN P08 | TALKING CHORUS P28 TEMPERAMENTAL Pog JUMP P29 TOUCH DRIVE P10 ARPEGGIO P30 POP SOLO P11 WHAMMY UP P31 RECORDER P12 WHAMMY DOWN P32 REIT MELON P13 | CLEAN FLANGE P33 PINK WALL P14 LITTLE WING P34 |CONFUSED ROOM P15 BEST
Patch List reset heh dal Pate Pedal ato lame >a Nam P41 OCTAVE SOLO Oct Down P61 WET CLEAN Wah P42 EIGHTY DIST Reverb P62 CALIFORNIA RF Gain P43 ACOUSTIC Reverb P83 ROUGH WHIP Oct Up P44 HOT ACOUSTIC Reverb P64 PREAMBLE DRIVE Gain P45 | BRIGHT RHYTHM Reverb P65 CAMP Mod P46 CRUNCH HIM Reverb P66 | ROLLING WHEEL Gain P47 DEEP ECHO Reverb P67 MAD WING Gain P48 SHINNING Reverb P68 EIGHTY HI GAIN Gain P49 BIT CRUSH Reverb P68 WHIRL ROOM Reverb P50 THE FIFTH Mod P70 SPACE DRIVE Mod P51 VIOLIN Reverb P71 STEP CLE
aoJol=Tgle [1 Scale&Chord List St Modes 01 Ionian 02 Dorian 03 Phrygia 04 Lydian 05 Lydian 08 Eolian 07 Logician 08 Melody: Minor og Harmonic Minor 10 Pentathlon Major 1 Pentathlon Minor 12 Blues 13 Altered 14 Diminished HW 15 Diminished W-H 16 Whole Tone h-314