A ROTISSERIE KIT Model No.: 97222 This manual contains important step by step instructions for the proper assembly and installation of nd using the appliance. Keep these instructions for future reference. This manual contains important step by step instructions for the proper assembly and installation of the Universal ROTISERIE.
IMPORTANT SAFETY WARNINGS READ ALL SAFETY WARNINGS, ASSEMBLY, AND INSTALLATION INSTRUCTIONS CAREFULLY BEFORE ASSEMBLING OR OPERATING YOUR ROTISSERIE. ELECTRICAL GROUNDING INSTRCUTIONS: This appliance is equipped with a three-prong grounding plug for your safety and protection against possible electrical shock. It must be correctly plugged directly into a properly grounded three-prong receptacle. DO NOT cut, remove or alter the grounding prong from the plug.
IF MISSING OR DAMAGED PARTS, PLEASE CALL CUSTOMER SERVICE AT 1‐888‐980‐4933. PROOF OF PURCHASE WILL BE REQUIRED. INSTALLATION INSTRUCTIONS Inspect contents of the box to ensure all parts are included and undamaged. READ ALL SAFETY WARNINGS, ASSEMBLY, AND INSTALLATION INSTRUCTIONS CAREFULLY BEFORE ASSEMBLING OR OPERATING YOUR ROTISSERIE. READ THE OWNERS MANUAL FOR THE GRILL BEFORE ASSEMBLING OR USING THIS ROTISSERIE.
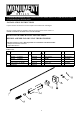
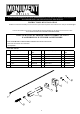
IF MISSING OR DAMAGED PARTS, PLEASE CALL CUSTOMER SERVICE AT 1‐800‐913‐ 8999. PROOF OF PURCHASE WILL BE REQUIRED . INSTALLATION INSTRUCTIONS Step 1 Attach the motor mount bracket on the left hand side of the grill using two “M6x12mm” screws, “M6” washers. See Illustration‐1. 4 Step 2 Slide the rotisserie motor onto the support bracket. Slide the spit rod into the motor socket. See Illustration- 2. Step 3 Install the spit rod, roasted fork lever handle, key washer and spit fork together.
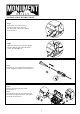
READ ALL WARNINGS IN THE OWNER’S MANUAL FOR YOUR GRILL ▲!WARNING ELECTRICAL GROUNDING INSTRUCTIONS: This appliance is equipped with a three‐prong grounding plug for your safety and protection against possible electrical shock. It must be correctly plugged directly into a properly grounded three‐prong receptacle. DO NOT cut, remove, or alter the grounding prong from the plug. OPERATION THE ROTISSERIE: 1.
ROTISSERIE COOKING CONTINUED: 12. 13. When the food is cooked, use oven mitts/gloves to remove spit rod from motor assembly. Loosen the fork set screws and remove the fork opposite the rotisserie motor. Then remove the meat by sliding it off the end of the spit rod. HELPFUL TIPS • • Use a meat thermometer to ensure food has reached a safe internal temperature.
ENSEMBLE DE RÔTISSERIE Modèle No.: 97222 This manual contains important step by step instructions for the proper assembly and installation of the Universal ROTISSERIE KIT. Read and follow all warnings and instructions before assembling, installing, and using the appliance. Keep these instructions for future reference. Ce manuel contient des instructions par étape importantes pour l’assemblage et l’utilisation de l’ENSEMBLE DE RÔTISSERIE.
CONSIGNES DE SÉCURITÉ IMPORTANTES LISEZ ATTENTIVEMENT TOUTES LES CONSIGNES DE SÉCURITÉ, D’ASSEMBLAGE, ET INSTRUCTIONS D’INSTALLATION AVANT D’INSTALLER OU D’UTILISER VOTRE RÔTISSOIRE. INSTRUCTIONS POUR LA PRISE DE TERRE: Cet appareil est doté d’une fiche à trois broches mise à la terre pour votre sécurité et offre une protection contre les risques d’électrocution. Cet appareil doit être branché directement sur une prise triphasée adéquatement mise à la terre.
SI DES PIÈCES MANQUENT OU SONT ENDOMMAGÉES, CONTACTEZ LE SERVICE À LA CLIENTÈLE AU 1‐888‐980‐4933. UNE PREUVE D’ACHAT SERA REQUISE. INSTRUCTIONS D’INSTALLATION Vérifiez le contenu de la boîte pour vous assurer que toutes les pièces sont incluses et ne sont pas endommagées. LISEZ ATTENTIVEMENT TOUTES LES CONSIGNES DE SÉCURITÉ, D’ASSEMBLAGE, ET INSTRUCTIONS D’INSTALLATION AVANT D’INSTALLER OU D’UTILISER VOTRE RÔTISSOIRE.
IF MISSING OR DAMAGED PARTS, PLEASE CALL CUSTOMER SERVICE AT 1‐800‐913‐ 8999. PROOF OF PURCHASE WILL BE REQUIRED. INSTRUCTIONS D’INSTALLATION Étape 1 Attachez le support de moteur sur le côté gauche de la grille avec deux vis “M6x12mm” et deux rondelles “M6”. Voir Illustration‐1. 4 Étape 2 Glissez le moteur de la rôtissoire sur le support de moteur. Voir Illustration- 2. Étape 3 Assemblez la broche, la poignée pour de levier de fourche de rôtie, la rondelle de clef, et la fourchette.
LISEZ TOUTES LES CONSIGNES CONTENUES DANS LE MANUEL DU PROPRIÉTAIRE DE VOTRE BARBECUE ▲AVERTISSEMENT INSTRUCTIONS POUR LA PRISE DE TERRE: Cet appareil est doté d’une fiche à trois broches mise à la terre pour votre sécurité et offre une protection contre les risques d’électrocution. Cet appareil doit être branché directement sur une prise triphasée adéquatement mise à la terre. NE COUPEZ PAS ni ne retirez la broche de masse de cette fiche. FONCTIONNEMENT DE LA RÔTISSOIRE: 1.
CUISSON AVEC LA RÔTISSERIE, SUITE: 12. Lorsque les aliments sont bien cuits, utilisez des mitaines ou de gants pour enlever la broche du moteur. 13. Desserrez la vis de blocage de la fourchette et retirez la fourchette opposé le moteur de la rôtissoire. Ensuite, retirez votre viande en la glissant de la broche. CONSEILS PRATIQUES • • Utilisez un thermomètre pour vous assurer d’une cuisson précise.