
Installation guide


Page 5
Part No. XG0512
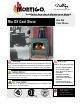
Rio DX Cast Stove
Installation
Direct Vent
Top Vent Venting Runs
For the Rio Pedestal Stove there are two types of Top Vent (DV)
installations: A) Horizontal (Through-The-Wall) Installations and B)
Vertical (Through-The-Roof) Installations.
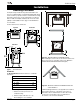
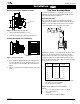
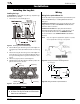
Allowable Vent Runs
Before you install any venting, you must determine whether the
venting run will be acceptable. Unacceptable venting can affect the
fireplace's combustion. Figure 8 shows various vent rises and the
corresponding number of 90° bends which can be made.
Figure 8. Venting limitations for top vent installations.
The minimum vertical rise for a Top Vent Installation is 29 1/2", which
allows 1 - 90° elbow and a maximum horizontal run of 10'. With
greater vertical rise, the number of 90° bends may be increased ac-
cording to the chart below. The total maximum horizontal run (H
T
) is
also shown, and the run between each elbow (H
x
) may be any length,
as long as it does not exceed (H
T
).
Vent Rise
1
Max. # Max. Horiz.
(V) of elbows Run (H
T
)
29 1/2" (min.) 1 10'
4' 2 10'
5' 2 10'
10' 3 10'
15' 3 10'
20' 3 10'
25' (max.) See vertical vent section
1
Vertical rise is measured from the center of the stove's flue
collar to the center of the termination.
2
See 'Through-the-Roof Installations'
Example:
If V= 12', the vent run may use up to 3 - 90° elbows.
If H
1
= 3', H
2
=2', and H
3
=3',
then H
T
=8'.
This would be an acceptable installation.
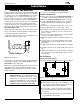
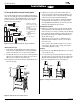
1. Ensure that the two long mounting brackets are facing the bot-
tom of the termination. (See inset). This will provide more heat
protection at the top of the termination, where temperatures are
highest.
2. Attach to the faceplate of the termination using four sheet metal
screws.
Installing Heat Guards over Terminations
MTKOG
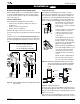
Installing Terminations with Built-In Frames
11
11
1. Frame the termination opening to 11" x 11".
2. Fasten the termination to the studs using a minimum of 4
MTO-3F
Figure 7. Installing the heat guard.
Figure 6. Installing the MTO-3F Termination.