
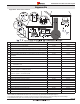
Specifications
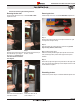


Remove the trim from the bottom
of the door as shown.
Remove the other side, as
shown in Steps 1 - 3.
Follow the steps below to remove, or install the
replace door trim.
Grasp the trim on either side of the
door with the tips of your ngers.
(Both sides Typ.)
Then, pull the trim from the top of
the door, as shown.
Follow the steps to remove, or install the replace door.
Follow the four previous steps to re-install the R-Series replace door.
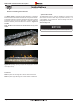
Remove glass suction cups from box and place on Glass door. (The
tool may not be exactly as shown).
Place the suction cups on the glass door, spaced evenly. (
Lifting the glass panel.
Hold the Tools rmly and lift the glass panel up and out of the lower
track (Into the upper track). Tilt the lower edge of the door panel
outwards.
Ensure the top edge of the glass is fully removed from the upper outer
track, and Tilt / Lift away Cautiously from the replace. Store in a safe
location until time to replace.
Section 8: Removing & Installing the Door
Page 31
XG0771 - 040513