
Operating instructions


Page 3
P/N XG0640
M40 Series Mobile Home Conversion Kit
Gas Conversion Instructions
8. Remove pilot hood/ orifice cap by pulling it off the pilot assembly.
The cap will snap off with slight pressure; the orifice must be
removed with an allen key. (See Figure 4)
9. Install the new orifice from the package marked 'Pilot Orifice' in
this kit to convert to the pilot to the new gas. Tighten the orifice
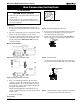
Ember Burner:
3. Disconnect the 1/4" tubing from the fitting on the underside of
the pan base. Disconnect the fitting from the inlet side of the gas
control valve.
4. Spin off the coupling just above the tee. The gas valve assembly
will drop out of the way, allowing access to the coupling.
5. Unscrew the coupling assembly from the pan base. The orifice is
located at top end of coupling. Unscrew it and install the orifice
from the package marked 'Ember Burner Orifice' in this kit to
convert to the new gas.
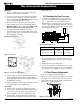
Main Gas Control Regulator:
6. Before re-assembling the gas tubing, the gas valve must be
converted to operate on the new gas.The gas control valve sup-
plied with this appliance has a removable regulator. To replace
it, remove the three screws as shown in Figure 2, and install the
new regulator supplied with this kit.
Apply the label indicating that the control valve has been con-
verted for use with a different gas, to the body of the gas valve in
a visible location.
7. Reassemble the gas fittings.
Pilot Assembly:
Figure 3. The Pilot Assembly.
Figure 4. The Pilot Assembly, with cap off. The pilot hood will snap
off; the orifice must be removed with an allen key.
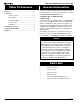
CAUTION - Before you begin:
1. Shut off gas at the shut-off valve and disconnect the electrical
supply (if used).
2. Remove the glass door as shown in the installation instruc-
tions and remove the logs. Flip down the lower trims to access
the control compartment.
A. Conversion
securely with an allen key. Re-attach the pilot hood, making sure
the notch in the hood lines up with the tab on the pilot assembly.
Figure 2. Converting the Sit 820 gas control valve.
Figure 1b. Changing the ember burner orifice.
Figure 1a. Accessing the ember burner orifice.