
Specifications


19
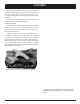
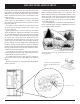
AIR SHUTTER ADJUSTMENT
The nal step of the installation is to check the ame
pattern, which should resemble the pattern illustrated in the
right column: The ames should be relatively well-dened
and stable. They should be bright yellow with a blue base
where attached to the burner ports, and should not look
orange or sooty.
Start the heater according to the directions, and allow the
heater to burn for approximately 15 minutes. The ames
will increase in length and become more yellow in color as
the Clarity heats up.
If the ames do not resemble the description above and
the illustration in the right column, the air shutters may
need to be adjusted.
Three separate screws—one for each burner—are used to
adjust the ames for a particular installation. Two of them
are accessible through the side access port on the right side
of the stove. The third is accessible from the front when
the control door is open. The screws may become hot to
the touch after prolonged operation. Use a glove to avoid
contact if hot. For best results when ne-tuning the ame
picture, initially, leave the middle screw unchanged from
its factory setting. Turn the other two screws as needed to
increase or decrease the brightness and length of the ame:
turning counterclockwise will decrease the ame; turning
clockwise will increase the ame.
1. To adjust the rear burner, open the right wing door,
reach through the side access port, and turn the rear screw
to adjust ame (see directions above).
2. To adjust the front burner, rst open the control door,
then turn the front screw to adjust ame (see directions
above).
Repeat the procedure as needed until the desired ame
effect is achieved.
Monitoring the Gas Flame
Periodically, the ames of the Clarity Direct Vent Gas
Heater should be checked while it is in operation. The
ames should be relatively well-dened and stable. They
should be bright yellow with a blue base where attached
to the burner ports. The ames should not look orange or
sooty. Portions of the logs will glow red when the ames
are properly adjusted.
If you nd the ames to be other than that described here,
do not operate the heater. Consult a qualied service person
or your Harman dealer for advice.
Rear Burner
Center burner
Front burner
Air adjustment screws
The properly-burning pilot will
resemble the illustration to the
right.
AIR SHUTTER ADJUSTMENT
The Clarity ame pattern will resemble this when the unit is
burning properly.